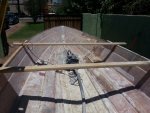
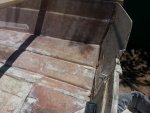
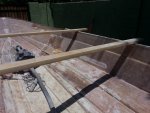
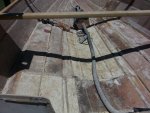
1984 Bayliner 15' Restoration

azmav

Seaman
Joined
Apr 16, 2013
Messages
61
Re: 1984 Bayliner 15' Restoration

Thats funny, I grew up the same way, liking the look of bayliners. Didn't discover until looking over this forum and THT about the negative view. Oh well I say, she is going to blow their socks off!
 

Okieboatguy

Petty Officer 1st Class
Joined
Jul 28, 2012
Messages
204
Re: 1984 Bayliner 15' Restoration

I think there is a definite love of the BL's, as well as dislike. I remember as a young man of 16 - 18 years old back in the 80's and looking at the Capri's and thinking it was a slick looking boat with good lines. Then when I bought my '83 1950 Capri from a neighbor for $300, and decided to rebuild her, due to my own childhood memories of them, That's when I realized how many people do look down on them.
But I also remember as a kid of 10 - 11 years old looking at the 65 Ford Mustang, and thinking that it was an ugly car, mainly since there were at least 5 or more people on my street that had them, and they were beaten up and not well taken care of. I distinctly remember thinking, I would never want or even own one of those POS's. Now, I am in the marked shopping for 65-68 Mustang!
Funny how time will change your view, but for me and the BL's, the view of my first love will never fade.
 

jigngrub

Fleet Admiral
Joined
Mar 19, 2011
Messages
8,155
Re: 1984 Bayliner 15' Restoration

Thats funny, I grew up the same way, liking the look of bayliners. Didn't discover until looking over this forum and THT about the negative view. Oh well I say, she is going to blow their socks off!

You can make her better, much better!

Handmade boats are much better than assembly line boats. You'll pay closer attention to detail and you can add structural support where the factory left it lacking.

If you want a really good boat, find a rotten ol' mass produced one and take it apart and rebuild it to your liking.... you'll come out a lot cheaper with a much better boat than a new one if you do it right.
 

jkust

Rear Admiral
Joined
Aug 2, 2008
Messages
4,942
Re: 1984 Bayliner 15' Restoration

Thats funny, I grew up the same way, liking the look of bayliners. Didn't discover until looking over this forum and THT about the negative view. Oh well I say, she is going to blow their socks off!

Well we went from a 1962 closed bow, glass boat with a 60HP Gale to the 84 Bayliner in 84. It was the coolest thing I'd ever seen when I was 10 years old and the only new vehicle my folks ever bought still to this day. It might as well have been a Ferrari. When I was in my teens me and my buddy would take it (it's at the lake house) and could get the whole thing, prop and all, out of the water if you hit the waves right. What can I say though, it's outlasted most every boat on the lake, most were much nicer brands. Bash them all day long, It doesn't bother me. To me bashing boats is like blaming cars for careless driving related accidents...It's an owner issue not a boat issue.
 

azmav

Seaman
Joined
Apr 16, 2013
Messages
61
Re: 1984 Bayliner 15' Restoration

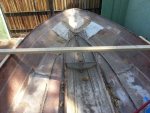
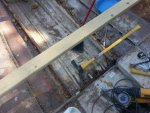
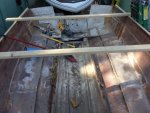
Project when I started this morning at 8. Done by 10:30.

Bayliner (64).jpgBayliner (65).jpgBayliner (66).jpg

Now the floor is all out along with the stringers. Lots of rot in all of it, and waterlogged foam even though this boat has not seen the water in over 5 years (granted not covered either, but hey, this is Arizona, not that much rain). The springers were pretty solid still, surprisingly.

I am thinking I will start sanding while the transom is still in, then when done, I will tackle that as a separate project to be done all at once, take out and replace.

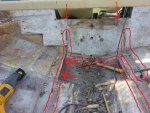
Bayliner (68.1).jpg

Looking at the above picture, can any of you tell me if this is original design by Bayliner? I am wondering if someone attempted a restoration at some point. In the picture, looking toward the stern, I have highlighted where the starboard wing swept down into the stringer from the transom, but the port edge of the main mid transom support has no wing. Just to port of the main transom support there was not so much a wing as a box built for the cooler but it only went up to the bulkhead. The port stringer only went back to the bilge area and tied into the floor of the bilge which was not well built and there was no direct contact to the mid part of transom with the main support for the outboard. Also, the starboard stringer was not tabbed into the hull as seen by the arrows, instead it was tied into the bilge floor and incidentally to the port stringer. Seems like a weak design to me.

The transom is pretty thin too. Eyeballed it but doesn't look like a full inch let alone 1.5". I will definitely be building this thing back better than it was! All in all, lots of place where the bottom side of panels were not glassed, lots of holes drilled with no glassing, no wonder these things leaked into the foam so bad and ended up with so much rot.
 

azmav

Seaman
Joined
Apr 16, 2013
Messages
61
Re: 1984 Bayliner 15' Restoration

Hello to those that had been following me, have been busy with home projects and a new job so have only had a little time for sanding on certain days. Thought I would load some pictures of progress and some lessons learned that hopefully will help others.

Bayliner (70).jpgBayliner (71).jpgBayliner (72).jpgBayliner (73).jpg

As you can see, I am almost there. I am in the market for my fiberglass and resin, looking at companies here in Phoenix to plan out what I need and figure costs, etc.

Couple of quick lessons learned.
1. Get a suit with booties! (I kept getting fiberglass past my boots and onto my ankles)
I finally traded in work boots for rubber concrete boots and taped the ankle to the boots. Same with heavy duty tile worker gloves, then I just strip out of the suit turning inside out. Next day I pop back into it, tape over any holes and back to it. This seems to be working well and reuse the suits saving money. I also duct tape the knees to prevent tears. Knee pads would work too but couldn't find mine.
2. Full face respirator would have been good, I had already bought the mask only and just use googles but this still leaves area around the mask and goggles open to fiberglass.
3. Get a 4 1/2" angle grinder and matching rubber pad and sanding disks in 24 and 36 to remove fiberglass. I already had a 4" heavy duty angle grinder and was using flapper pads. I finally realized that using the disks with the rubber backing pads was a much cheaper option and they come in more coarse grits. Getting a lot more done this way. Only problem is I bought the rubber pad not realizing it won't fit on a 4" grinder, ended up going to Harbor Freight for a cheapy, only works for about an hour before heat build up causes it to slow down. Going to go in for a good 4 1/2" grinder to replace both my present units. Wish I had done this first.
4. Use a shop vac for clean up. First round, I tried spraying out the boat, spent half an hour at the back waiting for water to drain and kept unplugging the hole. Now the fiberglass is all over the ground, Oh well.

That is most of what I have dealt with lately. Happy boating all!
 

jigngrub

Fleet Admiral
Joined
Mar 19, 2011
Messages
8,155
Re: 1984 Bayliner 15' Restoration

By the time you get everything figured out the boat will be finished!... then you'll be ready for another boat to do and will be able to do it in half the time you did this one, or it always works that way for me at least.
 

azmav

Seaman
Joined
Apr 16, 2013
Messages
61
Re: 1984 Bayliner 15' Restoration

Sounds good to me jigngrub! I just have to figure out how to get my wife on board with the idea. She doesn't like the fiberglass floating everywhere with the sanding. I am thinking through some ideas on rigging up a vehicle tent with some sort of filter system to trap the dust since the angle grinders don't have vacuum attachments.
 

azmav

Seaman
Joined
Apr 16, 2013
Messages
61
Re: 1984 Bayliner 15' Restoration

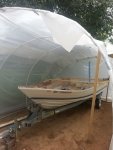
Not getting much done lately, had a few honey do's to finish and then decided it is getting too hot here in Arizona with summer coming on to keep working without something to help. Solution I came up with to keep it cheap is a pvc frame to cover with plastic. Misters are built into the frame and I will tie in a box fan on one end to get the air moving. The box fan will blow outward and will have a filter like one would find in your homes ac air return to block dust. I decided I was blowing too much dust around the yard. Here is a picture of the frame.

20130518_102541.jpg

Plan to finish this today, it is sitting over the boat and has been tested, then I can get back to sanding.
 

jigngrub

Fleet Admiral
Joined
Mar 19, 2011
Messages
8,155
Re: 1984 Bayliner 15' Restoration

Shade is good, but so is the heat. Paints, resins, and adhesives set and cure faster in warm weather... and the hotter it is the better the 2 part urethane foam likes it.
 

azmav

Seaman
Joined
Apr 16, 2013
Messages
61
Re: 1984 Bayliner 15' Restoration

My concern is that temperature here is already getting above 100 F during the day. In another 4-6 weeks, it will stay at 100 until almost 10 oclock. Some years it will be after midnight before it cools down below 100. I had seen in another post that above 80, it becomes very hard to work with poly resin due to advanced setting times.

As to the shade and mist, mostly right now it is for my sanity while I am sanding. Being in a full body suit in that kind of sun is murder. Once I was done sanding and ready to start layups, I was going to evaluate the ability to work in the tent. Will the extra moisture in the air cause problems? What about temp. above 80 or even 100? How will that affect the work?
 

gbolin

Recruit
Joined
May 27, 2013
Messages
3
Re: 1984 Bayliner 15' Restoration

I'm working on a very similar boat... an 86 1600 Cuddy... I've had and used it for three years.. time to fix her up now!
good luck on the resto!
 

Woodonglass

Supreme Mariner
Joined
Dec 29, 2009
Messages
25,929
Re: 1984 Bayliner 15' Restoration

Working with Poly resin in temps above 90? can be problematic. You can TRICK the resin into thinking the temps are cooler by keeping it on ICE in an ice chest and then mixing the MEKP at the last minute before use. Also mix using a 1% MEKP ratio to give you more time to get it spread out. Always work in the shade and try hard not to allow sweat droplets fall onto the mix.
 

azmav

Seaman
Joined
Apr 16, 2013
Messages
61
Re: 1984 Bayliner 15' Restoration

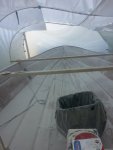
Well, here is the tent with misters. There is too much water coming off the misters and gets the boat wet inside. After I closed in this wall, I attached a cheap fan with a house filter to blow air out of the tent and catch dust. Funny enough, I just came across someone else that did the same thing. This tent has really eliminated the dust, but I still need to work out the cooling effect of the misters. Yesterday after only an hour in the tyvek suit, My shirt looked like I had just come out of the pool. Right now it is 9:30 and the temp is only now down to low 90's. Was a 107 or so today. Had hoped to finish before things got too hot but oh well.

20130528_123443.jpg
 

azmav

Seaman
Joined
Apr 16, 2013
Messages
61
Re: 1984 Bayliner 15' Restoration

Ok, so I am an idiot and have been grinding off EVERYTHING back to the original hull. Got it in my head somewhere that it made sense lest there be too much weight from extra material. I see Woodonglass has stated it is ok to grind down to clean solid glass, whereas I have been removing all the layup material around floor tie in and where stringers were laid. I will be able to finish more quickly now!:joyous:
 

azmav

Seaman
Joined
Apr 16, 2013
Messages
61
Re: 1984 Bayliner 15' Restoration

Nothing new really, just figured I would throw in a few pics. As to the grinding, all I have left is the layup material used to set the outer stringers although the starboard one is almost complete, then there is a smaller set of inner stringers that need to be cut out and ground down, and finally a few areas that are still dirty or have some type of white paint like coating through the ski locker area and the bilge. After that, I will finally get on to the transom. Then stuff starts going back in instead of out. How do you like the snow from this mornings grinding?

Bayliner (76).jpgBayliner (77).jpg

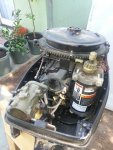
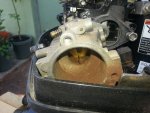
Then here I have a few shots of the engine. Some of the gunk is just oil, not sure why it would be there but most is from the insulation that came loose and got chewed up. Still need to finish detaching the carb, clean it, and put back, then clean out the whole housing. Fun, fun.

Bayliner (74).jpgBayliner (75).jpg
 

Ebacon

Recruit
Joined
Jun 8, 2013
Messages
1
Re: 1984 Bayliner 15' Restoration

I have a 83 bayliner capri outboard that I tore down a couple years ago.then life got in the way... About the same point in process where you stopped. I wonder how many people start this project then never finish? Anyway, I found this thread as I made up my mind to get the stringers back in his weekend. But am not sure about the details for wrapping and setting in hull and then applying the 2part. I have the mat and 2 part. And wood. But don't really know EXACTLY how to get it all back in the right way. Do I cut the wood at an angle then lay a layer of mat over it? Do I literally wrap the 2x4 in mat and somehow get it to stand up straight? Should the mat be form fitting and stapled to stringer then just roll the 2 part into mat? Do i basically build a "frame" in the hull with sthr stringers and bulkheads and then staple mat over top and paint or pour with 2part? Some guidance is needed here!!

On a side note I originally was not going to remove the cap and transom, but now I'm thinking it won't be that much more of a hassle. Your thoughts?
 

azmav

Seaman
Joined
Apr 16, 2013
Messages
61
Re: 1984 Bayliner 15' Restoration

Ebacon,

I will reply as best I can. Sorry for the delay, I have been traveling for a few days and unable to check in. I will put some basic answers here for you but it is helpful to create your own restoration thread where we can keep tabs on your progress. Include pictures as often as you can, we all love to see new projects and it makes it easier to understand what you are talking about sometimes.

Quick answer is cut your stringers to fit the boat first. Glass them with one layer of CSM. Stringers must then be bed (glued) to the hull first. Some guys prop them up with little bits of foam, then glue underneath them. ONce bedded, then create fillets, basically smooth rounded corners where stringer meets the hull using filler, basically a mix of resin and fibers, or other products. Some call this mix peanut butter. Then cut them to height for the floor. Now tab them in, and then glass them in their entirety. You say you have the mat and resin and what should you do, well that is called a layup schedule. There are different thoughts on this which has to do with how much strength you need in the application. That is where the reading comes in.

As to the stringers, you can use the old ones as templates, depending on how you cut them out. If you don't have them, it will more more difficult. Read this thread on layup schedules, it is not definitive, but very helpful. Probably how I will do my boat, but others use less or more material.

http://forums.iboats.com/boat-resto...lly-started-w-pics-384982-25.html#post3586813

There is a lot of information needed to cover everything you are asking. Would be challenging for me to put it all in one post. Once you have read through the thread on layups, take a look at the following two threads. The first has lots of videos and pictures, great resource. You will see many of your questions answered. Then it will be easier to help you through your questions.

http://forums.iboats.com/completed-...gnature-deck-stringer-restoration-510077.html

The second thread is a definitive guide on all things boats with fiberglass hulls, minus outboards. It includes an index so that you can find what you need quickly, it is a very long thread.

http://forums.iboats.com/boat-resto...pair/hull-extension-progress-pics-234392.html

On that note, you must remove the top shell if you have to rebuild your transom with an outboard. Only exception is if you cut off the rear top portion to get access. The reason is that the splashwell gets in the way otherwise. Once the floor is gone, the boat will flex, so you will need a way to support the sides, some guys use straps wrapped around, I chose 2 x 4's across the width and down the length, I first screwed them in from the inside through the rivet holes. Then I screwed through the top of the cross braces down into the boards running the length of the boat on either side. Granted I have to step over these all the time, but I know that when I am done, the top shell will fit back on! Keep in touch, and let me know once you get a thread started, would love to see the boat.

Oh, and FYI, to remove top cap, pull out the rub rail rubber, then drill the rivets with a 3/16" bit.
 
Last edited:

azmav

Seaman
Joined
Apr 16, 2013
Messages
61
Re: 1984 Bayliner 15' Restoration

Well, life is getting pretty busy these days so I have less time to work on the grinding, the heat has been taking its toll, even earlier in the morning. So I decided I needed a way to provide some air conditioning. The tent serves the purpose of keeping in the dust from grinding. (Does it ever stop!?) The misters I built into it sort of just water log the boat, not good around power tools.

I thought about just wearing coveralls instead of Tyvek for better breathing, but the wife is highly allergic to fiberglass, so unlike Opps, I cannot be bringing it to bed with me. I tried just toughing it out, but the heat gets so bad, that I can feel my heart rate going up and by the time I am done with an hour, feel light headed not to mention the huge amount of sweat I lose.

So what to do? Wait until summer is over? (I don't have access to a garage) Heck no! I decided on a cooling vest, maybe something with frozen type gel packs. Did some research and found companies that sell this kind of thing, especially to amusement parks for people in costumes like Mickey at Disney, etc. Apparently they are used for MS patients as well, not sure why.

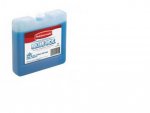
Anyway, came up with my own using this type of cold pack.

ice pack.jpg

I put four large ones and 4 small ones into the front of a flotation vest and 4 large ones into the back pad of the vest like this.

cooling vest front.jpg

The test came yesterday, in the middle of the day with 109 degree heat, I went in and started grinding and the effect was amazing. I could tell that I was being assaulted by heat, especially in my arms and through the rubber of the gloves. Especially the gloves as the grinder was putting off a lot of heat and did not seem to be able to cool down very well. But the ice wrapped around my torso just kept cooling me down. I was quite comfortable for about an hour and was much more focused than I would have been had I been fighting the heat and the sweat that was literally blinding me. Now when I use this earlier in the morning, I think it will be even more effective than just an hour. Got almost an entire stringer base ground out. Just 2 and a half left to go!

I had toyed with the idea of using Nida core for the deck and stringers to save weight, but since I am new to fiberglassing, I will just use ply. I did the math and there would not be that much weight savings since I will only need a few pieces. I figure I will save the money toward a repower instead.
 

azmav

Seaman
Joined
Apr 16, 2013
Messages
61
Re: 1984 Bayliner 15' Restoration

Taking a break from sanding for a bit until this weather is under control. Waiting for cooler weather. Unfortunately I had the time today but this is the temps we are dealing with.

phx temp.jpg

Crazy right!? I find it funny to see the guys that have to take a break for the winter when here I have to take a break for the summer!
 
Top