1985 Bayliner 2450 Ciera Sunbridge Restoration underway!

Status
Not open for further replies.

Ciera2450

Lieutenant Junior Grade
Joined
Apr 8, 2011
Messages
1,049
Thanks for that froggy! I’m still trying to sort out which way to go myself.

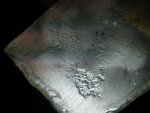
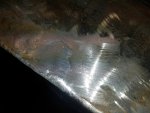
Today i I got the bottom side of the tank cleaned up really well and sanded with 120 to get a closer look at her condition after almost 35 years. It’s in pretty darn good shape!
I called the local PPG paint supply and I’m looking at well over $200 to do the POR 15, alumni prep,and alodyne. I’d really like to NOT spend that much but still provide good protection as it’s not accessible once it’s back in. I’m waiting for Sherwin williams to call me back with their recommendations. I’ll spend the money if I have to, but the condition it’s in now indicates that it stays fairly dry tucked in its little cave. What are some other suggestions to coat this tank? I’ve googled incessantly and am just confusing myself at this point. Looking forward to suggestions guys.

some pics after clean up and light sanding. One is close up of the worst pitting. There are a few other tiny spots that barely etch the surface. The worst part of the clean up was the darn tape residue. No idea what the tape was for. There were several wraps around the tank like a belt. Most had peeled away long ago and lots blew off with pressure washer but what was left.....That stuff was stuck on there! Goo gone, razor, and sander finally got it.


ADDFB6BF-DC39-4044-BC73-2B2500844020 by Ciera 2450, on Flickr

8CDCA79F-4055-4F4E-82E9-4A4EFC891280 by Ciera 2450, on Flickr

A72E0C13-61A4-4A21-9A44-718039E0BF13 by Ciera 2450, on Flickr
 

zool

Captain
Joined
Aug 19, 2012
Messages
3,432
It cost me about 100 for the alodyne/alumiprep and the por15..but i have a commercial account at ppg so maybe thats why.

You can go with SEM self etching primer in a rattle can from NAPA, and rustoleum primer and paint from HD, will cost a total of 25 bux +-..and do a good job.
 

Ciera2450

Lieutenant Junior Grade
Joined
Apr 8, 2011
Messages
1,049
Thanks zool, I may go that route. I got a price for a gallon of the POR and it alone was $175.
2 quarts would be just shy of two coats on my tank according to thei coverage chart. That’s why I quoted the gallon. How much did you use?

My tank is roughly 58”x38”x8” deep. It does taper but didn’t count that so I’d have a bit extra. Works out to about 250sq ft for two coats worth. 125 each coat.
 
Last edited:

Ciera2450

Lieutenant Junior Grade
Joined
Apr 8, 2011
Messages
1,049
Also, if I go the self etching primer route, do I need to use the rustoleum aluminum primer or just regular primer? Lowe’s/Home Depot have the aluminum primer for gutters and such.
 

zool

Captain
Joined
Aug 19, 2012
Messages
3,432
Regular Rusto clean metal primer for over etched aluminum is fine...the etch takes care of adhesion, just a light dusting is all that u need, the primer seals it up and creates the base for the paint.

My tank was 150 gal and I used one quart of por15...was 50 bux+-..
 

zool

Captain
Joined
Aug 19, 2012
Messages
3,432
your sf calc seems off...POR15 is geeraly used for under carriage and vehicle frames, that take a beating, your tank will be unmolested under the deck, its the moisture cure properties that you will benefit from....one coat is fine
 
Last edited:

Ciera2450

Lieutenant Junior Grade
Joined
Apr 8, 2011
Messages
1,049
It likely is. Lol my tank is only 65 gallons. I can swing 1qt of POR. Did you do the recommended 2 coats out of the quart?
 

Ciera2450

Lieutenant Junior Grade
Joined
Apr 8, 2011
Messages
1,049
Btw, my calcs were way off. Just redid them. Dunno where I got that. :confused:
 

zool

Captain
Joined
Aug 19, 2012
Messages
3,432
You can use one coat of POR15 over a dusting of self etch primer and thats it. POR15 makes a self etch primer for under it.
 

Ciera2450

Lieutenant Junior Grade
Joined
Apr 8, 2011
Messages
1,049
Thanks again zool! I dunno where my calcs went off. The tank is actually 48.2 sq ft of surface area total. I doubled it somehow. I will head to PPG tomorrow and pick up the POR

i really appreciate the help. I tend to over analyze things I’m unfamiliar with and end up confusing myself more. Will update tomorrow with a painted tank!
 

zool

Captain
Joined
Aug 19, 2012
Messages
3,432
Wear a respirator, POR15 is nasty stuff...be safe and have fun ;)
 

oldrem

Commander
Joined
Nov 7, 2013
Messages
2,002
For the exterior I would just prime with Rustoleum SE Primer - 1 can is about $4 followed with Oil based primer and oil based paint. 1qt of about $10 ea
 

froggy1150

Master Chief Petty Officer
Joined
Nov 3, 2017
Messages
861
Don't forget to fill the pitting first. The one in the pic seems deep. Hate to do all that work and have a thin spot give out.
 

tpenfield

Moderator
Staff member
Joined
Jul 18, 2011
Messages
18,155
Subscribing in . . .

Looks like quite a project . . . been there, done that with my 2 Formula boats.

You did right in taking the tank out by cutting into the aft berth. AllDodge and Bigdirty both did similar tank removals. The cap removal would have been worthwhile only if you had significant stringer rot going forward.

Your trick may be tabbing in the new bulkhead. Not sure if you cut enough of the aft berth wall away to get the tank in over the bulkhead (and therefore can easily tab the bulkhead in on both sides). . . or if you will have to put the tank in first and really only have good access to the rear facing surface.

As far as the pits in the aluminum tank, I would try to estimate the depth of the pits vs. the thickness of the metal. Typically tanks are 0.125" thick, but larger tanks are 0.190" There should be a label on the tank with the information. If you have pits that are more than 50% of the tank thickness, I would consider a new tank, or if you can get a welder to repair the tank. I just wouldn't trust JB Weld on deep pits.

It is a judgement call as to how deep and how many. On my 24 foot Formula, I opted for a new tank. On my 33 foot Formula, I was able to save the tank. The most important thing when fixing the pits is to get down to bare metal within the pit itself. There are some aluminum etch products (a Naval Jelly like chemical) that can help in that regard. If you cover a pit that is still a bit 'dirty', it is likely to continue to corrode into the tank, and may eventually fail.

As far as a coating (paint) for the tank, consider Interlux Interprotect 2000e . . . It is normally used as a barrier coat for fiberglass hulls, but it is also very good as a bare metal primer/sealer. It is an epoxy-based (2-part) paint, so it cures.

I put 3 coats of 2000e on my 160 gallon tank, and did not use all that much paint. I think the gallon kit will do just fine and have some left over.

You mentioned possibly doing a swim platform once you are done with the guts of the boat. I'm currently making one for my Formula 330, but it is a different animal, as it already has the built-in (small) swim platform. . . . but happy to share some advice when you get there.
 
Last edited:

froggy1150

Master Chief Petty Officer
Joined
Nov 3, 2017
Messages
861
So this how I addressed the pits. Get to clean fresh metal ( aluminum starts to grow a type of corrosion right away) then I filled all the pitting with aluminum brazing solder. I have not gone farther that that right now. Doing deck and stringers.... I might etch and gluvit. I will make final decision when it's time to install. I used the epoxy by sending unit. The brazing is tricky though cus it tries to warp so it's a balance between hot enough to bond and not so hot to warp. That's why I did epoxy next to fill. Didn't want it to crack. And to tig those areas would have been alot
 

Attachments

  • photo307597.jpg
    photo307597.jpg
    1.5 MB · Views: 1
  • photo307598.jpg
    photo307598.jpg
    1.4 MB · Views: 1

kcassells

Fleet Admiral
Joined
Oct 16, 2012
Messages
8,738
I used 1 of those magic brazing rods on my ole tank. Once it bends it's not aluminum anymore it's compromised. Done quite a bit of brazing but had to see for myself. Eltrasho. ...but the pits were beyond repair.
Same as yours looks ok but as you take down the ridge/buildup you practically lose the fill back to the pit.
 

froggy1150

Master Chief Petty Officer
Joined
Nov 3, 2017
Messages
861
Mine were not that deep. About 30%. I left the fill high. That's why I put so much air to my tank.... wanted to see if it would go boom. I ran a regulator and a long hose to it. When I do the deck that section will be removable. I plan on a new tank at some point but yes that rod stuff ain't that great but I think it's going to work for what I did and if not....... Plan b
 

Ciera2450

Lieutenant Junior Grade
Joined
Apr 8, 2011
Messages
1,049
Thanks for all the input guys! I spent a bit today cleaning out the pitted areas. A Dremel with a tiny wire wheel works great! There are about 10 spots total. The 2 worst of them were just shy of half of the material thickness deep. (.125) I measured about 1.5MM deep and .125” is 3.175mm. Any issues there?
I had to use a MM ruler and convert to sae. Didn’t have anything else to measure that small. The others are just very minor surface spots. I will be sure to pressure test before installing back in boat to be sure, but didn’t have any issues prior.

I was a bit ambitious trying to paint today as I’m currently waiting for JB weld to cure. Tomorrow will be the day! I picked up SEM self etching primer and POR 15 gray. I will sand the JB smooth and give the bottom side a quick once over again with the sander and then clean everything up to prep. Using vinegar and then acetone to thoroughly clean everything. After the bottom is done, I’ll flip it over and do the top side. (It almost looks new as is)
 

Ciera2450

Lieutenant Junior Grade
Joined
Apr 8, 2011
Messages
1,049
Thanks tpenfield! Great point about the bulkhead. My plan was to just glass from the aft side due to lack of access. If I bed the bulkhead in PB and preglass the back side, I’m hoping it will work ok. It barely had any glass on either side originally! I’m also going from the original 1/2” to 3/4” since I’ll have plenty for all the other work.

I have ave been silently following your swim platform build! Great work! I will tackle that after the transom work
 

zool

Captain
Joined
Aug 19, 2012
Messages
3,432
You will be fine tabbing just the outer section of the bulkhead along the tank bottom and sides, just tab in both sides of the rest of the bulkhead and bed it all in pb. I had to do the same.
 
Status
Not open for further replies.
Top