1985 Conroy X-19 I/O Transom Restoration

nrasnake

Seaman
Joined
Aug 13, 2012
Messages
62
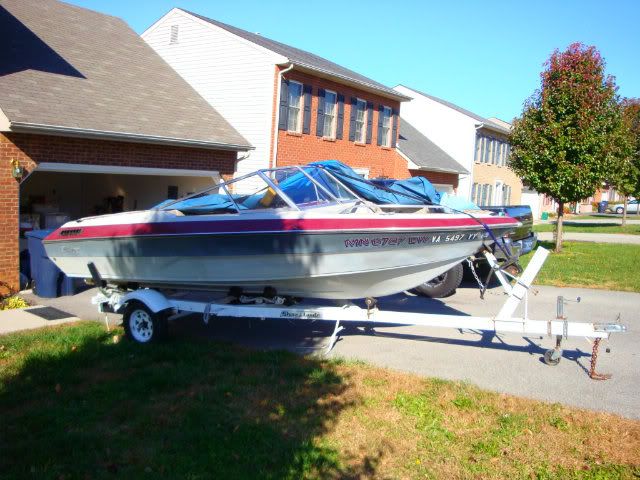
Hi all, new here to iBoats and starting a transom replacement on my 1985 Conroy X-19 I/O runabout that I picked up last November for $175! I've never owned a larger boat like this, but my wife and I had often talked about purchasing one. So, for the price, I figured I could do some research and either fix this one, or part it out and at least get my money back and look elsewhere for a boat that was ready to go.
8602ae2e.jpg

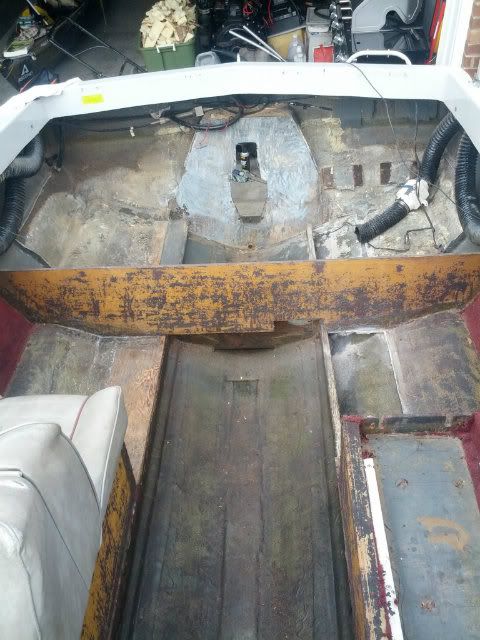
Anyway, this boat had sat outside under a boat cover for about 3-4 years untouched. Since bringing it home, I have worked on it off and on over the summer mainly on the Mercruiser 140 engine and Shore Lander trailer. With a carb rebuild, oil change, spark plug cleaning, and fresh gas she fired right up. To my surprise she ran beautifully for about 10 minutes until I noted the temperature went up and so I shut it off (probably needs a thermostat and new impeller, but I'll get to that later). My main concern now is the transom, which was so rotted I was able to stick my finger into it!
751f1acd.jpg


I've been reading up on iBoats which has been a fantastic resource and after watching/reading through almost all of Friscoboater's posts I couldn't help but be motivated to fix my boat. Thus, this past labor day weekend and after taking the week off work for a cruise, I got started. I was able to get the stern drive, gimbal housing, transom plate, and engine removed and I also got all of the transom wood removed and most of the engine compartment wood and foam removed. Now that I can see what I've got to work with (or lack thereof :)), I have some questions:

Underneath the transom wood appears to be about a 1/4" layer of bondo like material, although its grey in color (which I recall bondo is typically pinkish?).
5a3477dc.jpg

It is very hard and brittle and doesn't contain any fiberglass that I can tell. It also has several cracks running through it and around the edges of the transom hole you can see that this layer is pulling away from the actual fiberglass of the hull which is only about 1/8" thick.
611daf1a.jpg

My questions are:
1. Does anybody know what this is?
2. Would this be original, or has somebody replaced this transom before?
3. Is it repairable (as in could I "bondo" or fiberglass over it without concern), or should it also be removed and redone?
4. If it is to be removed and redone, does that mean laying up multiple layers of fiberglass until I get back to the original thickness? What's the correct fix?

In addition to the mysterious "bondo" layer, I put a straight edge on the outside of the transom (the gelcoat side) and noted the fiberglass has warped 1/8" or more from port to starboard from approximately the top 1/3 of the transom hole down, which I would guess is due to years of lack of support from the rotted transom wood.
604fe202.jpg

5. Is this a major concern, or could I expect the new transom wood to flatten everything out?
6. If this is a major concern, what's the correct fix? Cut through the entire hull and start fresh with fiberglass layers?
7. If replacing the entire hull transom area, is that a huge undertaking? I have zero fiberglass experience other than what I've been able to learn through iBoats, but I am good with tools, woodworking, mechanic work, and never afraid of trying something new.

At this point, I think those are my main questions and appreciate everyone's feedback and help. In addition, not being experienced in boats, I welcome suggestions on starting this project. Was this a nice/popular boat when it was new? Is it really worth fixing? My thinking is that for the $175 I paid for it I can put maybe $2k into into materials (doing the labor myself) and come out with a "brand new" boat that would be in better condition and last longer than just about any comparable boat I could go out and buy for $3-4k. Is that realistic? The rest of the boat is in nice condition for it's age. The hull is solid with just a few minor scuffs, but no cracks, chips, fractures, etc.

THANKS!
P.S. I hope the pictures attached correctly and show up in the post rather than attachments at the bottom. I followed the instructions from Don S., but when I preview the post I still only see the JPG thumbnails in the post with the actual images at the bottom... ???
 
Last edited:

Rick-101

Seaman Apprentice
Joined
Jan 27, 2012
Messages
48
Re: 1985 Conroy X-19 I/O Transom Restoration

Welcome aboard! I myself have jumped into my first project boat this year and doing the transom this past few weeks with the help of Iboats and a local shipwright.

Before all i hope you are wearing a respirator and eye protection grinding into the boat. Ichy has a whole new meaning after this.

1. I'm not sure what it is, I'm guessing some sort of resin, could be that yours is a runabout with a narrower transom needing added strength.
Mine was glass/plywood/glass/plywood/ transom skin (glass covered on the other side with gel-coat). You have to get down the last skin...

2. Most of the threads on replacement transoms, the guys all say they will last 20 or more years, so i would think its unlikely year boat/state of the wood if you could put your finger through it. If you and I are/going to spend so many hours doing the replacement, would you want sweat,energy and blood :) go to waist to have to redo it 5 years later:facepalm:?

3. If its solid resin that has cracked then I believe its lost its strength considering there's no glass. Ive learned the hard way, there's no simple fix with boats like this..

4. Once you get the transom skin on its own exposed, that's the starting point for the build. Search some of the i/o threads, there seems to be a few different ways to do the rebuild but most consist of the general principle from what i have seen:
-Outer skin
-Bonding adhesive (Peanut butter forum concoction, PL, poly resin/glass)
-3/4' plywood (marine, fur select, exterior grade.. I think the grain (strength) of the wood and glue are better for water)
-Bonding adhesive
-3/4' plywood
-Glass the whole thing in

All various methods considered you should end up with something like equal to 2'or + a little for the i/o assembly, check on the engine part of the forum, or the service/repair manual the members might provide you with(a god sent for all the mechanical issues i had).

5. The skin has flex to it because of the fibers, that's why they clamp everything to the plywood to get everything to bond flat.

6./7. I would not cut out the back skin of the boat, from what i hear its structural. Ive also heard that the cap is(top part of the boat, that they put together. Trailer placement or if its on roller can cause the hole thing to loose its shape when doing structural work like stringers...

You might want to cut into the deck/stringers 3inches so that you have room to insert/play with the plywood piece for fitment.
I also ground/sanded the fiberglass skin of the boat a little, same 3inches for when glassing the transom in.
Have a look at the stringer/deck and foam while your in there. (this is the point I'm at now)

Have a look at my thread:
http://forums.iboats.com/showthread.php?t=570022&highlight=transome+rot

Others will probably chirp in on anything i missed or might be mistaken.
Good luck!

Keep us posted!
Rick
 

nrasnake

Seaman
Joined
Aug 13, 2012
Messages
62
Re: 1985 Conroy X-19 I/O Transom Restoration

Thanks Rick. It looks like you've made some good progress with your project. Hopefully things are still moving along... or better yet you are done! Amen to the respirator and goggles. Fiberglass dust is NASTY!!!! I found that a reciprocating saw with a fine tooth metal blade did very well and didn't make much dust compared to a grind cutting method.

To recap what you were saying:

-The mysterious 1/4" material layer that was under my transom wood is possibly solid resin and is most likely original from the factory. Since it is cracked in several places, it has no strength at this point (I agree) and should be removed down to the fiberglass hull. From there I should put a layer of peanut butter or PL adhesive, clamp everything tight to flatten out the warped fiberglass hull, and then glass (I assume CSM) over the entire thing (and of course tab it in around the edges with 1708). I shouldn't be concerned with the hull being warped as the transom install with flatten things out. It would be more risky to cut the hull out as that could allow the entire boat to warp if not properly supported no the trailer.

On to more questions now.
1. If I remove the mysterious 1/4" layer (which I'm not sure how the heck I'm going to do that unless I settle in with a grinder for a few days :(... don't think I want to pry it out and risk cracking the hull glass - its quite thin),

Do I build that 1/4" back up with fiberglass layers? In order to get the original transom thickness, I'll need to do something.

Assuming I do layup several layers of glass, how can I do that while removing the hull warp? It seems if the hull is warped and I layup fiberglass on that, the layup with be warped as well and it probably wouldn't flatten out when bonding in the transom wood (at least without some serious clamping power... which doesn't sound like a good plan as it would have a lot of stress after it cured and I removed the clamps). Not to mention I wouldn't be able to clamp or flatten it out the hull while laying up the glass.

If anybody has any ideas, please let me know. And if you know any history no this particular boat, that would be appreciated as well (Is/Was it a popular/nice boat? Worth restoring?...)

Now, back to work! Where is my saw......

Thanks,
-Cody
 

nrasnake

Seaman
Joined
Aug 13, 2012
Messages
62
Re: 1985 Conroy X-19 I/O Transom Restoration

Hey everybody. I got some work done on the boat this week so I'm posting pictures to share. If anybody has some good advice, I'd appreciate it.

ce7c2e4b.jpg


a3d20c5e.jpg


a29328d2.jpg


Here are some more shots of that mysterious layer I found under the transom. Anybody know what this is? Should it be removed? Whats the best method to do that?
7d82c65c.jpg

9dbf6b28.jpg


Thanks,
Cody
 

xanthras

Petty Officer 3rd Class
Joined
Jun 29, 2009
Messages
76
Re: 1985 Conroy X-19 I/O Transom Restoration

Whatever that stuff is looks beat. All those cracks cant be good. I would remove it. Have you tested a small spot to see what is underneath it? Maybe setting a circular saw very shallow and then chip it away at the saw cuts? Grinding that looks like it would be rough. Also, how are the stringers? Are those being replaced too?

In any case, could be a cool little boat. I believe Mercruiser transome thiness needs to be 2inches. I dont think it matters how you get there as long as you have the basics like doubled up 3/4 inch ply.
 

nrasnake

Seaman
Joined
Aug 13, 2012
Messages
62
Re: 1985 Conroy X-19 I/O Transom Restoration

I agree, that transom layer (whatever it is) is no good now and I'm going to remove it somehow. I did chip away at the edges and it's solid mystery material all the way to the hull fiberglass. I'm thinking if I can get my pry bar or an old chisel in there, I may be able to chip it out slowly. If not, I'll do like you said and run the saw over it to dice it up.

I made quite a bit of progress this evening (I'll post pictures tomorrow when the sunlight is back). I've cut out all the rotted wood I can find and thoroughly cleaned up in preparation for a full day tomorrow. Nothing beats a clean workspace!!! What it's looking like is the port side is pretty well shot and the deck and at least 1/2 (meaning from transom to ski locker) of the stringer will need replacing. However, on the starboard side, I've not found any rot and everything looks, smells, feels, and tastes solid :). Regardless I'm still going to core sample it in various places to make 100% sure. There's no way I'm doing all of this half way. But, definitely the port side is shot and will require replacement. Again, I'll get some pics up tomorrow.

Regarding the transom thickness, I see Mercruiser requires 2" to 2 1/4" thickness. You're correct... it doesn't matter how I get there (well... as long as I get there correctly!). I'm just thinking of where the current motor mount is. I want to make sure the motor will still match it since it is solid and doesn't require replacement. I'll have to double check the transom thickness I removed and see what I'll need.

Anyway, thinking ahead for the transom, I envisioned two 3/4" sheets of plywood bonded together with PL adhesive and the a layer of CSM/PolyResin over the entire thing. Then, I'll bond that to the hull fiberglass with peanut butter. Finally, tab it in with 1-2 layers of 1708 glass... just like Friscoboater (well as best I can... man he made it look EZ!). Soooo, the transom equation I came up with is something like.... 1/8" PeanutButter + 1/8" CSM + 3/4" ply + Gnat Hair of PL + 3/4" ply + 1/8" CSM = A gnat hair over 1-7/8". Hmmm, not quite 2". What am I missing?
 

Trooper82

Commander
Joined
Nov 21, 2011
Messages
2,648
Re: 1985 Conroy X-19 I/O Transom Restoration

nrsnake...Welcome to the iboats dry dock....you found the right place for some good help...That stuff you found behind the transom wood is kinda strange to me....not that I have been around long...on your missing 1/8" I'd say that is your hull skin thickness? How think was the wood that you took out? Looks like a previous repair to me though...

Your in for some excitement....and fun...make sure you have the proper safety gear and precautions before you start any grinding.sanding/cutting...doesn't take much at all to make fiberglass splinters that become airborne....and you know that we all breathe...don't want an of that in your lungs or anyone elses...or eyes...or skin...

Looks like you hav a nice project to work on..wil be following for sure.....
 

GT1000000

Rear Admiral
Joined
Jul 13, 2011
Messages
4,916
Re: 1985 Conroy X-19 I/O Transom Restoration

Welcome to the dry dock, nrasnake...

We'll be glad to help out any way we can...

Saw your post in the other thread about where to get materials...US Composites, Iboats.com, etc...All Good...what is gonna get you is the Hazmat and Shipping fees...

Do some thorough searching around you neck of the woods and try and get a more local Marine Supplier...even if its an hour's drive away, you save a ton on the shipping costs...ask around any local marinas as to where they get ther boats fixed and in turn, where they get their supplies from...

As for that gray crusty stuff on the transom...it looks like an attempted repair at some point using a product similar to Sea-Cast...if done correctly, can last for decades, if not, well there you are...

Your pics are coming in perfectly...

Don't sweat the thickness issue of the transom just yet...once you get to the point of installing it, if your short by any amount, it can easily be built up with one or more layers of CSM and 1708...

And I totally agree that you should do a thorough core sampling of the structure...you definitely don't want to find out after the fact that you need to tear something up, you just replaced...

Have Fun!
GT1M
 

nrasnake

Seaman
Joined
Aug 13, 2012
Messages
62
Re: 1985 Conroy X-19 I/O Transom Restoration

Hey guys, as promised I'm posting some pictures of the progress made today. I didn't get as much done as I hoped for. All three of my reciprocating saw batteries crapped out so I had to make a trip to Home Depot which always takes two hours (I can't ever get out of there... too many tools to look at). I actually ended up buying a Ridgid corded saw for the same price as a new Ridgid battery was going to cost! That will do me until I can get the batteries I have replaced under the Ridgid lifetime warranty... great tools!

Anyway, I think I have 80% of the rotted wood out. I still need to cut out the rear portion of the port side stringer, a baffle near the motor mount, cut out the ladder mounts, do some stringer core samples, and then finish the detail grinding work. I should be able to get most of that done tomorrow and then I can at least start planning for reconstruction and fiberglass this week.

Progress so far... nice and cleaned up
065ba850.jpg


Front of the gas tank / Rear of ski locker area
265133bc.jpg


Port side stringers and front of the gas tank area under port side seat box
a9b4aa2a.jpg


Question: You can see where the stringers were notched to accomodate the baffle which separated the gas tank and ski locker compartments. Unfortunately, the notched area was not fiberglassed and thus some minor rot has occurred on the stringers in this area (luckily it is not bad). I was thinking that when I cut the bad section out of the stringer, the stringer will no longer be a continuous board and thus will lose it's structural integrity. I'm thinking of replacing the wood like shown below to hopefully make that joint stronger. What do you guys think? Overkill? Is there a better way to do it?
bcb6fd6d.jpg


Finally, that mysterious layer I found under the transom wood is chipping off in large pieces (shwweeewww).
8e87e0b8.jpg


Thanks for the input!
 

nrasnake

Seaman
Joined
Aug 13, 2012
Messages
62
Re: 1985 Conroy X-19 I/O Transom Restoration

Today was a good day. I was able to get quite a bit done, although I still have a bit to go with the demolition. At least I'm down to the detail work which just takes patience. I'm still wondering about how to cut out the bad sections of the stringers though. If anybody has suggestions with regards to my idea posted in my last thread, I would appreciate it.

Today I got all of the transom material removed down to the fiberglass hull. I also took the ladder off and removed the rotted mounts, removed the bilge mount from the bottom of the hull, and also removed the engine mount and bulkhead (I just realized I called that a baffle in my last post... whoops). I think all that's left is to cut out the rotted stringer sections and start grinding everything to prep for fiberglass. Oh, and I'll core sample the stringers too.

Let me know your thoughts on how to replace the stringer sections.

48233d49.jpg


Transom clean down to the fiberglass hull
41cf060b.jpg


Rotted ladder mount wood removed
b6ba7290.jpg


Engine mount and bulkhead removed
dcf416f8.jpg


Starboard stringer where engine mount bulkhead was joined
55494e3e.jpg

I took a close look at this section of the stringer. You can see most of the stringer is solid fresh wood, but below the notch and at the left-top end there is some staining. It doesn't look like its rotted, but rather just stained... and it didn't seem wet. With the entire starboard side looking to be solid and in good condition, I was really hoping to leave it as-is. On the other hand, if I've come this far I don't want to cut corners. Would you guys just plan on cutting this out, or could I put some "treatment" on it and leave it alone? I think I've heard of something like GetRot that's suppose to stop wood rot??? Is there something else that work just as well?

Regards, :)
Cody
 

cedarlattice

Petty Officer 2nd Class
Joined
Dec 3, 2011
Messages
104
Re: 1985 Conroy X-19 I/O Transom Restoration

Wow you are moving right along. I am not a pro, but if it is just stain i would treat it with some bleach. I am sure there are some commercial products out there also. I would sample that foam before you close it up. On mine, the foam on the top was bone dry, but when I drilled down I hit lots of water.
 

Rick-101

Seaman Apprentice
Joined
Jan 27, 2012
Messages
48
Re: 1985 Conroy X-19 I/O Transom Restoration

Great work! I was a bit caught up with things and didn't have any time to post but i have been following your thread :) To be honest you can try the products but i think ridding yourself of all the rot would be the best idea. building stringers is pretty simple. It will mitigate your risk for future years and its only a few more pieces since your going to have to glass everything in later...
In foresight. Ive learned that most of the glass/ pb will compensate for the pieces that don't need to be to 1/8th of an inch. This way you can save a lot of time. Once you have a global overview of the steps you can really make ground.
 

nrasnake

Seaman
Joined
Aug 13, 2012
Messages
62
Re: 1985 Conroy X-19 I/O Transom Restoration

I decided to take a break today and start planning for reconstruction and fiberglass. This is my plan for installing the new transom:
d1997852.jpg

Does this look right? If I come up short on the thickness I would just plan on adding 1708 layers until I get 2" to 2-1/4" thick.

I also put together a materials list on Fiberglassite.com. While I do more research on quantities needed, do you think this is close to enough material to do the transom, repair the stringer sections, and cover the deck?
d60b4ea7.jpg


Lastly, I'm a little concerned about the upcoming temperatures in my area (Roanoke, VA). Average temperatures should range from 50-75'F for the remainder of September and 45-70'F for October. I know it needs to be at least 60'F to fiberglass and so I'm curious, would I have any issues with proceeding this year? Note that the boat is always outside, and it would have to stay outside (but covered of course).

Thanks everybody for the feedback!
 

Woodonglass

Supreme Mariner
Joined
Dec 29, 2009
Messages
25,929
Re: 1985 Conroy X-19 I/O Transom Restoration

Your mat and biax will not add that much thickness. You should plan on sandwiching in a 3/8" piece of plywood between the two 3/4" pieces. I'd look for Fir plywood instead of Pine if possible. Floor underlayment is good too. Other than that your plan is good. Take care to ensure the transom is parallel and flat. This is critical on an I/O. Temps are a factor and 60 is critical. I'd get as much done before October as possible and for sure keep her covered to ensure NO moisture is allowed in.
 

Rick-101

Seaman Apprentice
Joined
Jan 27, 2012
Messages
48
Re: 1985 Conroy X-19 I/O Transom Restoration

The day off every so often are the best! You diagram looks about right, only thing is just having reinforcement with the plywood only on the one section. I'm not too sure how strong it would be with sharing the load to the floor/stringers and the cap, hopefully someone will chirp in.
The reason I'm bringing this up is that the material "sea cast type" is quite strong and it was pretty cracked...

As for temperature, cooler the better to a point, it will give you more time before it hardens.
Best of luck!
 

Trooper82

Commander
Joined
Nov 21, 2011
Messages
2,648
Re: 1985 Conroy X-19 I/O Transom Restoration

Will PL work or should he be using a good wood glue like TB3? I only ask because I used TB3 and have seen others that did as well...also the PL requires air to cure...I'd think it would be tough for air to reach towards the center of a piece of wood that big (to make a transom)

Not sure how long your boat is, but I am on gallon 25 for my 20' project...and will need more....
 

nrasnake

Seaman
Joined
Aug 13, 2012
Messages
62
Re: 1985 Conroy X-19 I/O Transom Restoration

Not sure how long your boat is, but I am on gallon 25 for my 20' project...and will need more....

WOW! :eek:... My boat is 19', but I'm really only replacing half the deck and the transom which is only about 3'x3'. Would I be good with 5 gallons to at least complete the transom and replace the port side stringer section? I've heard that Elmer's Poly Resin is sold at Lowes... would you even consider that (for the deck) or should I just go ahead and invest in 10 gallons?

Rick-101; said:
The day off every so often are the best!
I agree. After awhile without a break, I find my self getting unmotivated and starting to glaze over staring at the work I NEED to do.

Woodonglass; said:
Your mat and biax will not add that much thickness. You should plan on sandwiching in a 3/8" piece of plywood between the two 3/4" pieces. I'd look for Fir plywood instead of Pine if possible. Floor underlayment is good too. Other than that your plan is good. Take care to ensure the transom is parallel and flat. This is critical on an I/O. Temps are a factor and 60 is critical. I'd get as much done before October as possible and for sure keep her covered to ensure NO moisture is allowed in.
I will try and get Fir. I'm not quite following you on the "Floor underlayment is good too." Are you referring to a type of plywood?


I was able to get a few hours in on the boat today after work. Wow its getting dark quick now! I ran out of daylight before I could take some pics, but I'll get some up soon. I think I'm ready to settle in with the grinder and get everything smoothed down and prepped for glass. The rotted section of the port side stringer is out and all the other stringer sections are cut out and ready for replacement wood. I'll probably head to Home Depot tomorrow evening for some wood supplies and a tyvek suit. Tonight, I'm going to try and get the fiberglass supplies ordered. The transom should hopefully be roughed in this weekend if all goes well. I'm very pleased with how the progress is coming... I've just got to keep at it!

Thanks for the input and support :)
 

nrasnake

Seaman
Joined
Aug 13, 2012
Messages
62
Re: 1985 Conroy X-19 I/O Transom Restoration

Quick update...
I got my fiberglass materials and wood this week. Hopefully, I can get the transom in this weekend. Of course priorities are dictating and thus I must leave work early tomorrow to hit the river in my kayak for some smallmouth fishing. I know... I know... but you have to keep your priorities in line. Life is tough sometimes :)

I'll keep everyone updated with the progress this weekend.

Here are the materials. 5 gallons of poly resin is in the box. Wow that stuff stunk up the entire garage and I only opened the box!
572f3cbb.jpg


Not shown is my respirator, safety goggles, and the 1/2" threaded rod I'll use to clamp the new transom in place... that's what the nuts and washer are for. Oh, and the 3/4" PVC fittings I am planning on fiberglassing into the bottom of both stringers in the engine compartment so that I can drain water or let air circulate under the deck (if ever needed). Which reminds me, I meant to ask you guys why my boat has a vent at the tip of the hull cap (the top of what I'll call the bow nose). My boat cover ripped there and if it rains hard I notice some water gets into the vent and trickles down the keel toward the transom. Is that typical? What's the purpose? To let air circulate under the deck (and let rain/splash get under the deck)? I was thinking of plugging the vent since there is a gap between the deck and hull under the bow seat box (lift the seat cushion and there's the hull and edge of the deck).

Here's my prediction for the final transom thickness based on actual measurements of my fiberglass thickness. I should be slightly over 2-1/8" which would meet the Mercruiser specification of 2" to 2-1/4" in the power package installation manual I have.
29878c45.jpg


By the way, the plywood shown is what I picked up at Home Depot today. It's a 4'x8' sheet of "cabinet grade plywood" which they have for $29.95. A very good price for the quality I think. It's a solid 7 ply (more plys = more strength) as opposed to typical 5 ply board and has a very nice front and back veneer. I think it's also called Arauco (sp?). Not sure of the type of wood (pine I suspect) or glue used in it, but if I fiberglass it properly it shouldn't matter. Not to mention, I couldn't find Fir at Home Depot or Lowe's. And sheesh, after struggling to pull out 2 sheets of sorry looking "plywood" at Lowe's while the lumber guy stood at the end of the isle watching me... I had to walk out! But, I guess I shouldn't expect much right? No biggie...

Regards
 

nrasnake

Seaman
Joined
Aug 13, 2012
Messages
62
Re: 1985 Conroy X-19 I/O Transom Restoration

Ahhhhh, what a weekend. I did not get as much done as I had envisioned, but I did make progress which is good. I spent half the day on Saturday grinding and making the transom template and then most of the day Sunday cutting and gluing the transom wood together. I must say, the grinding really took the wind out of my sails... that is just nasty, hot, sweaty work.

Transom hull after grinding
b7dd193d.jpg


First cutout of the new transom wood
3dbf25e3.jpg


All three layers (23/32 + 3/8 + 23/32 plywood) of the transom glued (PL Premium Adhesive) and clamped together.
c40b857e.jpg


It's raining here today and tomorrow, so I'm just going to let the transom sit in the garage and cure. The next step will be to put several coats of resin on the transom and then a layer of CSM over the entire thing and a CSM layer on the hull where the transom goes. Finally, I will mix up a large batch of peanut butter and adhere the new transom to the hull, clamp it in place, and fillet the edge gaps. Once that's done, I can tie in the transom to the hull with a layer of CSM and then a final layer of 1708.

The next milestone will be to get the new port side stringer glued into place and glassed and then tie both stringer into the new transom. From there its new decking, new boxes for the foam on either side of the transom, and the motor mount and bulk head. I will save the middle bulkhead and stringer repair of last. After this weekend, I'm really doubting I'll get this far before the temperatures drop so much that I just can't fiberglass anymore. If so, I'll get everything ready for glassing in the spring and start working on refurbishing the engine and stern drive in the garage.

Sooo much work left to do, but there's no stopping now. I've just got to stay focused on realistic goals, stay positive, and keep plugging away.
 

GT1000000

Rear Admiral
Joined
Jul 13, 2011
Messages
4,916
Re: 1985 Conroy X-19 I/O Transom Restoration

Awesome Progress...a bit at a time...looking real good!
 
Top