1988 Marlin Ski Magnum overhaul

proshadetree

Lieutenant Commander
Joined
Jul 19, 2008
Messages
1,887
Re: Back to work on sanding and grinding

Re: Back to work on sanding and grinding

Looking good great to see such progress.The only way I race is if someone pushes that way Im sure to win.Dont find a lot of takers.
 

J. Mark

Petty Officer 1st Class
Joined
Sep 3, 2008
Messages
303
Re: Back to work on sanding and grinding

Re: Back to work on sanding and grinding

I'm not totally happy with the raw water pump's pulley alignment but a shim or a couple of washers should get it really close. As is, I would expect the belt to wear quickly or maybe get thrown.

Oh well I guess it will wait til I get the final install and alignment done. :(:(
 

J. Mark

Petty Officer 1st Class
Joined
Sep 3, 2008
Messages
303
Re: Back to work on sanding and grinding

Re: Back to work on sanding and grinding

Looks like you have your work cut out for you! Makes my issues seem small by comparison.

Weather cooled down, so I'm taking a break for a couple days and just doing some small part clean up in the basement and hopefully straightening out my tools and supplies so I can find everything easier.
 

J. Mark

Petty Officer 1st Class
Joined
Sep 3, 2008
Messages
303
Re: Back to work on sanding and grinding

Re: Back to work on sanding and grinding

Got a break in the weather and a couple of volunteers tonight and got the prop shat in, the prop on and the engine bolted in its final resting spot. I might just get the shaft alignment done Saturday! Ton's of little stuff to do, but It is on the way!

I had asked a question on prop shaft alignment in another thread. Got some good confirmation of what I expected.

Tonight I found that the shaft strut was slightly bent, but I was able to straighten it out. Might need a final tweak, but it is awful damn close. Ran out of light, but I think an hour or two this weekend could lead to a lot of work being done. This stage has really held up my installing any floor or making the patterns to build my rear seats and their riser box. Plus having to lift the engine again kept me from installing the carb or distributor.

I expect this project to start to move quickly when I get some more freetime.

Current goal is to fire the engine up the 1st weekend in May! I hope to have the floor in and glassed before then so I can install a seat. If I could water test it in May I would be totally jazzed
 

J. Mark

Petty Officer 1st Class
Joined
Sep 3, 2008
Messages
303
1988 Marlin Ski Magnum overhaul

Today was not a work day, but I still spent a couple of hours piddling with the boat.

Cut the thru hull openings for my exhaust, got the rest of the bolts for the engine mounts (cradles to be more accurate) drilled, 5200 coated and installed.

Replaced some damaged and missing hardware and repainted the swim platform brackets and some mounting hardware for the ski pylon.

Didn't work on the engine alignment at all, but so far it is looking very close and I don't think it will take too long when I have some quiet time.

Ran the cable for the Velvet drive and apparently it has to go over the engine. Not what I expected, but clearly that is the only way it will line up. Have it temporarily installed and roughly adjusted.

It does look like I'll have to modify the bracket to hold the throttle cable to work with the edelbrock, but that is a minor detail.

Wiring looks to be pretty good with about a 1/2 dozen wires under the dash to sort out. hard to do right now, but I'm only hoping for a tach and oil and temperature gauges at first. Anything else is gravy.

Now for the problem of the day Any ideas or help is appreciated.

My old exhaust trumpets were severely corroded and one was broken.

I bought some new ones and test fitted them today.

My transom is not flat though, it is three pieces The flange on the exhaust trumpet overhangs the contour and has a signifigant gap on the outer edge (about 3/8 of an inch)

the trumpets I have are ABS so I don't think I can do much with them. If it was steel I would bend them. If aluminum, I'd have a tig welder build them up and grind them to match the transom. As it is I don't know what to do.

I suppose I could fill the holes back in and repair the 3" openings in the transom and move them over 3/4 of an inch to deal with it, but I just redid the transom and don't want it looking like crap (even if only you folks here and I ever see it)

Any suggestions or ideas?

I made a pint drawing to give you an idea of what I am talking about
 

Attachments

  • IMG_1098.JPG
    IMG_1098.JPG
    27.3 KB · Views: 1
  • transom exhaust trumpet.jpg
    transom exhaust trumpet.jpg
    1.9 KB · Views: 1
Last edited by a moderator:

J. Mark

Petty Officer 1st Class
Joined
Sep 3, 2008
Messages
303
Re: Back to work on sanding and grinding

Re: Back to work on sanding and grinding

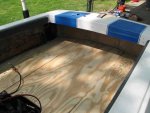
Disregard the above, I beveled the holes a little more and it slid in and flush all the way around. I really should stop before I get tired.

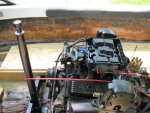
Got the edelbrock carb installed tonight- piece of cake-I used an adapter plate that is slanted to keep the carb level and was able to remount the bracket on the rear mounting stud.

Weather is going to be great starting wen, but with my kids, I won't get home til after 6;30 each night and I can't ignore them and they aren't old enough to be much help. :( So I get to do a little work this saturday and that is pretty much it til next weekend.

Engine start date is probably now going to be mid May :(

Now for the problem of the day . . .

I had some high pressure hoses from the transmission to the transmission cooler made and went to install them tonight . . . on the cooler side when fully tightened, the lines slide in and out of the fitting. Not sure how to fix them or if they can be used, but until I get this resolved, there is no way I can finish the cooling system hook up. I'm going to take the cooler and lines over to a friend's shop and see if he has any thoughts.

On the bright side I did get 16 feet of 1 1/4 hose for 2 bucks a foot at Boater's World (I'll have leftovers, but they are odd about cutting hose right now)

Not as productive a night as I needed, but managed to make some progress. Looks like a mid June launch is the earliest I can hope for.
 

J. Mark

Petty Officer 1st Class
Joined
Sep 3, 2008
Messages
303
Re: Back to work on sanding and grinding

Re: Back to work on sanding and grinding

Problem of the day solved! A couple of intermediate fittings added to the cooler and everything is as it should be.

as I said a while back, I can be a little stupid after a long day!
 

ridesapaint

Seaman Apprentice
Joined
Nov 30, 2008
Messages
40
Re: Back to work on sanding and grinding

Re: Back to work on sanding and grinding

good work! way to go on figuring **** out. i have been doing a lot of that too. i never spant so much time learning body work. i have been bustin *** 10 hours a day on the old gmc, doing body work for a week easily. i can't wait till i can start painting, but there are a lot of parts to paint along with the frame and body. i did get all the paint together...$1200 worth. i like the original color so went with it, a bright red with a lot of orange in it, and a tan/butterscotch interior. it is amazing how much goes into prep. how the heck do they restore a ride in a week on overhaulin?
im taking my boat camping next weekend to roosevelt lake in AZ, and first weekend in june to lake powell! im psyched.
 

J. Mark

Petty Officer 1st Class
Joined
Sep 3, 2008
Messages
303
Re: Back to work on sanding and grinding

Re: Back to work on sanding and grinding

Got a little more done this week, though not enough to post pics. Next few days should see a lot done and hopefully I'll give y'all an update with some pics.

Weekend work hopefully will have me ready to fire off the engine. I might even be able to post a clip of i running with some sound before long.
 

ridesapaint

Seaman Apprentice
Joined
Nov 30, 2008
Messages
40
Re: Back to work on sanding and grinding

Re: Back to work on sanding and grinding

The keel rollers on the trailer are shot, so i used the engine hoist to lift the stearn off the trailer to replace the parts. Now the bunks are too low, which explains why the rollers got ruined, and the nuts are so rusted that I have to leave it jacked up till I find the right nuts to replace on the bunk clamps. I guess I will drive into town again tomorrow (30 miles one way). I need to get some really good caulk for the GMC restore project.

Keep at it. Boating weather is nearly here, and I plan on enjoying it while I have time. I will try to take some pics here.


Jerry
 

J. Mark

Petty Officer 1st Class
Joined
Sep 3, 2008
Messages
303
Re: Back to work on sanding and grinding

Re: Back to work on sanding and grinding

Well the weekend got sidetracked, but on the plus side I got my neighbors boat running with a rebuild on the carb,a new starter solenoid and setting the timing set properly.

Still I managed to get what I absolutely had to get done-done

Here are pics of the floor trial fitted, and the new rear sets set in place to test fit. Everything is back out now and the second coat of epoxy is drying-tomorrow they start getting glued in.
 

Attachments

  • IMG_1140.JPG
    IMG_1140.JPG
    36.9 KB · Views: 1
  • IMG_1143.JPG
    IMG_1143.JPG
    45.3 KB · Views: 1
  • IMG_1144.JPG
    IMG_1144.JPG
    41 KB · Views: 1
  • IMG_1141.JPG
    IMG_1141.JPG
    47.1 KB · Views: 1

ridesapaint

Seaman Apprentice
Joined
Nov 30, 2008
Messages
40
Re: Back to work on sanding and grinding

Re: Back to work on sanding and grinding

you have a really cool boat. thanks for posting pics and continuing to write about it. very nice boat. looking good.
 

J. Mark

Petty Officer 1st Class
Joined
Sep 3, 2008
Messages
303
Re: Back to work on sanding and grinding

Re: Back to work on sanding and grinding

Weekend start never happened. I hate being dependent on the weather!

Silencers were bad-2 new ones on the way-another week wasted.

I did get the cooling system routed and buttoned up as well as getting the wiring routed and partially connected. Need to find a wiring diagram for my alternator as I only know where one of the three wires goes :(

All dash switches are going to be replaced and all the circuit breakers were shot or bypassed. I'm going to go ahead and replace the ignition switch while I have the steering wheel off and the panel removed. Found the broken wire to the hour meter and the fuel, tach, oil pressure, and voltage gauges are all functioning. Not sure on the temp, but if it isn't I believe sorting that out will be easy enough. I am surely getting closer, though every day of work I find something else I am not satisfied with, so an early June launch is looking more and more doubtful.

Rain is forecast for the rest of the week. I feel just like Charlie Brown after he tries to kick that football. I may even name my boat "Lucy" LOL
 

J. Mark

Petty Officer 1st Class
Joined
Sep 3, 2008
Messages
303
Re: Back to work on sanding and grinding

Re: Back to work on sanding and grinding

Well, the weather held last night and I got the ski pylon brace installed. I needed some 1/4 shims on each side and a thought came to me. I had an old stop sign in the attic- I took a look and it was aluminum! I pulled out the table saw and oiled the cut line and in a couple of minutes I had perfect shims. Clamped em in the vice and drilled them out to match the brace and installed them.

Damn that Murphy guy- I got one side all bolted down and then looked at my tube of 5200 which I didn't use :( Pulled it all apart and did it right. I managed to get to 8 foot sections of floor glued in and screwed down (the screws will come out later and be filled in) I used PL adhesive and against my better judgment I went ahead and glued to the hull joint and tried to make my filets. Well the rain came late after I went to bed and the moisture caused the PL on the surface to bubble up a fair amount. I'll cut it back out once it cures and am going to try a sureform file to keep the mess down. Not sure if it will work, but I really don't want to do more grinding.

I'll try and get some updated pictures in a day or two.
 

J. Mark

Petty Officer 1st Class
Joined
Sep 3, 2008
Messages
303
Re: Back to work on sanding and grinding

Re: Back to work on sanding and grinding

Maybe I watched too much CSI over the weekend, but I got to thinking-why did this boat fail?

1) Waterlogged foam-where did the water come from?
2) Blown head gasket-why did it blow?
3) overheated and bubbled exhaust hose-why did the engine overheat?
4) bad valves (6 needed to be replaced) what caused them to burn?
5) rotted wood in the transom and stringers
6) water in the transmission

Well I think it is important to examine what was wrong so as to prevent and correct it .


The waterlogged foam came from leaking exhaust silencers. I suspect the boat was also stored uncovered and possibly with the plug in. The bilge pump switch and breaker was bad as well. Transom hardware was not well sealed and the exhaust trumpets were corroded and probably leaking as well. The transom was mostly shot from the top to the bottom, so analysis of the failure is somewhat sketchy.

Engine failure is a bit harder to determine. The risers were bad, so I know that was a contributing factor. The carb was an automotive q-jet and had a vacuum line run from the intake to the choke hot air tube-this alone would likely account for burnt valves as the air sucked in would lean out the engine. beyond that I suspect trying to run a heavy waterlogged boat with improper timing, water leaking into the engine and a major vacuum leak-there may be other causes, (like the stuck thermostat) but these are good enough to satisfy my curiosity.

Water in the transmission-cracked hydraulic lines and standing water in the bilge are the probable culprits
 

J. Mark

Petty Officer 1st Class
Joined
Sep 3, 2008
Messages
303
Re: Back to work on sanding and grinding

Re: Back to work on sanding and grinding

new exhaust parts came in last night. Being the total dumbass I am, I ordered the wrong ones! these are straight without the 60 degree fitting that turns upwards.

I got them installed anyway and the hoses make the turn reluctantly. In order to make this work, I really need a doghouse that is 4" longer than my existing one. Glad I didn't get it recovered. I saw a ski supreme doghouse with an integrated rear facing seat and thought that was the coolest thing. Since I am going to have to modify mine anyway. . . :D

I'm going to incorporate this concept

Glad I didn't get it reupholstered!

Now if anyone here is in the middle Tennessee area and is good with boat wiring . . . I'm happy to provide all the refreshments you desire for a few hours help.
 

Attachments

  • cover.JPG
    cover.JPG
    46.8 KB · Views: 1

bowman316

Lieutenant Commander
Joined
Oct 21, 2008
Messages
1,822
Re: Back to work on sanding and grinding

Re: Back to work on sanding and grinding

as far as sanding and grinding goes, i just discovered a really easy way to do it.
I found a disc that you can put into a drill, and this disc spins and sands/grinds what ever it touches. One was really hard, and could cut metal, another was softer, for more delicate sanding.

These were 4 inch discs too, so the sanding went fast.

should be at lowes, or home depot if there is no lowes around you. (lowes is so much better in my opinion)
 

J. Mark

Petty Officer 1st Class
Joined
Sep 3, 2008
Messages
303
Re: Back to work on sanding and grinding

Re: Back to work on sanding and grinding

I have a grinder and plenty of flap wheels that will cut the adhesive down quickly, but they will also eat the wood if not used with lots of TLC. I could deal with that, but I am not in the mood to generate tons of dust again, since the motor is back in place.

I used the sureform file last night for about 10 minutes and got it mostly cleaned up. 30 seconds with the shop vac and it is nice and clean and I didn't have to deal with dust.

Heavier stuff comes up with a chisel and careful application of force. I don't need it perfect as I will be putting a layer of thickened resin down for my filet before tabbing, but I also want the bubbled PL removed so the resin is sticking to something sound.

I do a little woodworking and it is amazing how fast some things can be done by hand instead of using power tools.
 

J. Mark

Petty Officer 1st Class
Joined
Sep 3, 2008
Messages
303
Re: Back to work on sanding and grinding

Re: Back to work on sanding and grinding

Need some input here

I have decided to put all flotation above the deck in my boat-no foam under the deck.

My front stringers and floor supports have about a 6" space in front of where they end (just at the dash. I don't want water running down the side compartments unnecessarily (though they have limber holes both at the rear and at the low spot ahead of my motor approximately in the center of the boat)

So I am planning to add a couple of bulkheads as shown in this drawing (They are made, just not installed)

Is there something I am failing to consider?


Now for my above deck flotation-I decided to cover my deck with 1/2 interlocking rubber tiles. They are quite buoyant and are advertised to be waterproof. I'll likely use then on the sides of the hull and the deck. Additional flotation will go under the rear bench seat and up under the bow and gunnels.

If rubber burns I am sure it gives off lots of toxic fumes-is there a regulation against using it above deck that I should know about?
 

Attachments

  • bulkheads.JPG
    bulkheads.JPG
    45.7 KB · Views: 1
Top