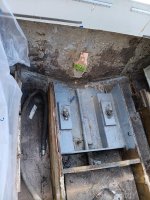
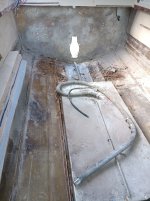
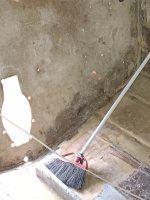
1988 THOMPSON 240 FISHERMAN REBUILD

newtoboat101

Chief Petty Officer
Joined
Jul 9, 2015
Messages
417
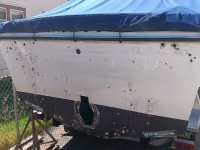
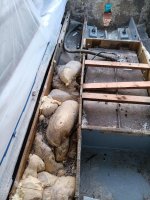
1988 thompson 240 fisherman fiberglass boat rebuild transom (see pics), my question is now that i have removed everything from the transom (trim tabs ,kicker motor bracket speedo tube ,and some other hardware) do i (1) replace the transom wood and fiberglass on the inside first then fill in the holes on outside ,or (2) tape the back side and fix holes then replace transom inside or (3) put a layer of 1708 on inside of transom then apply wood and fiberglass over it then fill holes from outside ,i think all the holes in transom has me a little concerned and intimidated ,any help or suggestion appreciated .some of the holes will be reused ,kicker motor bracket will be moved slightly thank you
 

Attachments

  • thumbnail 11.jpg
    thumbnail 11.jpg
    135.4 KB · Views: 5
  • thumbnail 8.jpg
    thumbnail 8.jpg
    192.8 KB · Views: 5

newtoboat101

Chief Petty Officer
Joined
Jul 9, 2015
Messages
417
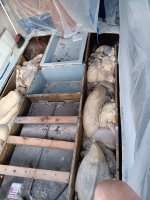
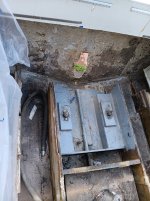
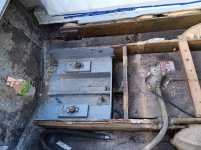
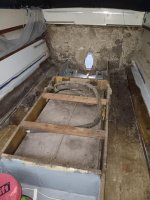
Hello, my question right now is stringer replacement size, when i measure the existing wood stringer,some is exposed ,so i measure 3/4 wood with fiberglass wrap making it 1 inch ,but i can not find if 3/4 inch width is correct ,most stuff i see on line says (2) 1/2 inch wood glued together to make 1 inch anybody rebuild thompson 240 that could tell me the correct width of wood for stringers, also after i tore deck off i see that the backend of boat transom and bilge area wood has been re done ,not a good job ,some wood has no fiberglass and transom was rotten along with stringers any help appreciated fortunately found marine grade plywood right up the street just ned correct width
 

Attachments

  • thumbnail 9.jpg
    thumbnail 9.jpg
    191.5 KB · Views: 2
  • 20260719_195038_OTWq.jpg
    20260719_195038_OTWq.jpg
    213.5 KB · Views: 2
  • 20260719_195041_OTWq.jpg
    20260719_195041_OTWq.jpg
    382.3 KB · Views: 2

newtoboat101

Chief Petty Officer
Joined
Jul 9, 2015
Messages
417
as i get into this project i can see that the aft end of the boat 1988 thompson 240 fisherman has been redone before shiffy job ,its all rotted out ,but i was surprised by the lack of craftmanship that this boat had ,and the lack of foam the factory put in ,and who ever re did the aft end put no foam in ,would lack of foam cause the boat to rock more than with foam,boat did have times on the big O where in certain conditions the boat would rock back and forth uncontrollably
 

Attachments

  • TRANSOM HOLES.jpg
    TRANSOM HOLES.jpg
    455.8 KB · Views: 2
  • thumbnail 10.jpg
    thumbnail 10.jpg
    200.9 KB · Views: 2

newtoboat101

Chief Petty Officer
Joined
Jul 9, 2015
Messages
417
hello so i have started getting materials together for transom rebuild and have sourced local coosa board ,now my question is thickness ,my boat transom area was rebuilt sometime ago,,they butchered the whole thing ,so thickness has to be 2-2.25 inches now my outer fiberglass skin is 1/4 ,so am i correct in saying if i go with one piece of 3/4 inch coosa across the whole back ,and 1 inch coosa slightly smaller than 3/4 inch and with my 5 plys of 1700 epoxied fiberglass cloth would put me in between 2 and 2.25 inches. IS THIS A GOOD COMBINATION?
 

Attachments

  • CLEAN UP.jpg
    CLEAN UP.jpg
    182.6 KB · Views: 1

bakerjw

Petty Officer 1st Class
Joined
Apr 3, 2013
Messages
352
Love to see the work!

Myself, I'd go with 3/4" Coosa 30 across the board if you can find it. It is more expensive but lighter and will never absorb water in case you miss something. Experience talking here which is why I am redoing a transom.

For the transom. On the inside I grind out where holes are to be filled and put a small patch on the inside. For the transom, 2 3/4" pieces of Coosa with a layer of 1708 between them will be fine. 1-5/8" is good for a transom. Once the stringers are tabbed in, you can put another smaller piece in between the stringers where the keyhole is if you wish.

I took 2 sheets of 3/4" Coosa (can use wood as well) and sandwiched them over a layer of 1708. Both Coosa or wood both need to be well soaked with resin before screwing the panels together with 1 5/8" drywall screws. I started from the inside and worked out and pushed excess resin out the edges. No air pockets. Messy but well worth it. When cured I removed the screws to provide air bleed holes for when the transom was installed.

Put thickened resin on the transom part of the hull and the new transom and then start clamping in place. No real need for 1708 between the outer skin and the new transom. The 1708 is used to cover the inside and tab the transom to the hull and stringers when they get put back in place. I mixed up a thick resin solution with a lot of cut glass and created a bed at the base of the transom. That helped keep the thick resin from oozing out the bottom.

When I put the transom in my latest boat, I started clamping it from the bottom up, air came out the bleed holes left by the screws first and then resin and I put screws back in the holes. It allowed air to bleed out which got rid of air pockets.

Once the transom is set in place, you will need multiple layers of 1708 on the transom as well as tabbed to the hull. When the stringers are finally mated to the transom, you will need additional layers of tabbing there.

Edited for clarifications.
 
Last edited:

bakerjw

Petty Officer 1st Class
Joined
Apr 3, 2013
Messages
352
1988 thompson 240 fisherman fiberglass boat rebuild transom (see pics), my question is now that i have removed everything from the transom (trim tabs ,kicker motor bracket speedo tube ,and some other hardware) do i (1) replace the transom wood and fiberglass on the inside first then fill in the holes on outside ,or (2) tape the back side and fix holes then replace transom inside or (3) put a layer of 1708 on inside of transom then apply wood and fiberglass over it then fill holes from outside ,i think all the holes in transom has me a little concerned and intimidated ,any help or suggestion appreciated .some of the holes will be reused ,kicker motor bracket will be moved slightly thank you

I covered a bit of this in my previous post. I like to seal the inside first and address the filling of holes on the outer skin later.

Joe Buskin runs a youtube channel called fishbumptv that is an outstanding resource for us DIY types.

I just put 3/4" sheets of Coosa 30 in my latest project where the outboard holes were 1/2". I used these holes and heavy internal and external bracing for clamping in the new transom in place. Once finished, I bored the holes in the Coosa out to 7/8", wrapped 1/2" bolts with teflon tape and filled the cavity with a thickened resin with lots of cut glass. When bolted up, I had a hole perpendicular to the transom and an area that will not compress. Coosa can be crushed a bit.
 

newtoboat101

Chief Petty Officer
Joined
Jul 9, 2015
Messages
417
I covered a bit of this in my previous post. I like to seal the inside first and address the filling of holes on the outer skin later.

Joe Buskin runs a youtube channel called fishbumptv that is an outstanding resource for us DIY types.

I just put 3/4" sheets of Coosa 30 in my latest project where the outboard holes were 1/2". I used these holes and heavy internal and external bracing for clamping in the new transom in place. Once finished, I bored the holes in the Coosa out to 7/8", wrapped 1/2" bolts with teflon tape and filled the cavity with a thickened resin with lots of cut glass. When bolted up, I had a hole perpendicular to the transom and an area that will not compress. Coosa can be crushed a bit.
fishbumptv is excellent tutorial also boatworks today is excellent
 
Top