1989 Specrtrum 1700 project.

Tim Wagner

Petty Officer 1st Class
Joined
Sep 7, 2003
Messages
201
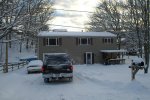
No real pictures yet, I just stuffed it in my garage and getting it dried out.
My cover is crap. Its only a couple years old but it has zero water resistance.
Ill get started with some pictures of the progress here shortly.
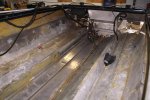
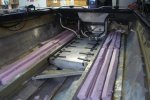
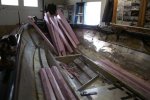
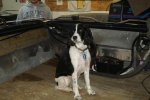
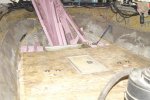
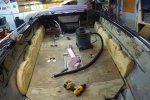
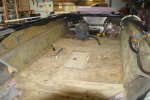
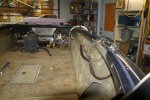
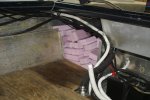
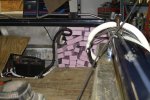
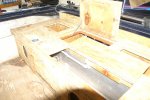
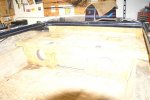
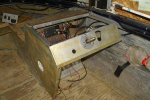
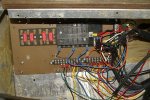
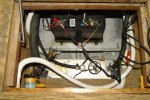
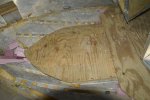
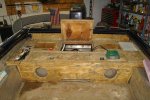
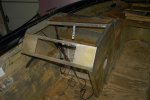
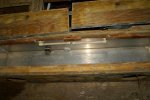
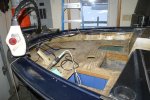
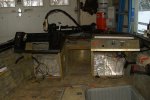
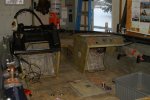
The ones I attached should give a little idea of what it looks like.
The youngster in the one picture isnt me. Thats my gals nephew.

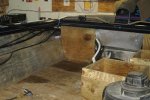
I did start removing the padded panels and stuff and pulled up some of sopping carpet.
Let it be known that I have already modified this boat. Im ripping it apart because there are about 30 leaky rivets.

What I did in the beginning was:
changed out the back to back seats and put in 2 pedestals.
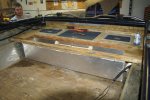
Built a casting deck across the back that has 2 storage hatches, an access hatch for the battery and bilge plus a 56 inch livewell (Im a musky fisherman) with fresh and recirculate pumps and all the associated circuitry for livewell control.
Added kicker bracket, a 10 hp merc kicker. remote shift and gas controls.
Reconfigured the dashboard gauges and added a battery gauge.
Rebuilt the front deck with new storage hatches and a new leaner seat.
Installed a 50 lb foot control
Added trim and tilt to the bow and stern
Completely rewired everything
Hummingbird LCD up front on the bow and a Lowrance 337C on the dash.
ship to shore radio.
Booming tunes with CD and 4 Rockford Fosgate Coaxial speakers.
Plus other stuff too.

Now all this is coming out, the rivets are getting sealed and repaired.
The thing is getting put back together with new carpet and going up for sale in the spring.

I bought a Starcraft Superfisherman 196. Its a 2002 with a 125 HP merc on it.
I put a 15 HP long shaft Johnson Kicker with controls on it.

I could go on for PAGES and PAGES but .........

For right now, anyone know what you can do with a boat cover.
Like maybe getting it cleaned and waterproofed.
its an Attwood cover. 175 bucks. But it lets the water through.
It fits my boat pretty good though.

More to follow ............
 

Attachments

  • 026_23A.jpg
    026_23A.jpg
    146.8 KB · Views: 0
  • Picture 002.jpg
    Picture 002.jpg
    144.4 KB · Views: 0
Last edited:

Tim Wagner

Petty Officer 1st Class
Joined
Sep 7, 2003
Messages
201
Re: 1989 Specrtrum 1700 project.

Im in the process of purchasing some rivets for this restoration project but I get to a spot for choosing a type of alloy and dont know which to get.
These are the solid type rivets that require a bucking bar and air riveting hammer tool.
the choices are 2117T4 or 1100F
I sent a request for this information to the folks that sell the rivets but I think Ill get an answer here quicker.
 

Tim Wagner

Petty Officer 1st Class
Joined
Sep 7, 2003
Messages
201
Re: 1989 Specrtrum 1700 project.

Ok, the boat is gutted to the hull and all the floatation foam is out.
Ive ordered the air hammer and rivets but ran into a couple road blocks.
The rivets in the boat are 3/16 so I ordered the next size up 1/4" Brazier head.
The air hammerk I bought came with 5 different "sets". Of course, the one I need for the rivets I bought isnt one of them.
One of the 5 that came with it will fit the heads of the ones that will get rebucked.
But for now, I had to order the set for the rivets I bought.
Another thing that should be noted.
Tthe air hammer i bought is known as a 3X.
You'll see others. 4X, 5X, 7X and 9X
The higher the number the longer the guns "barrel" is or the longer the stroke.
This little tidbit refers to the max size rivet they are recommended for.
The 3X is for max 3/16 dia. rivets.
The 4X is for max 1/4 dia. rivets.
Im hoping that this brand spankin new 3X gun will do the job on the 1/4 inchers I bought.
If not, Im into more money.
I dont need to do too many. Maybe 50-60.
This part of the project is taking forever to get under way but I dont want to start hacking away with the wrong stuff cause it will be all for nothing.

There have been some statements on "rebucking" rivets that leak.
So, just rebuck them and its a done deal or do i want to try to smear some schmootz on them to help with waterproofing.
Im not taking out the ribs. (this thing has "parallel plate" construction).
Meaning, what would be stringers dont go side to side. they go front to back.
At the transom, they are welded into the transom and motor well.
There is old bilge water residue and what-not all through the ribs internals.
I dont think any 5300 or Gluvit will stick right.
Experienced commets on this would be cool.

Il start posting pictures pretty soon.
I hope to start slamming rivets this weekend.
 

Tim Wagner

Petty Officer 1st Class
Joined
Sep 7, 2003
Messages
201
Re: 1989 Specrtrum 1700 project.

The rivet work is just about done.
I need to fill it with water tonight and be sure there are no leaks.
Here's the gutted hull
 

Attachments

  • PICT7440.jpg
    PICT7440.jpg
    147 KB · Views: 1
  • PICT7441.jpg
    PICT7441.jpg
    145 KB · Views: 1

ezmobee

Supreme Mariner
Joined
Mar 26, 2007
Messages
23,767
Re: 1989 Specrtrum 1700 project.

Looks good. While you have it stripped to the hull, I'd definitely take the opportunity to coat all the rivets and seams with Gluvit. A wire wheel should clean them up pretty well.
 

proshadetree

Lieutenant Commander
Joined
Jul 19, 2008
Messages
1,887
Re: 1989 Specrtrum 1700 project.

Good looking boat. I wish I could help with the rivets or the gluvit issues but I am a bondo boater. Keep us up on your progress.
 

Tim Wagner

Petty Officer 1st Class
Joined
Sep 7, 2003
Messages
201
Re: 1989 Specrtrum 1700 project.

At this point, we replaced or rebucked every rivet on the boat.
I filled it with water last night (up past the highest row of rivets) and of course, i found about 8 or 10 that I either missed altogether or just need replaced.
Thats not bad beings there were about 400 to do.
We were actually putting a yellow dot from a paint marker on the ones we did.
somehow we missed them.
It was a little tough because you have to keep moving the boat on trailer to be sure you have access to all the rivets in the section you are doing.
There seemed to always be a couple that the axle carriage blocked.
Then you had to complete what you were doing and then get the boat cocked on the trailer so you could get the ones you missed.
Im being so meticulous on this first step. I dont want it to be for nothing and have it be wasted time.
Plus whomever I sell it to, I dont want them getting hosed.
 

Tim Wagner

Petty Officer 1st Class
Joined
Sep 7, 2003
Messages
201
Re: 1989 Specrtrum 1700 project.

Starting the reassemble stage.
not moving too fast and behind schedule.
Got a helper for the floor boards.
Anyone know a good way to cut that foam that dont make too much of a mess?
I used long sharp hunting knife to get this far but some of it needs "trimmed" so the floor lays flat.
Maybe a nice serrated kitchen knife for like cutting bread???
Gonna try that tonight. I have a sharpener for serrated blades.
At this point, I only knicked my thumb but its a bit dangerous trying to finesse a nice trim on that stuff without having the knife in a precarious direction.
Here we are now.
Bilge pump/plumbing in.
Livewell pump/plumbing in.
Battery tray in.
Fuel tank in and plumbed.
Some flotation hacked in but needs hacked further if I can find a better way to cut it.
Floor boards going in tonight
Gotta get moving.
My goal is to get the thing seaworthy by the first week in March.
 

Attachments

  • PICT7494.jpg
    PICT7494.jpg
    140.9 KB · Views: 0
  • PICT7495.jpg
    PICT7495.jpg
    141.7 KB · Views: 0

81 beachcomber

Petty Officer 2nd Class
Joined
Mar 20, 2009
Messages
187
Re: 1989 Specrtrum 1700 project.

Good to see you're doing stuff properly for the next owner.
 

Tim Wagner

Petty Officer 1st Class
Joined
Sep 7, 2003
Messages
201
Re: 1989 Specrtrum 1700 project.

Moving onward!!
I now have 2 of the floor sections in along with the flotation neatly cut and and packed underneath.
Notice the bolt heads there for the seat mounts.
I put them clawed inserts in there underneath so I can use screws on the mounts instead of lag bolts or screws.
They keep pulling out.
The two in the front are 5/16-18 and the other 4 behind are 1/4-20.
Them seats are not coming loose ever again!!
The dog kept on bugging me to get in so there she is!!
Notice the Steelers Collar.
Bummer on the Superbowl but a great season at any rate.
Tonight will be the last section of floor, fit the floation and the side pieces. (the foam that was behind them I kept so that part will go very fast)
Slowly but surely my pool table room will be emptying out.
You cant even move in there with all the boat parts.
 

Attachments

  • PICT7502.jpg
    PICT7502.jpg
    139.7 KB · Views: 0
  • PICT7500.jpg
    PICT7500.jpg
    142.7 KB · Views: 0
  • PICT7499.jpg
    PICT7499.jpg
    147.2 KB · Views: 0

Tim Wagner

Petty Officer 1st Class
Joined
Sep 7, 2003
Messages
201
Re: 1989 Specrtrum 1700 project.

Last nights progress.
Theres both sides reused flotation installed.
Then both side panels in but just sitting there not fastened.
On the port side, the hose sticking out of there is the livewell overflow and the wires are rear speakers.
the last picture is the port side panel completly installed and all the carpet fuzzies and glue scraped off.
My arms couldnt handle doing the other side, plus i had a few beers and well, you know.
 

Attachments

  • PICT7504.jpg
    PICT7504.jpg
    145.5 KB · Views: 0
  • PICT7506.jpg
    PICT7506.jpg
    145.8 KB · Views: 0
  • PICT7505.jpg
    PICT7505.jpg
    144.4 KB · Views: 0

Desertsky

Seaman
Joined
Aug 25, 2010
Messages
73
Re: 1989 Specrtrum 1700 project.

Just for info (too late for you now, I guess). You can easily cut foam by making a cutting bow from some scrap pieces of wood or conduit and a few feet of stainless steel mono leader wire. If you use conduit, put some wood plugs in the end and mount the wire to that. A 12v battery charger will get the wire plenty hot to carve the foam with. send me a PM if you want specifics on this.
 

Tim Wagner

Petty Officer 1st Class
Joined
Sep 7, 2003
Messages
201
Re: 1989 Specrtrum 1700 project.

You know, I pondered rigging something like this with my never ending Macgyver skills but Im working in the garage. as you can see its tight.
I really wasnt up for breathing them fumes. Let alone stinking up the house with it too.
Thanks for the suggestion though.
I wound up switching my tactics to a serrated bread knife.
I sharpened up evey notch on this thing and it actually cuts the stuff quite well.
You just need to be really careful not to get your body in line with your cutting.
Its a teeny bit dangerous.
 

Tim Wagner

Petty Officer 1st Class
Joined
Sep 7, 2003
Messages
201
Re: 1989 Specrtrum 1700 project.

Here's last nights progress.
I'm a little disappointed with my pictures here, the beers were flowing.
I got the other side panel in and all the old carpet fuzz and glue scraped off.
Both of the rear bays that are not accessible with the rear deck put together were packed with flotation and covered.
The rear deck is stitting in place but not attached.
The goal tonight is to have the rear deck completely in and the remaining carpet residue scraped off.
Its 3 hatches need removed and stripped as well
The livewell needs its plumbing completed and both of its lids stripped of old carpet residue
 

Attachments

  • PICT7509.jpg
    PICT7509.jpg
    144.2 KB · Views: 0
  • PICT7510.jpg
    PICT7510.jpg
    141.3 KB · Views: 0
  • PICT7512.jpg
    PICT7512.jpg
    143.8 KB · Views: 0
  • PICT7511.jpg
    PICT7511.jpg
    144.4 KB · Views: 0
  • PICT7507.jpg
    PICT7507.jpg
    141.1 KB · Views: 0

Tim Wagner

Petty Officer 1st Class
Joined
Sep 7, 2003
Messages
201
Re: 1989 Specrtrum 1700 project.

Got the rear deck and livewell installed.
Removed all the old carpet.
Livewell plumbing isnt connected nor is the recirculating pump wiring connected.
These pictures are overexposed cause I was taking picture outside and didnt make the necessary changes.
Here they are.
 

Attachments

  • PICT7517.jpg
    PICT7517.jpg
    141.6 KB · Views: 0
  • PICT7516.jpg
    PICT7516.jpg
    139.7 KB · Views: 0

Tim Wagner

Petty Officer 1st Class
Joined
Sep 7, 2003
Messages
201
Re: 1989 Specrtrum 1700 project.

Weekend Update.
The back deck is about 99% in. I need a couple hose clamps and a small piece of hose to finish that.
The on board charger isnt mounted yet either. I guess there is no reason not to slap a couple screws in that and bundle the wires in.
The front deck structure is in but a little screwed up. I wasnt paying attention (beer) when I was screwing down all those cross pieces and got the spacing for the front hatch a too short and the final cross pieces that are sitting loose dont fit. Some small simple adjustments will solve that. No problem. The the front deck can go in.
Both consoles are completely fastened in.
The fuse panel is in and a good bit of the wiring is connected. That should all clean up when rebundled. So a couple "hold-downs" and about 400 tie wraps should take care of that.
I did run into a problem with the passenger seat mount.
I used these clawed threaded inserts underneath. That completely dictates exactly where they mount.
Both mounts were in before with no problems but this time I guess I have the floor slightly off from where it originally was and it hits on one of the parallel ribs.
I think Ill need to shim that plate up with a piece of 3/4 to get the part that goes through the floor to clear the rib. It will work. Or Ill need to go to a different style mounting plate.
Dont know yet.
 

Attachments

  • PICT7529.jpg
    PICT7529.jpg
    150.4 KB · Views: 0
  • PICT7530.jpg
    PICT7530.jpg
    153.3 KB · Views: 0
  • PICT7523.jpg
    PICT7523.jpg
    151.6 KB · Views: 0
  • PICT7527.jpg
    PICT7527.jpg
    147.3 KB · Views: 0
  • PICT7518.jpg
    PICT7518.jpg
    146.4 KB · Views: 0

Tim Wagner

Petty Officer 1st Class
Joined
Sep 7, 2003
Messages
201
Re: 1989 Specrtrum 1700 project.

More pics
 

Attachments

  • PICT7525.jpg
    PICT7525.jpg
    149.6 KB · Views: 0
  • PICT7528.jpg
    PICT7528.jpg
    146.2 KB · Views: 0
  • PICT7524.jpg
    PICT7524.jpg
    144.7 KB · Views: 0

Tim Wagner

Petty Officer 1st Class
Joined
Sep 7, 2003
Messages
201
Re: 1989 Specrtrum 1700 project.

First Id like to say, I wanna drive to Punxy and deliver a hollow point at 3500 fps to that stupid groundhog!!!!
No shadow!! Phooey!
No work last night. There were other priorities!!!!
On the left of that one picture, that big blue monster is my starcraft all tucked away.
 

Attachments

  • PICT7537.jpg
    PICT7537.jpg
    151.2 KB · Views: 0
  • PICT7534.jpg
    PICT7534.jpg
    145.8 KB · Views: 0

Tim Wagner

Petty Officer 1st Class
Joined
Sep 7, 2003
Messages
201
Re: 1989 Specrtrum 1700 project.

The front deck is complete.
When I started this, I bought 2 4x8 sheets of R15 foam.
I didnt think I'd be able to fit that all in there but once I got done packing the open spaces in the bow, i have just a couple chunks left. Believe me, i packed that stuff everywhere i could. I cant get anymore in there.
I cleaned up some wiring on the passenger console and have it just sitting on there.
Im taking a break tonight.
Ill do some clean up, put some tools away, hit it with my brandy new shop vac (my other one died. I had that thing about 17 years!) but thats about it.
Maybe start a punch list.
Im actually starting to think about carpet.
 

Attachments

  • PICT7540.jpg
    PICT7540.jpg
    147.3 KB · Views: 0
  • PICT7539.jpg
    PICT7539.jpg
    143.6 KB · Views: 0
  • PICT7541.jpg
    PICT7541.jpg
    142.1 KB · Views: 0

ezmobee

Supreme Mariner
Joined
Mar 26, 2007
Messages
23,767
Re: 1989 Specrtrum 1700 project.

Construction looks great. I'd vinyl as much as I could and carpet maybe just the casting decks. It'd look like a new one.
 
Top