1990 4.3 Century 2000 - Floor,Transom,Stringer,Upholstery Project

Chris51280

Ensign
Joined
Jan 24, 2018
Messages
932
Thanks Mike. Will do.
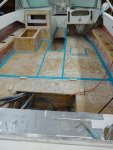
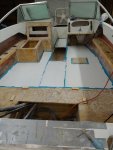
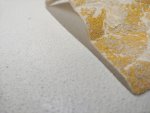
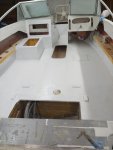
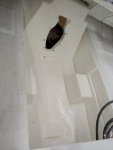
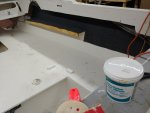
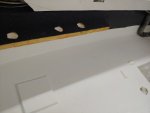
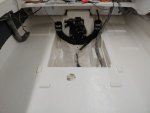
Not much done last night. Just sanding the deck smooth. It is still not perfect but you could spend hours on hours fairing and sanding. The gelcoat will take some out and some will get the sand anti slip gelcoat. I will be ok with the end result.
 

steve_h7

Chief Petty Officer
Joined
Sep 16, 2018
Messages
401
What thickness of plywood did you use for the seat supports and the cup holder rail? Do you use
ACX? I've got to get one of those nail guns too. :)
 

Chris51280

Ensign
Joined
Jan 24, 2018
Messages
932
Hi Steve, 1/2" BCX. You can use ACX of course. Was not concerned about surface finish since I would be sanding or painting the visible areas.
The nail gun was a 16g with 1-3/4 nails. I did not find stainless ones and just used regular. Have to watch where you shoot them. Some came out on the sides and i moved them back and forth until they broke off. brakes right at the edge. better than cutting them. I also glued them together with wood glue.
Holes were patched with wood filler or resin and csm. The other wood that will not be painted will get old timers formula and eventually carpet over.
The sundeck was made out of 5/8 BCX and it is very solid. With additional supports on the side and eventually in the middle left and right of the engine which also act as dividers, it will be very solid. I used old timers on the sun deck as well.
What I figured is that the old original seat bases were not to badly rotted since they are the ones that dry out again. I dont think the wood was treated just painted white. So whatever I have will outlast again everything originally.
 

steve_h7

Chief Petty Officer
Joined
Sep 16, 2018
Messages
401
Perfect, thanks for that... I never had a compressor so ordered a little one yesterday with a brad nailer. :thumb:
 

Chris51280

Ensign
Joined
Jan 24, 2018
Messages
932
yup. nailers dont need much air. a little 3 gallon air compressor from HFT will do.
I used also 2x2s on the sundeck to reinforce the butted joints.
 

Chris51280

Ensign
Joined
Jan 24, 2018
Messages
932
Could not get much done this last couple of days. Wife is sick and kids have needs. So thats life.
started to paint the floor with sand mixed in. Will see tomorrow how it will come out. Couple more layers for sure.
moved my gauges to the new front.
 

Attachments

  • photo314343.jpg
    photo314343.jpg
    238.5 KB · Views: 5
  • photo314344.jpg
    photo314344.jpg
    241.1 KB · Views: 5
  • photo314345.jpg
    photo314345.jpg
    215.7 KB · Views: 5

Chris51280

Ensign
Joined
Jan 24, 2018
Messages
932
Painted the boat with gelcoat today. I will put some halyard in it tomorrow so it isn't so bright. The yellow sandpaper is a 60 grit as a comparison. I will put some more layers over it yo thicken the areas that are uneven to sand smooth later. It won't be perfect but better and nicer than carpet in my opinion. The sides will get carpet, thays why I haven't painted it to the top.
 

Attachments

  • photo314441.jpg
    photo314441.jpg
    166.7 KB · Views: 4
  • photo314442.jpg
    photo314442.jpg
    172.8 KB · Views: 4

Chris51280

Ensign
Joined
Jan 24, 2018
Messages
932
Painted the bilge twice and the front section again with pigmented gelcoat. Can only paint half since I need to stand somewhere too. The gelcoat kicks very fast. I would say maybe 10minutes. Another coat or two tomorrow with a last one with wax added. I try to get it as thick as possible. I have another 1.5 gallon. Might as well use it
 

Attachments

  • photo314540.jpg
    photo314540.jpg
    150.3 KB · Views: 3

steve_h7

Chief Petty Officer
Joined
Sep 16, 2018
Messages
401
Painted the bilge twice and the front section again with pigmented gelcoat. Can only paint half since I need to stand somewhere too. The gelcoat kicks very fast. I would say maybe 10minutes. Another coat or two tomorrow with a last one with wax added. I try to get it as thick as possible. I have another 1.5 gallon. Might as well use it

I was surprised by the same thing. My first batch I mixed up about 16oz and was working away and realized after using about 1/2 of it that it was setting up in the bottom of the cup. :eek:
All that sanding and prep work looks nice. :thumb:
 

Chris51280

Ensign
Joined
Jan 24, 2018
Messages
932
Thanks Steve. You won't get super smooth like factory with a mold but I still prefer this over carpet. The roller leaves a fairly rough surface finish too. The gel sets in the bottom of the cup really quick. I mix about 250ml each time now with a new cup. It dries out until the next day and breaks out nice and clean to start over. There are some spots that aren't as nice but again, I could be sanding here for a year. Most spots you start only to see when you apply paint to it. and then you will have to wait until the last coat with wax to harden out so you can sand easier and hope not to break through again
 

Chris51280

Ensign
Joined
Jan 24, 2018
Messages
932
Installed the trandom assembly and the drain plug. Plenty of 3m 4000uv to make sure it is sealed. Torqued to 25lbf
 

Attachments

  • photo314650.jpg
    photo314650.jpg
    116.7 KB · Views: 2
  • photo314651.jpg
    photo314651.jpg
    178.9 KB · Views: 2

Chris51280

Ensign
Joined
Jan 24, 2018
Messages
932
Another mistake I made was that my battery box is in the way of the steering ram. :mad-new::facepalm::rolleyes:
guess I will make another one that is not so nice looking next to it or add on to this one.
 

Chris51280

Ensign
Joined
Jan 24, 2018
Messages
932
The rear engine mount has a fiber washer, a spring, a sleeve and a metal washer. I forgot where what goes. I know the fiber washer goes ontop of the transom assembly mount, then I think the spring goes inside the hole of the transom assembly. then the engine mount with the sleeve and the washer on top
 

Chris51280

Ensign
Joined
Jan 24, 2018
Messages
932
New gimbal bearing and the y pipe installed. I put some aviation gasket around it to be sure it will seal. Ordered new trim sender since the old ones could not be salvaged. Painted the boat one last time with the wax additive to hopefully seal the gelcoat. The bench got old timers applied and carpet added
 

Attachments

  • photo314837.jpg
    photo314837.jpg
    106.7 KB · Views: 1
  • photo314838.jpg
    photo314838.jpg
    161.8 KB · Views: 1
Top