1992 Doral Monticello 270 MC

Brian WV

Seaman
Joined
Mar 3, 2012
Messages
71
Hello all

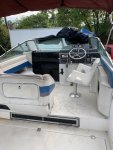
I decided to take on a project thats a bit larger than my previous 23 foot SunRunner that I restored and have owned for the past 8 years or so. I always browse facebook marketplace and craigslist and stumbled upon this listing for a Doral Monticello that caught my eye. The price was reasonable so I checked with the wife and got the nod to go take a peek. What I found was a very oxidized and neglected boat. I was actually to the point of walking away from the boat but the price kept dropping. It got to a point where the price was so low that it was actually worth the risk of jumping in. So the next day I took off to grab it and made it home without incident during rush hour traffic in the DFW metroplex. Once I squeezed it behind my gate I turned in for the night and went out the next day to get a little closer look at some things. I guess lets do a list of good and bad....

The Good
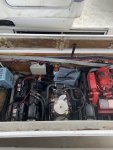
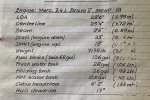
Fresh 454 sitting in the boat
New generator with 5 hours on it
Heat and AC working down below
other systems such as trim pumps/blower/bilge work (which really arent big things but hey I'll take it)

The Bad
VERY oxidized. I think I'll be wet sanding and buffing all summer long
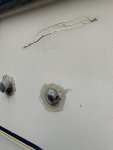
Chips, chunks, and gouges in multiple areas that will need addressed
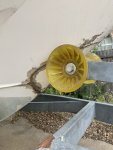
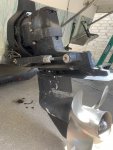
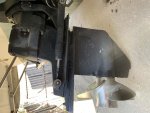
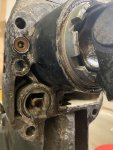
The outdrive looks like its seen better days
Needs some vinyl work
Cockpit area will need freshened up
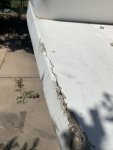
Swim deck will need pulled and redone. A lot of cracks and other damage due to previous owner towing jet skis with it

Overall just very neglected.

The Plan
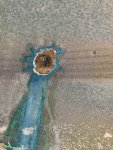
I am going to have to address one particular gouge below the water line right away
I noticed silicone along the drive where it meets the transom so I think I'm going to have to take a good look at that.
The drive in general looks....not great? I'll probably pull the lower unit and take it for skeg repair

While on the topic of the drive, I think I have a Bravo II? Seems fairly difficult to nail these outdrives down from Mercruiser. Not sure which is harder to identify Mercruisers or Volvo.

If anyone has can help verify the drive I'd appreciate any input. I even put the serial number and kind of got lost in the weeds trying to verify that it was for sure a Bravo 2. SN started with OD634..


Anyhow to the pics!

And why was I browsing for another boat project? Well my SunRunner mayyyyy have a cracked block..
 

Attachments

  • photo330905.jpg
    photo330905.jpg
    1.9 MB · Views: 1
  • photo330906.jpg
    photo330906.jpg
    1.9 MB · Views: 1
  • photo331115.jpg
    photo331115.jpg
    1.9 MB · Views: 1
  • photo331873.jpg
    photo331873.jpg
    2.1 MB · Views: 1
  • photo331874.jpg
    photo331874.jpg
    1.9 MB · Views: 1
  • photo331875.jpg
    photo331875.jpg
    2 MB · Views: 1
  • photo331876.jpg
    photo331876.jpg
    1.6 MB · Views: 1
  • photo331877.jpg
    photo331877.jpg
    2 MB · Views: 1

Bondo

Moderator
Staff member
Joined
Apr 17, 2002
Messages
71,079
I even put the serial number and kind of got lost in the weeds trying to verify that it was for sure a Bravo 2.

Ayuh,...... Looks like a B1,.......

The prop on a B2 is much, Much larger,.....
 

Brian WV

Seaman
Joined
Mar 3, 2012
Messages
71
Ayuh,...... Looks like a B1,.......

The prop on a B2 is much, Much larger,.....

What led me away from it being a B1 initially was the skeg being vertical rather than swept as it is on the B1. The boats original owners were very thorough about keeping all of the paperwork for the systems on the boat.. attached I found this page stating it was a B2 along with some other general stats of the boat. I just went out and measured the prop its roughly 18 inches in diameter.

I am going to take the lower unit to a prop/repair shop so perhaps they can tell from the lower unit?


Please excuse my array of attachments I'm still trying to figure out how ti attach without having to click on the pic to enlarge....
 

Attachments

  • photo331899.jpg
    photo331899.jpg
    2.1 MB · Views: 0
  • IMG_4811.jpg
    IMG_4811.jpg
    2 MB · Views: 0
Last edited:

alldodge

Moderator
Staff member
Joined
Mar 8, 2009
Messages
42,535
Being 18 inches, that's a B2
Pics can be deceiving
 

Brian WV

Seaman
Joined
Mar 3, 2012
Messages
71
Not too much going on with the boat lately as its 100 degrees and humid down in Texas but I did manage to order a few things that I'll need sooner than later. I also did a test area on the boat to see what kind of shine I could get out of it.

I ordered a new starting battery and went with Lifeline GPL-2700T. I saw somewhere alldodge recommended them and with a good bit of research decided to give that one a go. Ill gather their GPL-27T house batts closer to launch time.

I also ordered and received and new 6x48 sliding taylormade window that I'll be throwing in the boat to replace the old leaking 6x48 that is on it now. Anyone have a recommendation on sealant for it? I am leaning towards 3m 4200 for now

IMG_5257 2.jpg

Test spot... Also found new blower vent louvers..thx ebay
IMG_5205 2.jpg
I stripped the striping with a 3m rubber wheel then wet sanded 1000,1500,2000 and buffed with a 3M medium compound. Got a little shine out of it

IMG_5207 2.jpg

I am in the process of now gathering all of the thru hull fitting sizes along with other hardware that needs replaced and making a run to west marine for replacements. Goal is labor day to be in the water.
 

alldodge

Moderator
Staff member
Joined
Mar 8, 2009
Messages
42,535
I like lifeline, they lasted longer then other brands. Right now I'm trying Duracell AGM and comparing time
 

Brian WV

Seaman
Joined
Mar 3, 2012
Messages
71
Well last night I went out to start the process of pulling the drive since I need to take the lower unit to a shop for a skeg repair. The prop nut seemed to be stuck so I threw some 50/50 acetone/atf together and finally got it off. I noticed that the speedometer tube was detached and seemed to be broken at the fitting so I'll have to research that. I drained the gear oil and there was some water in the oil, grreatttt. When I removed the drain screw and upper screw for the vent I did not see any washer so I'm not sure if thats the culprit or not. It was a solid 100 degrees out so I only got that far last night. Heres some pics of the findings..
IMG_5305.jpg
I also found some gear oil behind the prop so I am not sure it its just the missing washers that caused the water intrusion. Thoughts?
IMG_5303.jpg

Thoughts about the overall condition of the drive? I see a good bit of corrosion on the transom plate as well in general all over the drive. Think I can fill pitting with marine weld on the drive and repaint?

IMG_5306.jpg

Also the manual states to move the drive in the full down position to remove. When I that i noticed the drive is pointed further down than parallel. Should it be that way when I pull the drive? Or should I move the drive up enough to be exactly level?

IMG_5310.jpg


As always, appreciate the input
Brian
 

alldodge

Moderator
Staff member
Joined
Mar 8, 2009
Messages
42,535
I usually go full down then bump up because I never leave the drive full up or down without going the other direct just a bump. Also always leave the drive full or almost full down

Taking the drive off is just easier mostly down and even full.
The drive should be tucked up under the boat a tad when full down because that helps is take off, its designed that way

Going to need to pressure test the drive to figure out where its leaking. A missing washer can be the issue and could also be other places. Find this out before repairing the skeg just so you know what might be needed. Then if easy enough fix, get the repair

The pitting isn't to bad IMO, and a good cleaning, wire brush, primer and paint and go again
 

Brian WV

Seaman
Joined
Mar 3, 2012
Messages
71
Well I got the drive off the the boat. One thing I immediately noticed was there was a good amount of drive oil in the U joint bellow...doest seem good.....

IMG_5321.jpg

Took a look at the drive surface area around the u-joint and noticed the seals seemed bad.. I can take more pics.

IMG_5324.jpg

IMG_5325.jpg

Is there a common reason as to why there would be so much drive oil in the bellow? Next step? I am going to pressure test the drive sometime early next week. Heading out of town for the wknd.

As always appreciate the input
Brian
 

Attachments

  • IMG_5324.jpg
    IMG_5324.jpg
    2 MB · Views: 0

alldodge

Moderator
Staff member
Joined
Mar 8, 2009
Messages
42,535
Lube in the bellows is the yoke seal
The water intake area looks like its been leaking for a while
 

Brian WV

Seaman
Joined
Mar 3, 2012
Messages
71
looks like i'll be doing some weekend research on what it takes to do that job and order some parts. Thanks I appreciate you taking all the research and guesswork out of the cause for the leak
 

Brian WV

Seaman
Joined
Mar 3, 2012
Messages
71
Well I did pressure test today and it failed. Went to 10 PSI and lost 1 PSI every 10 min. Found some air coming out around the prop shaft with the help of some soapy water. With the yoke seal leaking and now the lower unit leaking I am trying figure out if I can tackle this job. Looks like a decent amount of specialty tools and a whole lot of rings/seals that I havent played with before

IMG_5450.jpg
 

AShipShow

Lieutenant Commander
Joined
Jul 8, 2016
Messages
1,803
My guess is it's going to be a bear to remove the bearing carrier with the amount of corrosion... not positive on bravo drives, but assuming it's similar to alpha drives and alot of times it has to be carefully cut out in pieces... you might get lucky tho with some heat and penetrating oil...

You will definitely need the right tools tho... you can buy them tho for what you will pay a shop in labor to do the job
 

Brian WV

Seaman
Joined
Mar 3, 2012
Messages
71
My guess is it's going to be a bear to remove the bearing carrier with the amount of corrosion... not positive on bravo drives, but assuming it's similar to alpha drives and alot of times it has to be carefully cut out in pieces... you might get lucky tho with some heat and penetrating oil...

You will definitely need the right tools tho... you can buy them tho for what you will pay a shop in labor to do the job

I agree about having an issue removing the bearing carrier. I have a call in to a local shop to see if they will reseal it pending they have all the tools for a bravo 2. The corrosion mixed in with me never tearing into an outdrive has me a little apprehensive to do it myself. I did just pull a volvo duoprop 290a off of my other boat that I may try to dive into (cracked block).

With the Doral Ive been just testing areas to to see what it will take to get the shine id like out of it. Was hoping to do a 2000 wetsand then medium compound etc but looks like I need to go a bit deeper on the wetsanding. To be continued..
 

Brian WV

Seaman
Joined
Mar 3, 2012
Messages
71
thumbnail_IMG_5488.jpg

Finally got the volvo outdrive into the garage. Will more than likely go through it in the fall. The search continues for a shop to fix my leaky bravo II
 

Brian WV

Seaman
Joined
Mar 3, 2012
Messages
71
Well, found a shop that agreed to re seal the drive only for him to not show up when I was told to drop off the drive. What a waste of my morning. I think I'm just going to purchase the tools and try to fumble my way through this myself. Be ready for questions!
 

alldodge

Moderator
Staff member
Joined
Mar 8, 2009
Messages
42,535
Start another thread in the Merc section for the drive to get more eyes on it. I'll look for it
 
Top