1993 Chaparral Gemini 190: Chronicles of a New Boat Owner (Deck Rebuild) [SPLASHED June 2018]

bpounds1991

Petty Officer 1st Class
Joined
Nov 3, 2017
Messages
321
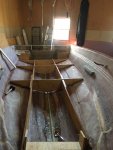
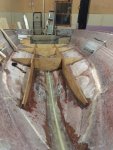
Honestly I just didn’t want to go back outside at 2am lol. With temperatures so up and down at the moment I’ll be getting up early tomorrow to turn the heaters on, I can’t be sitting around this long with so much work to do. The plan tomorrow is to add another layer (or two) to the transom, add another layer to the hull backbpiece as well as install the opposite side hull side piece and ladder support. Within 3 weeks I’m planning on installing the deck so cold weather or not, we’re moving right along lol.
 

kcassells

Fleet Admiral
Joined
Oct 16, 2012
Messages
8,738
With all that work and stress...take a much needed 2 hr sleep/break!:)
Lookin good!
 

bpounds1991

Petty Officer 1st Class
Joined
Nov 3, 2017
Messages
321
Checked a few things off the list this morning. Transom received two layers of 2215, both went on pretty smooth but the ol' air bubbles started giving me some problems. Ladder support and hull backing piece were both PB'd in by my wife, who has now been promoted to Senior Chief Petty peanut butter spreader after how well she did lol. All in all about 60-70oz of resin used between the PB and transom. Another annoyance I ran into were the slightly frayed edges of the fiberglass, they just refused to lay down no matter how much resin I threw at it. IMG_2918.JPGIMG_2917.JPGIMG_2916.JPG
 

bpounds1991

Petty Officer 1st Class
Joined
Nov 3, 2017
Messages
321
This morning I got out and started the stringer/bulkhead bedding. For some reason some of the bulkheads had raised up just high enough that I didn't feel comfortable using PL, so I did the entire bilge area, aft gas compartment, and the outside of the gas compartment. I took a sheet of ply after and weighted it down with cinder blocks to let that even out in the PL. Gonna give that a few days to cure, then off to finish bedding in PB. IMG_2923.JPG
 

eggs712

Petty Officer 1st Class
Joined
May 8, 2012
Messages
354
I've been lurking... You're moving really fast and doing a nice job :thumb:
 

bpounds1991

Petty Officer 1st Class
Joined
Nov 3, 2017
Messages
321
Thanks eggs712 ! This is the part where I'm actually trying to slow the pace down a little bit lol, although I'm planning for 2 weekends from now to have the deck ready for install. The side to side 1/4"-1/2" difference really bugs me as far as the bulkheads go, but I used a 1" block level and it's exactly 1" below the deck line across. The 1" was to account for the foam adhesive strips to protect the hull from the wood, fiberglass, and 1/2" of decking that'll be going on top of it. If it's off by 1/4" across the entire boat, I think I can live with that lol. Gonna let this sit a few days while I get the fuel lines, bilge pump, and a few other odds and ends ordered.

If it warms up this weekend I'll glass the two pieces of wood I installed yesterday, but as far as the transom goes I think that's finished. It was tabbed with one layer of 2215 and covered with 2 layers of 2215 as well for a total of... 66oz cloth/4.5oz CSM
 

boedekerj

Seaman
Joined
Jul 24, 2017
Messages
71
Awesome project! Just food for thought on the "Fraying" and other pitfalls I fell into during glassing; For the first few weeks that I was glassing, anytime I found a layup that was "dry", or under poly'd, I would grind down and either re-lay, or PB, then overlay. What I started doing, with some success, was injecting catalyzed resin into unintentional voids. What I did: I went to my local Farm and Fleet and bought some livestock syringes. So, when I came across dry laminates, I would drill a small hole down into that pocket, then injected the resin into the dry spot. It worked very well. Lessons learned: 1. Don't over drill for depth. 2. MUST drill top-down, as the resin will escape quite quickly. Anyway, your project looks fantastic! Good luck!
 
Last edited:

bpounds1991

Petty Officer 1st Class
Joined
Nov 3, 2017
Messages
321
Thanks for the tips boedekerj , I've been doing grinding on the "less than successful" areas and on the spots where air bubbles popped up. I ended up just grinding them out to fill them with PB. Luckily when the transom dried it didn't look as bad as initially thought.
 
Last edited:

mickyryan

Rear Admiral
Joined
Apr 18, 2016
Messages
4,216
air bubbles suck .... it happens seems no matter how many times i roll with a bubble buster, once it starts to see it happens ... lol
 

bpounds1991

Petty Officer 1st Class
Joined
Nov 3, 2017
Messages
321
Had to turn the heaters on and wait a few hours before starting up today. Got about 95% of the left side filleted, and I'm gonna let that kick off for a bit before going back to do the other side later. I also need to do the insides but I figured start with one outside, then the other, then work my way back on the inside so I don't get cornered lol. Overall I used 72oz of PB just for this side :faint2:. Weapons of choice were a 3" putty knife and "not my wife's" smaller kitchen spoon.
Click image for larger version  Name:	IMG_2933.JPG Views:	1 Size:	132.8 KB ID:	10543107Click image for larger version  Name:	IMG_2934.JPG Views:	1 Size:	141.4 KB ID:	10543108Click image for larger version  Name:	IMG_2932.JPG Views:	1 Size:	133.8 KB ID:	10543109Click image for larger version  Name:	IMG_2931.JPG Views:	1 Size:	131.7 KB ID:	10543110Click image for larger version  Name:	IMG_2930.JPG Views:	1 Size:	145.1 KB ID:	10543111Click image for larger version  Name:	IMG_2935.JPG Views:	1 Size:	139.4 KB ID:	10543112
 

bpounds1991

Petty Officer 1st Class
Joined
Nov 3, 2017
Messages
321
Outsides of the wood all finished up. Went out and picked up a ball valve for the bilge area, hadn't decided if I'm planning on doing anymore tonight or not it's still up for debate lol.

IMG_2936.JPG
 

Attachments

  • IMG_2936.JPG
    IMG_2936.JPG
    978.7 KB · Views: 0

bpounds1991

Petty Officer 1st Class
Joined
Nov 3, 2017
Messages
321
Ski locker compartment finished, and so are my knees lol. First 5 gallon bucket is also finished, and I think I may need to order some more chopped fibers ASAP.
 

Attachments

  • IMG_2938.JPG
    IMG_2938.JPG
    126.4 KB · Views: 1

JASinIL2006

Vice Admiral
Joined
Feb 10, 2012
Messages
5,713
One thing I found helpfl when doing fillets: after smoothing out the PB with amspoon, brush it lightly with a chip brush dipped in catalyzed resin. It gives you a super smooth surface with no craggies to cause problems when you tape over the joints.

Looking good!
 

bpounds1991

Petty Officer 1st Class
Joined
Nov 3, 2017
Messages
321
I'll definitely give that a try when it warms up a little bit, it's still hard to find consistent time to glass at the moment with the weather so inconsistent. I had my small putty knife that I was lightly taking over the fillets after I used the spoon, it seemed to be working "ok" lol.
 

bpounds1991

Petty Officer 1st Class
Joined
Nov 3, 2017
Messages
321
Thanks Eric! I wanted to get out this morning and start tabbing, but unfortunately there's just no way even with 2 heaters to warm the garage up that quickly before work. Either way PBing the stringers and bulkheads is completely finished, and the ball valve is installed on the PVC. The 1 1/2" hose came in as well for the fuel tank, waiting on the 3/8" hose, aerator, and bilge pump to come in sometime early next week. IMG_2949.JPG
 

mickyryan

Rear Admiral
Joined
Apr 18, 2016
Messages
4,216
i see what-ya did with the pvc down the middle but are you going to have drains for the other areas or ? it seems if the boat ever sunk or anything , filled with water these boxes would never have a place to drain?
 

bpounds1991

Petty Officer 1st Class
Joined
Nov 3, 2017
Messages
321
The PVC has holes drilled in it throughout and has an opening at the U bolt up front. BaylinerChuck was the creator of that method lol, but as far as the ski locker I have no drainage in place. The gas tank area of course will be covered, and the area behind the fuel tank was just filled with foam decked over as well.
 

bpounds1991

Petty Officer 1st Class
Joined
Nov 3, 2017
Messages
321
Woke up at 5:30 this morning to turn the heaters on, and it still wasn’t warm enough by 8:00 to start tabbing. I ended up opening the door from the house to the garage and by 10:00 we were ready to go. It took my wife and I about 2 hours to get 2 layers on both sides of the front, and I’m hoping tonight I can move into the fuel tank area. 3A3E33A2-6782-4402-B429-1CA09377D6AD.png
 
Top