buckmaster221
Recruit
- Joined
- Feb 19, 2010
- Messages
- 5
Hello Boaters!
This is my first post on this site. I have been doing a lot of reading on here and talking to my local shop about materials needed to replace the deck in my boat.
I "inherited" a 1995 Sea Nymph from my dad who due to medical problems shouldn't be on the water by himself anymore. The boat hasn't seen water in 3 years and hasn't been covered for longer than that. Needless to say, the deck is shot.
I thought I was going to have the boat completed already but due to some technical difficulties imposed by our friends in Washington , it is going to take longer than expected. For those of us who are old enough to remember the "Man in Black", think of it like I am building it "One piece at a time". However, I will be paying for the materials lol.
After doing a lot of reading on here, I have decided on which way I want to go with the deck.
15/32 pressure treated plywood
Kilz primer
Marine grade carpeting
3/16 closed end pop rivet
#12-14 1-1/4 stainless self drilling screw
3-M 5500 caulk
Now, before you guys start in on me about the pressure treated wood, I talked to my local dealer and that's what they suggested. That is what they use for replacing decks on Lund boats (they are the local dealer). I was planning on using this in the first place. I refuse to use marine grade plywood, unless someone wants to donate it. It is cost prohibitive. The boat brand new was less than 5k in 1995 when it was purchased new.
I know from reading that Gluv-it is highly recommended for use during a rebuild. For me, it is cost prohibitive. I am going to paint Kilz on ALL surfaces of the wood before installing it. I will make all necessary cuts before painting the wood.
After the wood is prepped, I will install and staple the carpet down on the edges and backside. The top will have the screws going through it into the stringers and the seats will be fastened to the deck as well so the carpeting should not move. I will also screw the deck into the stringers going down the middle of the boat.
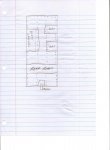
As I am not going to be using a 10ft piece of wood, I will have a seam. The deck is approximately 9'7" that I am replacing. I have 4 metal seats in this boat. 2 on the starboard, 1 on the port which is also a live-well and a rear bench that goes across the back and fastens to both sides. The other 3 seats also fasten to the sides with rivets and then are screwed into the wood. My thought is that for the best stability with the seam, I should place it under the rear bench.
After the deck is installed, I am going to caulk around the entire deck and the seam. There are 4 metal pieces that run down the sides and will be screwed to the deck and stringers. I am guessing that these pieces are for water run-off. They may provide some stability as well, but since they are not attached to the side and only the floor, I don't see where they will provide that much stability. However, since they came out, they will be going back in. I am going to caulk around those as well.
Once the deck is back in, I can reattach the seats. I am going to use the caulk to go around the rivet and around the holes on the back side of the seat where it makes contact with the side of the boat. I figure by doing it this way, it should help with leakage through the rivet holes. Once the seats are riveted in, I can reattach them to the deck. I am thinking that I can probably screw them into the stringers rather than just into the floor as they were originally. I still have to take a few more measurements to make sure that screwing the seats to the stringers will work. I am using closed end rivets so that will prevent leakage through the rivet.
In talking with my local dealer, they suggested stainless steel screws instead of riveting the deck to the stringer for a couple of reasons. First, riveting the deck back in is a pain in the backside. Second, if the deck ever does have to be replaced again, it will be a lot easier to remove. I know I have read on here that you should only use aluminum on aluminum, but in talking with them, they suggested the stainless and I should have no problem with corrosion. Also, I am in school right now and if at all possible, I will have a new boat in 5 years. That's the plan right now, but don't tell my wife lol!
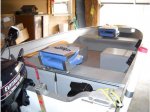
I am including a picture. The boat pictured is not mine since I didn't have the camera with me when I took the old deck out, which came out in a lot of pieces. The vinyl covering or whatever it is that was used to cover the deck peeled off the deck on the way out. That made for a real enjoyable day.....NOT!!!!!!!! The boat pictured is the shorter version of my boat. Instead of one seat on the starboard side, I have 2. I also do not have a front bench like the boat pictured, I have a raised deck there with a pedestal seat. I do plan on including pictures of my boat as I get closer to having all of the materials needed to replace the deck.
Any comments and/or criticisms will be appreciated.
This is my first post on this site. I have been doing a lot of reading on here and talking to my local shop about materials needed to replace the deck in my boat.
I "inherited" a 1995 Sea Nymph from my dad who due to medical problems shouldn't be on the water by himself anymore. The boat hasn't seen water in 3 years and hasn't been covered for longer than that. Needless to say, the deck is shot.
I thought I was going to have the boat completed already but due to some technical difficulties imposed by our friends in Washington
, it is going to take longer than expected. For those of us who are old enough to remember the "Man in Black", think of it like I am building it "One piece at a time". However, I will be paying for the materials lol.After doing a lot of reading on here, I have decided on which way I want to go with the deck.
15/32 pressure treated plywood
Kilz primer
Marine grade carpeting
3/16 closed end pop rivet
#12-14 1-1/4 stainless self drilling screw
3-M 5500 caulk
Now, before you guys start in on me about the pressure treated wood, I talked to my local dealer and that's what they suggested. That is what they use for replacing decks on Lund boats (they are the local dealer). I was planning on using this in the first place. I refuse to use marine grade plywood, unless someone wants to donate it. It is cost prohibitive. The boat brand new was less than 5k in 1995 when it was purchased new.
I know from reading that Gluv-it is highly recommended for use during a rebuild. For me, it is cost prohibitive. I am going to paint Kilz on ALL surfaces of the wood before installing it. I will make all necessary cuts before painting the wood.
After the wood is prepped, I will install and staple the carpet down on the edges and backside. The top will have the screws going through it into the stringers and the seats will be fastened to the deck as well so the carpeting should not move. I will also screw the deck into the stringers going down the middle of the boat.
As I am not going to be using a 10ft piece of wood, I will have a seam. The deck is approximately 9'7" that I am replacing. I have 4 metal seats in this boat. 2 on the starboard, 1 on the port which is also a live-well and a rear bench that goes across the back and fastens to both sides. The other 3 seats also fasten to the sides with rivets and then are screwed into the wood. My thought is that for the best stability with the seam, I should place it under the rear bench.
After the deck is installed, I am going to caulk around the entire deck and the seam. There are 4 metal pieces that run down the sides and will be screwed to the deck and stringers. I am guessing that these pieces are for water run-off. They may provide some stability as well, but since they are not attached to the side and only the floor, I don't see where they will provide that much stability. However, since they came out, they will be going back in. I am going to caulk around those as well.
Once the deck is back in, I can reattach the seats. I am going to use the caulk to go around the rivet and around the holes on the back side of the seat where it makes contact with the side of the boat. I figure by doing it this way, it should help with leakage through the rivet holes. Once the seats are riveted in, I can reattach them to the deck. I am thinking that I can probably screw them into the stringers rather than just into the floor as they were originally. I still have to take a few more measurements to make sure that screwing the seats to the stringers will work. I am using closed end rivets so that will prevent leakage through the rivet.
In talking with my local dealer, they suggested stainless steel screws instead of riveting the deck to the stringer for a couple of reasons. First, riveting the deck back in is a pain in the backside. Second, if the deck ever does have to be replaced again, it will be a lot easier to remove. I know I have read on here that you should only use aluminum on aluminum, but in talking with them, they suggested the stainless and I should have no problem with corrosion. Also, I am in school right now and if at all possible, I will have a new boat in 5 years. That's the plan right now, but don't tell my wife lol!
I am including a picture. The boat pictured is not mine since I didn't have the camera with me when I took the old deck out, which came out in a lot of pieces. The vinyl covering or whatever it is that was used to cover the deck peeled off the deck on the way out. That made for a real enjoyable day.....NOT!!!!!!!! The boat pictured is the shorter version of my boat. Instead of one seat on the starboard side, I have 2. I also do not have a front bench like the boat pictured, I have a raised deck there with a pedestal seat. I do plan on including pictures of my boat as I get closer to having all of the materials needed to replace the deck.
Any comments and/or criticisms will be appreciated.