1998 50hp Johnson Rebuild First Startup Advise Needed

flyingscott

Fleet Admiral
Joined
Apr 8, 2014
Messages
8,152
Another question regarding the joe reeves method it pertains to this portion:

”To set the timing on that engine, have the s/plugs out, and have the throttle at full, set that timer base under the flywheel tight against the rubber stop on the end of the full spark timer advance stop screw (wire it against that stop if necessary)”

I do not have full advance stop screw my timing is adjusted my shortening or elongating the timing linkage. Please see the attached photo how would apply his method? Would I just concoct a way to make sure it has no play or movement in it while setting the timing?

I'm aware that the linkage is out of wack currently I have not done a link and sync yet.

Pull the linkage forward until it stops this will give you max advance. Make sure all the plugs are out.
 

lindy46

Captain
Joined
Nov 27, 2008
Messages
3,886
Another question regarding the joe reeves method it pertains to this portion:

”To set the timing on that engine, have the s/plugs out, and have the throttle at full, set that timer base under the flywheel tight against the rubber stop on the end of the full spark timer advance stop screw (wire it against that stop if necessary)”

I do not have full advance stop screw my timing is adjusted my shortening or elongating the timing linkage. Please see the attached photo how would apply his method? Would I just concoct a way to make sure it has no play or movement in it while setting the timing?

I'm aware that the linkage is out of wack currently I have not done a link and sync yet.

If you have a manual, look on page 224, image 46. The full advance stop screw is #9. You must follow the procedure outlined on this page IN ORDER to get all the adjustments correct. Disconnect the throttle cable when making adjustments. Adjust the timer base link (item circled) to 2.5" from socket to socket after you adjust the idle stop screw to 0.5" out.
 
Last edited:

thatone123

Banned
Joined
Mar 7, 2009
Messages
707
Never heard that sequence before. Usually it's idle for an hour with short bursts of higher RPM, never over half throttle for a few hours. Then run 1/4 to half throttle with short bursts up to full throttle for a few more hours as you are on a trip or trips. 10 hours is usually stated as good, but maybe this is just for new engines.
 

Aaron Huyser

Seaman
Joined
Mar 19, 2019
Messages
65
If you have a manual, look on page 224, image 46. The full advance stop screw is #9. You must follow the procedure outlined on this page IN ORDER to get all the adjustments correct. Disconnect the throttle cable when making adjustments. Adjust the timer base link (item circled) to 2.5" from socket to socket after you adjust the idle stop screw to 0.5" out.

Heres a picture of my manual in the timing section as it pertains to my linkage there is no stop screw just and idle adjustment screw. My linkage looks like both to be honest my confusion is this. In the manual it says all except 45/55 commercial models through 1993, should have the the idle screw set to .5 inches out as you stated however in figure 188 it doesn't show that like it does in fig 189 also if I set the adjustment to .5 inches inches my follower roller will not be centered on the throttle lever alignment marks.... saying that currently its looks like the attached photo and when i checked full advance timing useing the joe reeves method it was dead on 15 which is 4 degrees under the 19 required by the manual looks like someone had marked the 15 in the past also. Let me know what y'all think.

im kinda thinking about adjusting it with the half inch idle screw setting and disregard the alignment marks on the throttle lever.

also the spark control rod is set right at 2.5 inches as you stated.

im a bit confused cuz my linkage looks like both lol let me know yall.
 

Attachments

  • photo312532.jpg
    photo312532.jpg
    1.6 MB · Views: 0
  • photo312533.jpg
    photo312533.jpg
    1.2 MB · Views: 0
  • photo312534.jpg
    photo312534.jpg
    915.4 KB · Views: 0
Last edited:

lindy46

Captain
Joined
Nov 27, 2008
Messages
3,886
Your motor looks exactly like mine. My manual says to disregard the alignment marks on the 50hp model and initially set the idle adjustment screw to 0.5". Your motor does have a full advance stop screw. It is in the diagram but not marked. It is just above the words "throttle lever arm" in the diagram.
 
Last edited:

Aaron Huyser

Seaman
Joined
Mar 19, 2019
Messages
65
Your motor looks exactly like mine. My manual says to disregard the alignment marks on the 50hp model and initially set the idle adjustment screw to 0.5". Your motor does have a full advance stop screw. It is in the diagram but not marked. It is just above the words "throttle lever arm" in the diagram.

Please see the picture I guess i was confused on the what the full stop screw was i used that to set the wot on the carb valves meaning at wot the carbs valves are fully open and the visual pins are vertical is this correct?
 

Faztbullet

Supreme Mariner
Joined
Mar 2, 2008
Messages
15,930
Never heard that sequence before. Usually it's idle for an hour with short bursts of higher RPM, never over half throttle for a few hours. Then run 1/4 to half throttle with short bursts up to full throttle for a few more hours as you are on a trip or trips. 10 hours is usually stated as good, but maybe this is just for new engines.
What I posted is the way BRP factory breaks em in. They use test tank and test prop...that why its start and go with new engines, no break-in required. Different story if Siezcos was installed.
 

Aaron Huyser

Seaman
Joined
Mar 19, 2019
Messages
65
What I posted is the way BRP factory breaks em in. They use test tank and test prop...that why its start and go with new engines, no break-in required. Different story if Siezcos was installed.

So complete the break-in as you stated earlier in the thread correct?
 

lindy46

Captain
Joined
Nov 27, 2008
Messages
3,886
Please see the picture I guess i was confused on the what the full stop screw was i used that to set the wot on the carb valves meaning at wot the carbs valves are fully open and the visual pins are vertical is this correct?

Yes
 

Aaron Huyser

Seaman
Joined
Mar 19, 2019
Messages
65
So here's an update on the startup. So I set all the linkage and timing(Using the Joe Reeves Method) and started carbs at 3.5 turns out however the only way I could Get it close was to have the long idle screw all the way seated in meaning no half inch gap and even then at idle in gear the RPM's are barely at or just under spec seems strange to have that screw all the way in.... Any suggestions?

Also I got a little more RPM out of it by adjusting the low speed idle jets (air fuel mixture screws on the carbs according to the manual)

I also did a compression test on both cylinders they are both exactly the same at 138-140 closer to 140 when cranking and the gauge settles at about 139

This is the model number Johnson 1998 50hp E50TSLECC.
 
Last edited:

Aaron Huyser

Seaman
Joined
Mar 19, 2019
Messages
65
-Its my understanding idle should be set with load in forward gear if thats correct how does this effect nuetral? won't the RPM be higher in neutral?

-Its my understanding engine should idle within spec with carb butterflies closed

-The low speed idle jet is harder to adjust then it sounds lol.

-One could remove the stop not on the idle screw to get more idle out of it but I feel this would be wrong.

-My manual calls for 0-2 degrees idle timing after TDC mine seems off or to far advanced.

-My manual calls for a 775-825 idle in forward gear so 800 would be the sweet spot.

-Plugs are gapped to .030 per manual.

-There are no leaks that I can see I had one early on with the fuel filter being loose but I remedied that early on in the process. As of now I cannot see any leaks of any kind around crankcase seals gaskets etc.. everything seems tight.

-Shifting in and out of forward gear feels very smooth no binding grinding etc...
 

Aaron Huyser

Seaman
Joined
Mar 19, 2019
Messages
65
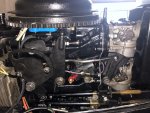
Ok ya'll I've got a major development tell me if my thinking is correct. Here is where I'm at. I started thinking about the electrical system based on a post in another forum where someone had a similar issue. Saying that, one of the gentleman recommended that he should start the engine and remove a spark plug wire and see if the engine dies or keeps running and then repeat the process for the remaining spark plug. This got me thinking because I have great compression which led me to think about spark.

when I did this I found that if I pull the top plug wire the engine would keep running however if I pull the bottom plug wire the engine would die. So then I tested the resistance on the power pack according to CDI's troubleshoot guide according to them the resistance measurements should be as follows:

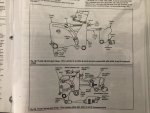
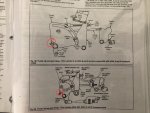
Orange/Blue wire to Blue wire should read 110
Orange/Green wire to Green wire should read 110
White wire to engine ground should be Shorted
Brown & Brown/Yellow to ground should be Open or M range


My readings were as follows:

Orange/Blue wire to Blue wire should read 85.7 Top Cylinder
Orange/Green wire to Green wire should read 99.2 Bottom Cylinder
White wire to engine ground should be Shorted
Brown & Brown/Yellow to ground should be Open or M range

So if my thinking is correct, wouldn't this mean I'm not getting sufficient and or consistent spark overall? Also with the lower circuit being closer to spec that's why it stays running after disconnecting the top spark plug. This would explain rough idle and low RPM wouldn't it?


Here is the CDI link go to page 39 for Two Cylinder Engines 1977-2006 4-60 HP Models

http://www.cdielectronics.com/wp-content/uploads/2013/02/CDI Troubleshooting Guide - 2012.pdf
 

lindy46

Captain
Joined
Nov 27, 2008
Messages
3,886
So here's an update on the startup. So I set all the linkage and timing(Using the Joe Reeves Method) and started carbs at 3.5 turns out however the only way I could Get it close was to have the long idle screw all the way seated in meaning no half inch gap and even then at idle in gear the RPM's are barely at or just under spec seems strange to have that screw all the way in.... Any suggestions?

Also I got a little more RPM out of it by adjusting the low speed idle jets (air fuel mixture screws on the carbs according to the manual)

I also did a compression test on both cylinders they are both exactly the same at 138-140 closer to 140 when cranking and the gauge settles at about 139

This is the model number Johnson 1998 50hp E50TSLECC.

My slow speed idle screw is almost all the way in, and my idle mixture screws are set at 3.25 turns out. I also adjusted the remote cable thumb wheel counterclockwise (cable longer) to achieve a satisfactory idle.
 

Aaron Huyser

Seaman
Joined
Mar 19, 2019
Messages
65
My slow speed idle screw is almost all the way in, and my idle mixture screws are set at 3.25 turns out. I also adjusted the remote cable thumb wheel counterclockwise (cable longer) to achieve a satisfactory idle.

My screw is totally in like completely seated....What do you think in regards to my powerpack issue? when checking timing at idle I noticed the spark looked as tho it might be skipping or intermittent. when I originally got the boat the stator died on me and I've heard this can damage the power pack I'm still using the old harness so this could be an issue specially with resistance being out of spec. and even with adjusting things the idle just seems rough...

Hopefully others will chime in also.

Thanks for all the feedback everyone.
 

Aaron Huyser

Seaman
Joined
Mar 19, 2019
Messages
65
Ordered a powerpack hopefully that is the issue let me know what ya'll think or if there is something else i may be overlooking.
 

JerEazy

Petty Officer 1st Class
Joined
Jul 26, 2017
Messages
234
Can grab a spark plug tester from any auto parts store for a few $$ - good to have and IMO the only way to be sure that you’re getting spark.
 

Aaron Huyser

Seaman
Joined
Mar 19, 2019
Messages
65
Yeah i have spark plug testers The question at hand is not spark but how strong the spark and if that spark is intermittent based on a bad powerpack
 

spybot

Chief Petty Officer
Joined
Jul 4, 2016
Messages
504
What I posted is the way BRP factory breaks em in. They use test tank and test prop...that why its start and go with new engines, no break-in required. Different story if Siezcos was installed.

I am about to waken my "Refresh Build" I used Wiseco pistons What breaking in should i use ?
Sorry jumping in not wanting to hijack the thread. Just looking for some info
 
Top