21' ProLine CC Rebuild Progress with Pics

83ProLine

Petty Officer 2nd Class
Joined
Mar 23, 2008
Messages
105
Hey Everyone,

I thought I would start a new thread with a title a little more conducive to my overall project.

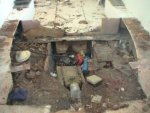
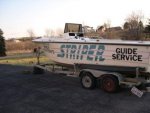
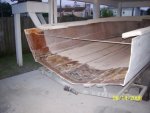
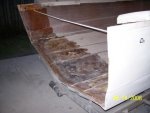
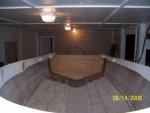
To refresh everyone?s memory, I have a 1983 21? ProLine CC built that I got for free in early 2008. Rot had taken over the whole boat ? so I started ripping everything out and have since completely gutted the boat.

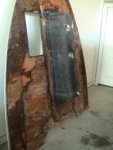
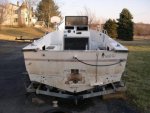
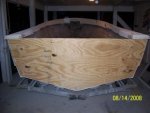
From the previous thread I started, ?Stinger Height Differential?, I learned that my first mistake was cutting out the outer skin of transom. And that is where I left of ? needing to mockup a new transom.

(BTW - here is the link for reference if anyone ever wants to reference it - http://forums.iboats.com/showthread.php?t=270035)

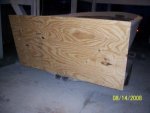
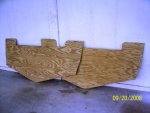
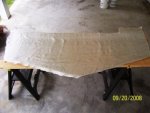
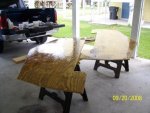
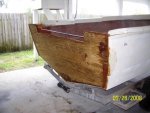
Now to the transom rebuild. . .
 

Attachments

  • 08Mar22.underside of bow decking.jpg
    08Mar22.underside of bow decking.jpg
    27.6 KB · Views: 1
  • 08Mar22.bow-to-stern decking removed.jpg
    08Mar22.bow-to-stern decking removed.jpg
    34.6 KB · Views: 1
  • Rear - February.jpg
    Rear - February.jpg
    39.3 KB · Views: 1
  • Side - February.jpg
    Side - February.jpg
    33.7 KB · Views: 1

83ProLine

Petty Officer 2nd Class
Joined
Mar 23, 2008
Messages
105
Re: 21' ProLine CC Rebuild Progress with Pics

First thing, I borrowed a page from Oops? Hull Ext thread and installed a threaded rod across the back part of the transom to keep the sides of boat from deforming when the cap is off. I installed the rod while the cap was on and screwed to the sides of the hull.

I then traced and cutout a mockup of the transom using a ?? sheet of plywood. I did that for two reasons ? first, I wanted to post some pics to see if I am on the right path, and second, I need to cut out a walkthrough to what will be my swim-platform-style outboard bracket.

Now that my mockup is done - my question is are there a set of measurements that I need to use to cutout the top part of the transom enough to make it an easy step over onto the outboard bracket?

I'm getting ready to go on vacation for a week or so. . . I guess I will get some PT plywood before I leave and get a head start the drying process.


Regards,

James
 

Attachments

  • (1) Transom Prep.JPG
    (1) Transom Prep.JPG
    38.3 KB · Views: 0
  • (2) Transom Prep.JPG
    (2) Transom Prep.JPG
    34.4 KB · Views: 0
  • (3) Tracing Outline of Transom.JPG
    (3) Tracing Outline of Transom.JPG
    32.7 KB · Views: 0
  • (4) Plywood Mock Up of Transom with Cap.JPG
    (4) Plywood Mock Up of Transom with Cap.JPG
    33.7 KB · Views: 0
  • (5) Plywood Mock Up of Transom - From Bow.JPG
    (5) Plywood Mock Up of Transom - From Bow.JPG
    32.1 KB · Views: 0

oops!

Supreme Mariner
Joined
Oct 18, 2007
Messages
12,932
Re: 21' ProLine CC Rebuild Progress with Pics

ok james....looking good....before you glass that puppie in there..

take a stringline from the tip of the bow.....and run it to each corner of the transom to make sure its not crooked.....(the distance to each top corner should be the same)......then mark that spot.....

then do the same for the bottom corners.....the distance will be shorter cause the transom is angled....mark that spot ....

then pull the transom back out and do the uasual transom water sealing (fiberglassing)

then put it back in and tab it in ...look on the hull ext thread for transom tabbing......

after it is tabbed and cured in place....run a full layer of glass....matt first....then cloth over the full transom.....and on to the bottom of the inner hull.......read up on the term "ruff and scuff"
make sure you get at least a 1 foot over lap ot the bottom and the sides.....

after that is glassed in place......add the second layer of transom.....this time carring the glass farther than the first.......

that part is now done.......

the outside of the transom is still raw (except for watersealing)

if there is any space between the hull and the transom....fill it with peanut butter now.

take your grinder and grind off the gellcoat 1 foot around the edge of where youve cut....be very careful not to take too much off....you just want to expose the glass.....

now take your cloth....i suggest 1708 or thicker.....and glass the outside....using the same over lap to the sides and bottom....the corners will be tricky......dont be afarid to cut the glass so its eayser to shape.

do three layers of this.....each layer farther than the last on the outside of the hull....the last being right up to where you ground off the gell.

after thats all cured....youll need to fair it in.....and make it smooth for paint..

that will get you back on track

cheers
oops
 

83ProLine

Petty Officer 2nd Class
Joined
Mar 23, 2008
Messages
105
Re: 21' ProLine CC Rebuild Progress with Pics

Oops - thanks for the excellent instructions!!! :D :D :D

Question though - what about the cutout for the transom?? I have seen a few CC's that have the top part of the transom cut out to allow one to easily step over the transom and onto the bracket. Are there a particular set of measurements I need to follow for this?

I imagine I should make the cutout before I start glassing new inner & outer skins, right?
 

Off-Peak

Petty Officer 2nd Class
Joined
Jul 22, 2008
Messages
102
Re: 21' ProLine CC Rebuild Progress with Pics

Nice Work!! Glad to see you are hangin' in there... Hats off to you!!
-OP-
 

jcsercsa

Captain
Joined
May 21, 2007
Messages
3,401
Re: 21' ProLine CC Rebuild Progress with Pics

Looks great keep the pics comming james !! John
 

ondarvr

Supreme Mariner
Joined
Apr 6, 2005
Messages
11,527
Re: 21' ProLine CC Rebuild Progress with Pics

There aren't really any special or correct dimensions for most things on boats, it's whatever the designer (this is you now) want's to do. Lay it all out in cheap plywood and see if it works for you.
 

83ProLine

Petty Officer 2nd Class
Joined
Mar 23, 2008
Messages
105
Re: 21' ProLine CC Rebuild Progress with Pics

Gentleman,

8/16 was my last post ? since then. . .
- I spent a week or so on vacation
- Got back and spent two weeks wishing I had not gone on vacation
- Took a direct hit from Tropical Storm Hanna :eek: :eek:
- And watched two sheets of pressure-treated plywood dry out in our guest bedroom (guests don?t seem to visit when there?s a hurricane watch anyway)

So after more than a month of drying out, I took advantage of some unseasonably cool temperatures here at the beach and decided to give my first attempt at fiber glassing at whirl.

Before I start buying cloth by the roll, and resin by the 5-gallon container, I decided to head on down to Boaters Supply and get just enough to be dangerous. I bought:
- MAS 6oz Fiberglass Cloth, 48? x 108?
- MAS Low Viscosity Epoxy Resin
- MAS Medium Non-Blushing Hardener


I let the sheets of plywood dry whole, which turned out to be a good idea because the edges of the plywood split a little during the drying process. I cut out the two pieces that would be sandwiched together using a template I created in an earlier post. Note, I cut an extra notch out of the final product, with rounded edges, to allow me to step from the deck out onto the outboard bracket. Finally, I roughed-up both pieces with some 60grit to prep for water-sealing.

Next up, I cut the fiberglass cloth to size, and mixed the resin and hardener together at a ratio of 2:1. I noticed that the mix poured easier and more fluidly from one mixing container to another the more I mixed it together.

I poured the mix out onto the pieces and dabbed it into place using a 3? paint brush. While it soaked in a little, I found every clamp that I own, and headed down to fill up four 5-gallon buckets with sand.
 

Attachments

  • 1. Dried PT Plywood Sheets..jpg
    1. Dried PT Plywood Sheets..jpg
    34.5 KB · Views: 0
  • 2. 6oz Cloth Template..jpg
    2. 6oz Cloth Template..jpg
    34 KB · Views: 0
  • 3. Wet Sheets..jpg
    3. Wet Sheets..jpg
    41 KB · Views: 0
  • 4. Working in Cloth..jpg
    4. Working in Cloth..jpg
    38.7 KB · Views: 0
  • 5. Ready to Sandwich..jpg
    5. Ready to Sandwich..jpg
    37.1 KB · Views: 0

83ProLine

Petty Officer 2nd Class
Joined
Mar 23, 2008
Messages
105
Re: 21' ProLine CC Rebuild Progress with Pics

After a bit of soaking, I worked the cloth in, and then sandwiched the two pieces together. It?s still sitting under my house drying.

Attached are some pics of the process. What do you guys think?


Next up - tabbing the whole thing into place.
 

Attachments

  • 6. Weighted & Clamped.jpg
    6. Weighted & Clamped.jpg
    46.3 KB · Views: 0
  • 7. Weighted & Clamped - Top Side..jpg
    7. Weighted & Clamped - Top Side..jpg
    37.6 KB · Views: 0

83ProLine

Petty Officer 2nd Class
Joined
Mar 23, 2008
Messages
105
Re: 21' ProLine CC Rebuild Progress with Pics

Hey guys - here is an update.

The whole thing dried out well overnight. I think my first shot at fiber glassing turned out well.

One concern I have is that I didnt have enough clamps. There is a small section where, if you stick a flathead screwdriver between the edges, they will slightly pry apart.

This is where the sheets had warped a little during the drying process. I clamped as much as I could, but just didnt have enough clamps.

Question - is the the solution to use a syringe to shoot in some resin and clamp off while it sets up??

Regards,

James
 

oops!

Supreme Mariner
Joined
Oct 18, 2007
Messages
12,932
Re: 21' ProLine CC Rebuild Progress with Pics

sure thats one....peanut butter is another....but the resin/syringe will be easyest....

and glassing is pretty easy isnt it? ;).....actually...its an art !

small sections like a transom are a dream....flat....smooth....and you can see all the air........it gets a little more technical when you do corners and stringers....but at least you wont be afaraid of it now that you have conqured the basics !

carry on.....and sorry to hear about your vacation.....

i remember last newyears eve.....my girl wanted to go out and all i wanted to do was work on the boat :D
 

jcsercsa

Captain
Joined
May 21, 2007
Messages
3,401
Re: 21' ProLine CC Rebuild Progress with Pics

Looking good 83ProLine, where you got that little gap , could you stand it up and pour a little mix in ?? John
 

83ProLine

Petty Officer 2nd Class
Joined
Mar 23, 2008
Messages
105
Re: 21' ProLine CC Rebuild Progress with Pics

Looking good 83ProLine, where you got that little gap , could you stand it up and pour a little mix in ?? John

No - tts too small to pour anything in. Its less than an 1" of a section of edging, and it doesnt open more than 1/2". Thats why I was thinking the syringe was the best option.

I originally wanted to lay the whole thing down on the concrete and sit buckets of (whatever) on the sandwiched pieces, similiar to the way Oop's did in his Hull Ext thread. The problem here at the beach, is that it can go from 80 & sunny to 80 & blowing rain sideways in the blink of an eye. When it rains, especially sideways ;), rain is able to dampen the concrete under the house.

So I decided to put the whole thing up on saw horses - I just didnt think I would need that many clamps for the edges.

Note to those of you doing this part of the project - dont put the thing up on saw horses! :eek:
 

83ProLine

Petty Officer 2nd Class
Joined
Mar 23, 2008
Messages
105
Re: 21' ProLine CC Rebuild Progress with Pics

Well, Gentleman. . . today was not a good day of work on the boat. :mad:

The first disaster was in producing my first mix of ?peanut butter?.

I measured out 16oz of resin
Added about ? cup of cloth strands from some leftover cloth I cut up
Mixed the contents
Added some Wood Flour (Added some, didn?t really measure)
Added some Colloidal Silica (Added some, didn?t really measure)
Mixed the contents
Added 8oz of hardener
Mixed some more

The consistency wasn?t quite peanut butter, but more like thick glue. I started to apply the mixture to the tail edge of the hull by dabbing it on with a 2? paint brush. About 5 minutes into the process, the 2qt plastic bucket containing the mix, literally, started to smoke. :eek: Immediately after that, it became too hot to even hold. :eek: Shortly after sitting it down, the mix was rock solid.

I was able to get enough mix dabbed on the edge of the hull to seat the transom. . . which by-the-way, is not a one-man job.

Once the transom was seated, I started to think about what went wrong with the first batch. Figuring I mixed the contents too much, or added too much of the wrong thing, I whipped up another batch of ?peanut butter?, this time measuring out as follows:

8oz resin
4oz hardener
Mixed the contents
Added 1 ? cup of Wood Flour
2 table spoons of Colloidal Silica
Mixed the contents

This time the mix had a much better consistency, kinda? like thick pudding, and stayed workable much longer ? but still not long enough. I started cramming it in cracks where I could from outside the boat while it was workable.

End the end, I managed to get the transom set, but there is still a ton of cracks to fill in from the outside. And I have not even gotten to the inside yet. So, just a little frustrating because I am being set back a bit. :mad:

So I am going to put in an order to US Composites first thing Monday for some resin and fillers. Thats another thing. . . buying the sh*t from Boaters World is costing a fortune.

Anyone want to chime in and tell me what these fillers are intended for, and in what quantity I am suppose to use them to get the perfect mix of ?peanut butter???

Wood Flour: I know this stuff is simply finely sifted saw dust ? just used to thicken a mix, right??

Colloidal Silica: I have no clue what this stuff is except that it apparently makes the mix hard as a damn rock. It really doesn?t look like you want to breath too much of this stuff in, either. :eek:

Phenolic Micro Balloons: More death in a can, I?m sure. Boaters World had it on the shelf, but I didn?t know what it did so I didn?t get it.

Glass Bubbles: Boaters World didn?t sell this stuff ? what does it do??


Thanks for listening to my rant. I just envisioned I would get a lot more done today.
 

Attachments

  • 1. Peanut Butter - before it started to smoke.jpg
    1. Peanut Butter - before it started to smoke.jpg
    39.8 KB · Views: 0
  • 2. Seated Transom.jpg
    2. Seated Transom.jpg
    38.6 KB · Views: 0

83ProLine

Petty Officer 2nd Class
Joined
Mar 23, 2008
Messages
105
Re: 21' ProLine CC Rebuild Progress with Pics

More bad news this week. . . :mad:

I spoke to two different guys that make outboard swim platform brackets and they both recommend a minimum transom thickness of 2?. The transom is just installed is only 1? thick.

Fortunately, I didn?t glass the transom in yet ? it?s just seated in with peanut butter ? so I can add a ?? sheet on the inside with no problem.

Unfortunately, the ?? sheet of PT plywood I picked up today has to dry out, so this portion of the project is on hold for the next three or four weeks.

That will be 1.75" of wood - I should be able to make up the remaining .25" with glass work, right??

Does anyone have anything to add about the different types of fillers above - I have held off placing an order from US Comp until I learn a little more.
 

jcsercsa

Captain
Joined
May 21, 2007
Messages
3,401
Re: 21' ProLine CC Rebuild Progress with Pics

Hay ,i cant tell you much , except for what it says on the US Composites site !!

But the question i have is a 1 inch transom sound kind of thin , most of the ones i have seen are 1 1/2 inch's , what size motor is on there ?? If i rememberer right i think oops is also 1 1/2 and hes doing a swim platform on his !! why dont you pm him he might be a little more help !! sorry i couldnt help more !! John
 

maxum247

Lieutenant
Joined
Sep 18, 2007
Messages
1,363
Re: 21' ProLine CC Rebuild Progress with Pics

More bad news this week. . . :mad:

I spoke to two different guys that make outboard swim platform brackets and they both recommend a minimum transom thickness of 2?. The transom is just installed is only 1? thick.

Fortunately, I didn?t glass the transom in yet ? it?s just seated in with peanut butter ? so I can add a ?? sheet on the inside with no problem.

Unfortunately, the ?? sheet of PT plywood I picked up today has to dry out, so this portion of the project is on hold for the next three or four weeks.

That will be 1.75" of wood - I should be able to make up the remaining .25" with glass work, right??

Does anyone have anything to add about the different types of fillers above - I have held off placing an order from US Comp until I learn a little more.

I'm not sure what brand of epoxy and fillers US Composites sells but to get an idea of how fillers are used you might check out www.westsystem.com click on "Product Information Tab" when the page comes up click on the words "User Manual" highlited in blue and scroll down to "Fillers", this may help give you a better understanding of how fillers work.
 

BigB9000

Lieutenant Junior Grade
Joined
Dec 5, 2007
Messages
1,154
Re: 21' ProLine CC Rebuild Progress with Pics

I always order from http://www.fibreglast.com/

Mainly because whenever I have a question about something, or not knowing what something is, they always have the answer. I have most of there how to books and CD's, and read just about everything on the site.

Good people over there.

and buying fibreglass from a boat shop?! Home depot would be a hell of a lot better than the boat shop.

And my transoms on ALL of my boats have been 1 1/2" thick.

When I first saw the pics I thought to myself "That looks a little strange"


...anyway, onto my question for you. how did you get the origional stingers out?
 

83ProLine

Petty Officer 2nd Class
Joined
Mar 23, 2008
Messages
105
Re: 21' ProLine CC Rebuild Progress with Pics

Thanks, John. I just sent Oops a PM. I too noticed that his transom was only 1.5? of wood ? I didn?t know, however, that he is mounting a platform bracket.

The old transom was only 1? thick, so like a dumb*ss I replaced what was there. :eek:

The boat didn?t come with a motor, but I know it had a 200 on it at one time. Glassed in the interior skin of the former transom was a pretty-thick steel plate that, I'm guessing, served as a giant washer to the outboard that use to be on the boat.


you might check out www.westsystem.com click on "West Systems Users guide" when the page comes up click on the words "Product Guide" highlited in blue in the second paragraph and scroll down to "Fillers", this may help give you a better understanding of how fillers work.

Thanks man! I?m going to give it a look.

...anyway, onto my question for you. how did you get the origional stingers out?

A cordless saw zaw & a pack of 8? big tooth demo blades. I started at the bow and followed the floor line to the stern for each one - there were four to cut out. A 4.5? grinder and diamond blade got the rest.

I used the saw zaw to cut out most of the foam too.

I will give fiberglast a look, too. . . thanks!
 

oops!

Supreme Mariner
Joined
Oct 18, 2007
Messages
12,932
Re: 21' ProLine CC Rebuild Progress with Pics

mannn ive missed a lot of this thread......

sooo sorry......there is so much going on in resto these days....its hard to keep track of whos doing what and where they are........last year there was only 15 ish goin on........that was easy.....this year it seems like triple that number.......

any hoo you have your pm......

ok....micro balloons.....glass bubbles......used to thicken the resin and add some stregnth to the resin....

wood flour is structural....but used best with epoxy resin as epoxt bonds tenaciously with wood.......

look for cabosil...and glass bubbles or micro balloons along with milled fibers.
that mix is very strong with poly.....

8 oz.of mekp...???? :eek: :eek: :eek:...lucky you didnt burn the boat down..:D........the mix ratio of poly to cayt.....is minimum 1.5 to max 2.5.

so we are talking drops here.......so if you use the metric system.......(much easyer in this circumstance)....if you use 100 millileiters of resin.....you only use 2 ml for mekp.....(thats a med hot batch........1.5 is cold....2.5 is screemin hot......just shy of smoke.....if you get too hot and smoke....the resin will be brittle.....not good....espically on a transom......

cheers to you......keep goin......if you have another question....dont be afaraid of pm'ing me and direct my attention to it

oops
 
Top