23 Steiger Craft rebuild

merch

Cadet
Joined
Oct 20, 2012
Messages
16
Re: 23 Steiger Craft rebuild

Thanks guys. as you can imagine I am having a lot of fun right now...

Can't wait to get to the part where new stuff goes back in.
 

merch

Cadet
Joined
Oct 20, 2012
Messages
16
Re: 23 Steiger Craft rebuild

P1020693_zps3a1c1e75.jpg


Why grinding sucks…

Well there’s the obvious; it’s hard work, no matter how hard try to cover you skin there will always be some part of you left prickling from glass, and the dust….. ooooohhh the dust.

But, there’s one thing I found to be the worst thing about grinding…

You’ve been working for a while and the disc you’re using is getting pretty tired. You’ve already cleaned it three times but this time it’s dead for real. You finally stand up straight for the first time in an hour. Your knees, your back, your wrists and forearms… They all cramp from the sudden change in posture. You start to feel the prickling of fiberglass in areas you are sure there was no way possible for it to get in there. But it is. You look down at the thin snow pack of white dust covering the entire bilge of the boat. You could vacuum, but as soon as you start the stuff will be everywhere again. You can’t see your progress through the mess so the whole experience is hardly motivational. You toy with the idea of taking a break, but it takes too much time to get all your gear off and on and you worry that if you do, you might not be able to bring yourself to gear back up. You decide to suck it up and keep going.

You pull off the old disc and set it down next to the new one. The thing is dead. With the new disc installed you take one last stretch, twist the crick out of your neck, and get back down on the floor.

Ugh… Not again… Fire up the grinder and then it happens…

The disc touches the material. You immediately notice something different. The sound of grit tearing at material is loud enough to be heard through the whine of the grinder for the first time in a while. You can feel the disc cutting and pushing back at you. You put slight pressure down on against the material and it tears through a layer of roving/mat like it’s nothing. You keep going… You’ve covered more area in the first 30 seconds than you had in the last 5 minutes of the old disc. You start to think “I’m moving now… Maybe this won’t take so long… This really isn’t that bad…” Another minute passes. The sound begins to change. You feel yourself pushing down harder to achieve the same cut you enjoyed just seconds earlier. Your progress slows considerably. You can start to feel your muscles burn a little again….

Then that’s it... A minute or two and the new disc is now broken in.

That’s what sucks most about grinding. That brief moment of false hope from a new disc.

On to the project now.

I have made a bit of progress. 95% of the bilge has been stripped of all the secondary bonding material. I still have a small section near the transom where it’s really thick though. It’s the spot where two layers were laid for the transom tabbing, followed by two layers for the stringers, followed by two more layers for the bulkhead, all topped off with gobbs of gel coat. Nevermind the pools of resin near the base of the transom. I’ll get through it. Shown below:

P1020664_zps7a31ef40.jpg


P1020662_zpsbb13d30a.jpg


After this I have a little work around the chine and finally the transom and forward bulkhead which are looking like cakewalks next to the stringer/bulkhead tabbing removal. Here are a bunch of pictures to show the progress:

Earlier this week
P1020672_zps59db80d4.jpg


P1020675_zpsac720697.jpg
 

merch

Cadet
Joined
Oct 20, 2012
Messages
16
Re: 23 Steiger Craft rebuild

And after today

Looking aft
P1020696_zpsa1437879.jpg


Area behind fwd bulkhead
P1020700_zps2095cf84.jpg


The whole mess looking fwd

P1020718_zpsaa6dea97.jpg


P1020727_zps39c22e7b.jpg


And finally, a few shots for those of you that have been here before. The dust?

Windshield trim
P1020669_zps94798b3d.jpg


Can of WD40
P1020657_zpse4ea9475.jpg


This really does suck? Really...
 

Woodonglass

Supreme Mariner
Joined
Dec 29, 2009
Messages
25,929
Re: 23 Steiger Craft rebuild

You might consider making a vacuum box. Take the filter off your vac. Set it in a cardboard box. Cut three sides out of the box and tape furnace filters over the cut outs. Seal the top, cut a hole for the hose and then duct tape it. the Vac exhaust will blow the dust out into the box and the filters will catch it. Makes a mess in the box but it extends the time you have before clean out.
 

merch

Cadet
Joined
Oct 20, 2012
Messages
16
Re: 23 Steiger Craft rebuild

Hi everyone. Been a while since I did anything meaningful on this build, but looks like I?ll have the time to start moving along again.

Some decisions have been made on how I will move forward. Most importantly I will be closing the transom off and getting a bracket. Also, I will be going wood-less on the transom and stringer/bulkheads and I am 95% I will be going forward with vinylester.

The bracket decision was pretty easy. I always kind of wanted it, but when I solicited my wife regarding the subject she nearly demanded it. The choice to go wood-less was a bit more difficult. The advice I?ve gotten from everyone regarding my options has been great, and although I?d say 75% of the folks recommend the plywood route, in the end I need to make the decision for myself.

Vinylester vs. epoxy has been another tough decision for me. Although I love the idea of epoxy, ultimately moving forward with vinylester is likely just due to the local availability of the product. I can get epoxies locally, but at nearly twice the price of the vinylester. My initial calcs/estimates put the whole job in the 25-30 gallon range for resins (I?m sure it won?t be less anyway). The best source for price and quality have come from online sources, mostly in florida, but at ~$50 per 5gal bucket for shipping, I?m not sure the extra cost is worth it especially considering that ?locally available? options are really convenient with a job like this.

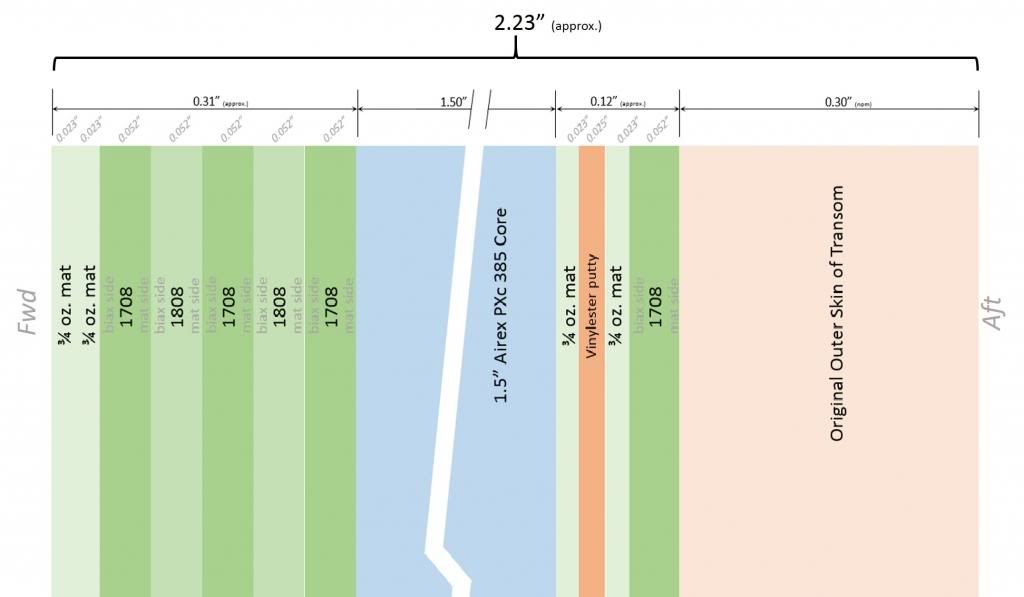
I have a lot of thoughts on how to move forward with the whole thing and I will be posting and soliciting advice as I go forward here, but the first tree in the forest is the transom coring and closure (decided to use a 1-1/2? sheet of Airex PXc due to local availability). I?ve dug around quite a bit online regarding this one and it seems as though my options are nearly limitless. So, instead of asking everything, I have a very specific question regarding the approach I?d like to post here to get started.

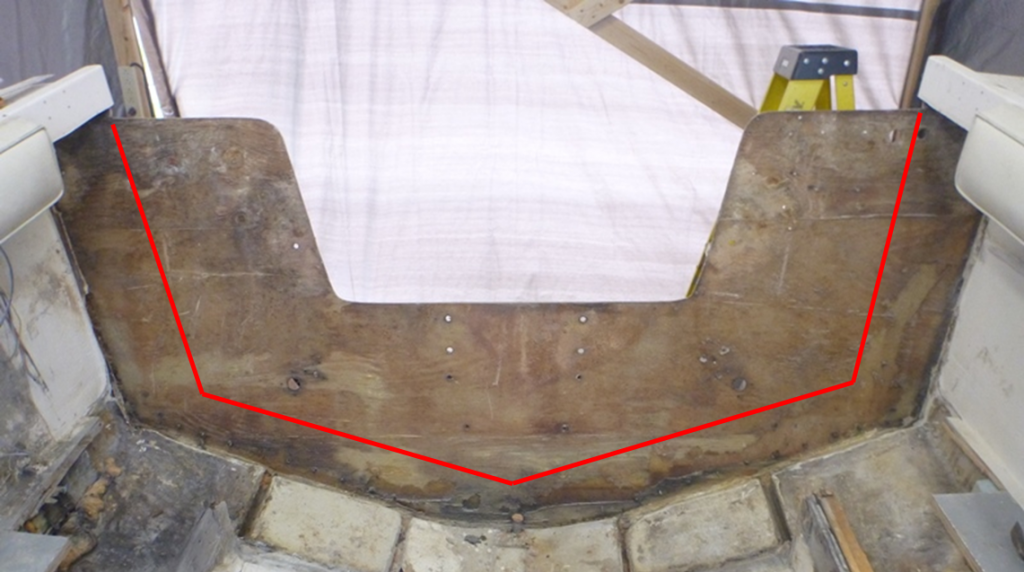
Really what it boils down to is what?s the most practical approach for closing it up in both time and effort. Does it make the most sense to bond the new core in as the transom exists and fair in the old notch with glass and filler? Or, is it better to cut the majority of the transom out leaving a narrow frame to bond the new core in? (shown in the picture below with the red line indicating the possible cut)

transomcutoption_zps3dd03260.png
[/URL]

My thoughts are that cutting it out might alleviate some of the challenges associated with clamping the new core in thoroughly to assure a good bond to the old material. Also, if I cut the transom out and leave only a frame it seems like a much simpler process could be used to bond and clamp (aka temporarily screw) the new core to the remaining outer edge of the old transom. I?d also get to avoid filling in a fairing all those big holes that are already in the transom.

The only disadvantage I can see to cutting it out is that it would require more glass and goo to build it back up. Conversely, it seems like laying up the new outer skin evenly like this might be more straightforward than patching in the notch and fairing it all in. Same goes if I decide to add a camber to the top of the transom. Building in a camber off the old stuff would result in a slightly taller new transom core which I can't imagine would be very pleasant to lay up.

Looking for some experienced advice on this one I guess.

Here?s the link to a nice example of what I?m talking about with regards to cutting it out first.

Grady White Boat Owners • View topic - 1892 24' Offshore transom question
 

jbcurt00

Moderator
Staff member
Joined
Oct 25, 2011
Messages
25,111
Re: 23 Steiger Craft rebuild

i wouldn't cut off the transom skin, IMO, unless it is structurally unsound or extremely damaged, as far as I can tell, neither is the case...
 

electric603

Petty Officer 2nd Class
Joined
May 4, 2012
Messages
168
Re: 23 Steiger Craft rebuild

Your doing an awesome job, and yes the grinding does suck. That is the reason the rebuild I am working on will be my last, and it is only a 16 footer. That must have been a lot of work. What are you going to use for your stringer core material?
 

merch

Cadet
Joined
Oct 20, 2012
Messages
16
Re: 23 Steiger Craft rebuild

Thanks guys.

Most folks i ask are advising against cutting out the transom.

As for the stringers, i have a plan to preform them with 8lb foam that i am working on.
 

merch

Cadet
Joined
Oct 20, 2012
Messages
16
Re: 23 Steiger Craft rebuild

Been getting some feedback regarding my last question about cutting the old transom out. The responses have been overwhelmingly ?don?t do it?. I guess that answers my question.

So, I will continue over-thinking this one to death starting with the transom layup.

I will be purchasing my first batch of supplies this week so I?d like to ?loosely? nail down the layup for the transom since it will happen first. I sketched up the plan in the pic below based on a few guiding philosophies:

1.) Try to obtain close-to-even thickness on the outer and inner fiberglass skins
2.) Get something close to the original thickness for the finish transom
3.) The plan seems sane compared to the many other transom builds I?ve seen on various sites

Transomlayupall_zps0e6bc334.jpg


This plan meets most of my entrance criteria (with some wiggle room anyway). If I tried to even out the thickness between the inner and outer skins including the new material between the core and the outer skin, I would end up with an inner skin almost ?? thick which seems excessive at first glance. Most folks end up throwing 4 layers of 1708 on the inner skin and call it a day. I went with 5 plus some mat for the inner-most skin.

Also, some guesses were made here especially with respect to the thickness of the putty bonding layer between the outer skin and the new core.

Looking for some feedback if anyone cares to weigh in.

Thanks,
Tom
 
Top