52-54 Johnson Seahorse 3hp Project - Need help with carburation

grapppa

Cadet
Joined
Sep 17, 2016
Messages
11
Purchased a Seahorse and spent the last week getting her up and running! Here is what I did -new cylinder head gasket (has good compression based on the running tests I've done) -checked ignition coils/wires and set timing; both cylinders fire with nice blue spark -rebuilt carb after thorough carb cleaner, probing and compressed air. Replaced both jets, float pin, float, welsh plug (cleaned in there also), carb and float gaskets, and repacked needles. Set carb float slightly higher than parallel. Went into the reed valve, cleaned up in there; noticed that the reed valve gasket is weak (its the original I think based on the fact that the original factory paint was undisturbed); leaf plate gasket good - the outer gasket (http://www.marineengine.com/newparts/part_details.php?pnum=OMC0203228) is the weak one.

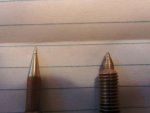
Both the HS and LS needles have 1 slight wear spots on each needle from overtightening but overall they are good. The wear spots require high magnification to really see them but they are definitely there.

After disassembling and reassembling carb more times than I care to remember.. here is what I have. The needles are set less than 1/4 turn from seated in order for the engine to run at all. The engine starts up on choke and idles very smoothly. If I turn choke off, it will die unless it is at higher throttle. It will rev up great with choke off in high throttle but wont run in lower throttle than start position. If choke is on, it will idle down very nicely and is smooth. She spits back fuel occasionally.

I am certainly no expert, but I suspect that wear on the the needles may be causing the issues. If this is the case, can a needle be re-machined (I know an excellent machinist who I'll bet can do this no problema). Only a few thousanths would be required to re-tip it IMHO.

This is my first restoration. Any suggestions welcome!
 

grapppa

Cadet
Joined
Sep 17, 2016
Messages
11
Other notes: -running with air box off -lots of black ooze from exhaust port(running in a garbage can all day created a small superfund site) -inspected and cleaned impeller which was in good working order
 

oldboat1

Fleet Admiral
Joined
Apr 3, 2002
Messages
9,612
Might take a look here: http://www.fiberglassics.com/wiki/images/b/be/Johnsonservice001.pdf . The first carb pictured is probably close to what you have, but gives you an idea anyway. Note the orientation of the float -- It's possible to install them upside down. The needles are probably not an issue, based on what you describe. It is possible to carefully clean them up, though, with a piece of 600 grit wet/dry sandpaper on a hard surface. You can carefully rotate the needles on the wetted sandpaper, matching the bevelled angles. Can just polish them a little (Don't damage points, particularly the l.s. needle.) Some recommend against this because you can damage them, and I don't quarrel with that.

You need the gasket that fits at the end of the nozzle, and be sure the nozzle is squeeky clean, running a pick or soft wire in the small holes. I don't know what jets you replaced. (Don't take out any lead plugs in the body -- replace them if you took them out.) Also, be sure the vent hole(s) are cleared as well as the fuel openings -- often one on the front face of the carb, but just clean every opening you can find, blowing into it with carb cleaner and a plastic nozzle. If you used a float needle with the little rubber tip, you need to use the clip that connects the needle to the float arm.

16:1 is the oil ratio.
 

F_R

Supreme Mariner
Joined
Jul 7, 2006
Messages
28,226
What the needles do: They shut off the fuel flow when you screw them in---like closing a water faucet. If damaged by over tightening, they will still shut off the flow as before, but will be more (or less) responsive to slight movement.

Normally, 3/4 turn open on the slow speed needle is not enough. I'd expect somewhere between 1 to 1-1/2 turns open. This may be the only thing wrong, and goes along with the need for choke. OR--there is that damaged needle issue. But I really don't think so, since you indicate that high magnification is required to see the damage.

EDIT: Of course it has black gunk in the can after running all day. That's the oil that you put in the gas. It has gone through the engine and done it's job, and then discharged out the exhaust where it picks up carbon particles, turning it black, then emulsifying with the warm cooling water. That's just the way it is and is normal. But it will be much less offensive if you get it out or that bucket and onto a boat on the lake and adjusted properly. It was made to run on a boat, not in a garbage can.
 
Last edited:

grapppa

Cadet
Joined
Sep 17, 2016
Messages
11
I did not replace the nozzle and I cleaned it well. The gasket was replaced with new. The nozzle has 3 tiny holes along its vertical axis...I hope this is the original !

I have both HS and LS only 1/4 open; any more seems to flood the carb. ( I spent many hours thinking the float was causing the flooding and set it to many heights without effect that's when I discovered that leaning out using the needles was what I needed to do to start it)

I am using the clip as the tip is rubber; with the small end of the clip attached to the needle itself and with the other end on the flat between the pivot arm and the float body... The valve seat and gasket were replaced also.

All vent holes are clear. (found the suggestion for the vent holes on the face of the carb earlier - this site is great BTW)

I polished both needles with 600 prior to the posting. Put in it a power drill; spun it low revs and lightly touched it with 600. There was microscopic pitting which I burnished down to a smooth surface. Very very little brass was removed in the process.

Thank you for your suggestions!
 
Last edited:

oldboat1

Fleet Admiral
Joined
Apr 3, 2002
Messages
9,612
I've always eyeballed the float height, checking for level with the edge of the inverted top. Not to flog a dead horse, but the largest part of the float goes up into the top of the carb, which might be a little counterintuitive (see pic in the link). 1/4 open for the needle adjustments is very lean.

Tank filter and valve need to be clear and open, although that seems to be the opposite of your problems -- likewise for tank vent issues. Maybe a good idea to check anyway.
 

grapppa

Cadet
Joined
Sep 17, 2016
Messages
11
I think its installed correctly. When installed, the side that is completely flat (on a new repro float) with no recesses or indentations was up, which when mounted to the engine, would be down. I went through that carb at least 10 times and could not find the smoking gun. FWIW, pic of the needles.

Leaving on my fishing trip tomorrow - had to button 'er up... She will run well enough to get the job done... Will look her over again when I return in a week.
 

Attachments

  • CIMG7722.JPG
    CIMG7722.JPG
    13.8 KB · Views: 0

grapppa

Cadet
Joined
Sep 17, 2016
Messages
11
Major progress to report. When reassembling the carb I noticed that the new gasket protruded against the engine side carb mounting surface preventing a flush seal. I also reused the old gasket as it was better fit. I also replaced the reed gaskets.  Reset points and timing.  Now it starts and runs well off choke; smooth at high and low speed. Barrel testing it more tomorrow...
 
Last edited:

grapppa

Cadet
Joined
Sep 17, 2016
Messages
11
After more barrel testing and fine tuning (new plugs also)... the engine runs very nicely.... its now winterized until next spring. Thanks for all your help.
 
Top