68 AristoCraft 8-teen off and running

Scott Danforth

Grumpy Vintage Moderator still playing with boats
Staff member
Joined
Jul 23, 2011
Messages
50,276
you could always have a set of HiTek or CMI headers made.
 

Scott Danforth

Grumpy Vintage Moderator still playing with boats
Staff member
Joined
Jul 23, 2011
Messages
50,276
also, the old 351 ford manifolds nearly fit perfectly on an LS marine motor. you have to drill and tap 2 or 3 holes if I remember from an article on LS! tech.
 

Lt. Dan

Petty Officer 3rd Class
Joined
May 31, 2013
Messages
93
Hello Scott.,

I looked into custom built, at the time they were too much, just no big manufacturers making them and the Cleveland manifolds I looked into were a viable option until I began discussions with guys that showed me not only weight (cast iron) but metal incompatibility between the aluminum and cast properties.
Way back I stated one goal was power to weight ratio which is excellent with the aluminum, manifolds, motor mounts and drive accessories.

In Ponchatoula Louisiana, I can buy the correct aluminum manifolds now for $1200, That's a good deal IMO since all I need to add is the aluminum risers, for attachment to the y-pipe, nice quite thru the outdrive exhaust.

It's good hearing from you again, .

Regards
Doug
 

Scott Danforth

Grumpy Vintage Moderator still playing with boats
Staff member
Joined
Jul 23, 2011
Messages
50,276
please post the link to the manifolds. those of us considering a custom LS stroker could use a source.
 

Lt. Dan

Petty Officer 3rd Class
Joined
May 31, 2013
Messages
93
No Title

Marine Power, Cassell, Eickert, and others, there are quite a few now under $1500, much easier to Google the manifolds, I look at so much stuff I never book mark, I just remember where I saw what I was looking for.

Sanding & grinding left, maybe two more fiberglass itch filled weekends, then the transom, engine box, fuel tank box and 2 stringers to bed, tab and glass.
Then its rotated and the hull is sanded, and epoxy primer applied and sanded and blocked out. Unless something drastically changes, I want it splashed by April.
 

Scott Danforth

Grumpy Vintage Moderator still playing with boats
Staff member
Joined
Jul 23, 2011
Messages
50,276
here are a few links that I have found on the following page: http://www.chelseacoachworks.com/pa...ww.chelseacoachworks.com/boats/pages/ls1.html


Exhaust systems
O2 sensor
  • O2 sensor location may be an issue. You may want to build a set of exhaust manifold spacers to mount the sensors next to the exhaust ports. Running open-loop without the sensors is an option but performance and gas mileage will suffer.

    355_074.jpg


    Ckick here to see how the spacer was fabricated.
Bellhousing
Flywheel
Flexplate and flywheel power take Off adapters
Starter, alternator, bellhousing, raw water pump
Fuel system
USCG approved Flame arrestor
Cooling system
Electrical system
  • USCG approved starter, alternator. Check the PCM catalogs for these parts. ECU will have to be protected from the elements by enclosing the components in a waterproof housing.
Related Links
 

Lt. Dan

Petty Officer 3rd Class
Joined
May 31, 2013
Messages
93
A lot of the same stuff I've looked at over the last year and a half. The top Cassell manifolds are jet boat parts running injection and therefore 02 sensors, thought about them but wont work well with my application. I canned the FI setup for the ease of a Holley, MSD & crank fire ignition The Marine Power units are traditional in appearance and are well suited for quiet performance, and Ponchatoula is 45 minutes from my Baton Rouge home. Lots of information, some I had not seen, Thanks!
 

Lt. Dan

Petty Officer 3rd Class
Joined
May 31, 2013
Messages
93
No Title

Almost there, almost there
 

Attachments

  • photo209870.jpg
    photo209870.jpg
    86.8 KB · Views: 1
  • photo209871.jpg
    photo209871.jpg
    142.6 KB · Views: 1

Lt. Dan

Petty Officer 3rd Class
Joined
May 31, 2013
Messages
93
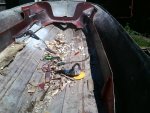
I finally have time to begin the reconstruction of the AristoCraft 18. To that end I have looked at various ways to fill the holes created when I moved the windshield & cockpit aft 3 + feet. In the past I received advice from qualified forum members, personal friends, read construction books and major refit procedure articles. It is time to move forward.

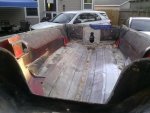
I decided to use exterior grade 3/8 plywood, a strip 4" wide, sealed with epoxy resin, attached to the underside of the deck extending 1/2" past the cut line I made to separate the cockpit and move it backwards, into the cockpit sidewall. My intention is to let the cockpit section rest upon this ledge for centering and support while attaching L brackets prior to adhesion with heavy cloth and epoxy.

Attaching "L brackets" from the underside of the deck to the side of the cockpit wall on 6" centers using counter sunk S/S hardware (I can then hide the hardware with filler docksides), I can adjust "centering" of the cockpit left to right prior to reattaching the cutout section to the deck with heavy biaxial glass cloth & epoxy resin down the side and across the deck both above and below the structure for strength. The "L brackets" should allow a centering of the reattached cockpit section before glassing so the boat does not look like it's crabbing along the water while in straight line movement and the retained sliding hardtop moves freely fore and aft.

Since I have the deck removed from the hull, doing the attachment from the backside should be a piece of cake once the cutout is centered properly, secured with the brackets/bolts, and glassed in on the underside. I can then set that aside to work the transom, engine mounting support, fuel cell enclosure, under the floor conduit for control cables, electrical harness & A/C hoses to the front unit. I think there should be good access to the fuel cell and conduit, but I am unsure at this point whether or not I will modify a production hatch (ski locker type) from a salvage boat or fab a removable enclosure cover.

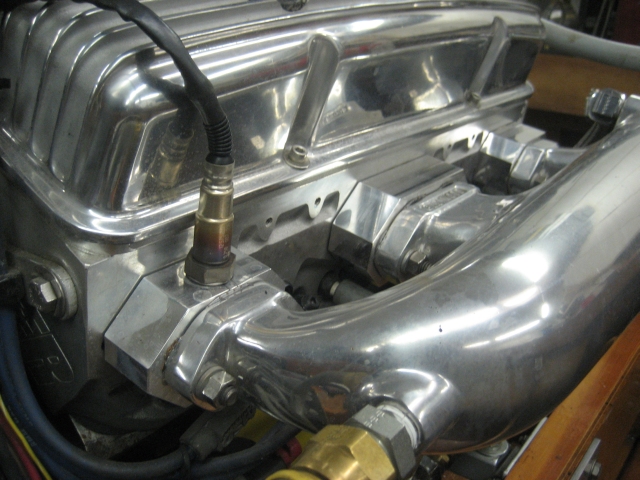
I still need to address flotation type, transom thickness for a Bravo1, Hydraulic trim tabs & pump, accelerator/transmission control type (sidewall or center console mounted?) and placement that will work with a GM LS2 aluminum V8.

I have collected all the wood working power tools necessary over the last year (table saw, jig saw, band saw, dual action sanders, belt sanders, wood clamps, even a mig welder for framing the engine mount and various other brackets needed) Looking forward to moving on this, it?s been a long time collecting things and I hear a boat ride calling.


Take Care
 

Woodonglass

Supreme Mariner
Joined
Dec 29, 2009
Messages
25,929
WELL, WELL, WELL...Look who's back at the helm!!! Glad you're back working on your project. Look forward to some pics and details!!!;)
 

Lt. Dan

Petty Officer 3rd Class
Joined
May 31, 2013
Messages
93
Hello Wood, you did have some of the better advice way back when, I did not forget that. It was aggrevating me just seeing it sit under the cover. Have to say the worst was stripping it all out, now that that is done, onward and upward! Ran out of time working these contracts in different states to work on the boat, when I had time it was generally in another state, when I was home, I didnt have time or the other tools necessary to do wood work easilly. Problem solved, I plan on doing something every other weekend until it is ready to be inspected by Fish & Game for title issuance. After that, paint, rigging & a ride.
 
Last edited:

Lt. Dan

Petty Officer 3rd Class
Joined
May 31, 2013
Messages
93
Who would know the weight of the sliding hardtop installed on the 19? I'm asking based on what appears to be a much slimmer design than this 18 top. If so, I would like to upgrade this item, if I can locate one. Any help is greatly appreciated.
 

GA_Boater

Honorary Moderator Emeritus
Joined
May 24, 2011
Messages
49,038
The 19 top is heavy, very heavy. And I think they are the same top. Both boats have a 7'7" beam and the 19 is only 7" longer. If they are different, the weight would vary by only a few pounds.

18.PNG

19.PNG
 

TruckDrivingFool

Lieutenant Commander
Joined
Jul 30, 2007
Messages
1,818
Interesting thread you have going here, I'm no help just curious if with all that space you're creating forward have you given any though to just going to an inboard powertrain? Could simplify the transom rebuild, open up cabin room, and help with weight distribution.
 

Lt. Dan

Petty Officer 3rd Class
Joined
May 31, 2013
Messages
93
The 19 top is heavy, very heavy. And I think they are the same top. Both boats have a 7'7" beam and the 19 is only 7" longer. If they are different, the weight would vary by only a few pounds.


Hello GA Boater,
Judging from the photos my top looks like the 19 top. I suppose a late production 68 18 teen, could have a 19 top? I can attend to that when the time comes, I forgot how heavy it is until I moved it yesterday. Nice photos btw.
 

GA_Boater

Honorary Moderator Emeritus
Joined
May 24, 2011
Messages
49,038
I snagged the pics off of Aristocraftboats.com in the fiberglass boats brochure section, Lt.
 

Lt. Dan

Petty Officer 3rd Class
Joined
May 31, 2013
Messages
93
Interesting thread you have going here, I'm no help just curious if with all that space you're creating forward have you given any though to just going to an inboard powertrain? Could simplify the transom rebuild, open up cabin room, and help with weight distribution.

Thought about that briefly, but in the end I really wanted to move the cockpit aft which would have eliminated any interior room with a inboard in that configuration. The C/G has been factored and located. In a early post I explained the process of how we arrived at the proper & accurate spot with the weight that will go back in.
There may be still 3 or 4 advertised in a GA boat salvage yard which would lend itself to that configuration. From what I see on the bare hull, a gimbal would be very easy to do allowing a mid mount "ski natique" style configuration but with weight there, it might plow instead of plane, that's too much excitement for me.

Stay Safe
 

Lt. Dan

Petty Officer 3rd Class
Joined
May 31, 2013
Messages
93
No Title

I picked up 3" U brackets, attached 2 after a slight modification finding the idea will work. I spent today adding hardwood 1x2 by 8 ft., hardwood strips to the upper hull where the rub rail attaches with stainless steel screws. Additionally I was able to sanitize the underside of the deck of all remaining plywood and fiberglass mat used to attach it nearly 50 years ago. There is much more removal necessary in order to fit the deck evenly and level upon the hull. It is nice to have the time, tools and place to work again. Have a great one! Much, much more to follow.
 

Attachments

  • photo232066.jpg
    photo232066.jpg
    69.4 KB · Views: 1
  • photo232067.jpg
    photo232067.jpg
    59.2 KB · Views: 1
Top