gm280
Supreme Mariner
- Joined
- Jun 26, 2011
- Messages
- 14,605
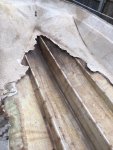
Early update, i was shooting for a weekly update, but got some extra help yesterday. Managed to get the cap moved off the boat with the help of my Brother in law and my nephew, great bunch of guys. Ill get a stand fabbed up for the cap and try cutting the inner transom glass and removing the remainder of the deck.
For my first question to the community, is it better to remove the transom and stringers all at once or replace them piece by piece. My sensible side says to complete the transom repair first then stringers, one at a time then deck. Seems like most threads i have read, you guys just gut the whole dang thing and start figuring it from there.
If it is any consolation, I have seen worst...much worst.
Before you get too involved, you seriously need to take a lot of measurements NOW! I used a graph paper system for that. Measure across the hull (beam if you will) from the very back (transom) and measure at some intervals all the way to the front (bow) and layout those measurements on some sketched diagram of your boat. I measured about every foot to capture the arch of the sides. Because it would be really sad (and you wouldn't be the first) to find out after all the work, that your cap won't fit back in place anymore.
Any side splaying out will stop the cap from fitting back in place. So your cradle really needs to keep the sides in check for that reason.
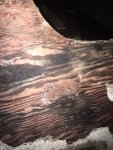
As you start grinding the old fiberglass out in prep for new transom and stringers, you will start to see how flimsy the sides actually are. That is why you build the cradle to hold them in their original place as you rebuild the internals.
As to your question about how to do the rebuild of the structure, I personally would gut the entire hull including the transom and stringers first. Then grind the hull in prep to replace them. I put the new transom back and then the stringers. And depending how your boat was made, the stringer probably tie into the transom. So a new transom will make the stringer replacement solid as a rock.
Keep up the great work and questions. And make sure you post updated picture for us to see and offer ideas and help. :thumb: