69 Woodson Tri-hull with 68 Johnson 55hp

Hab

Petty Officer 2nd Class
Joined
Jul 4, 2017
Messages
158
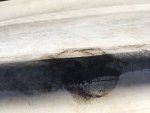
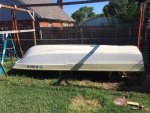
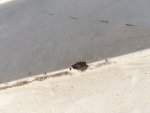
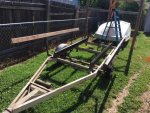
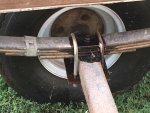
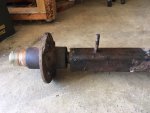
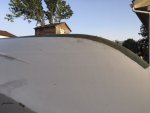
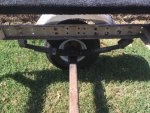
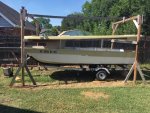
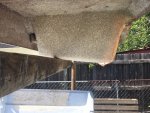
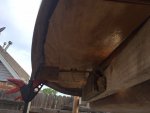
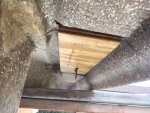
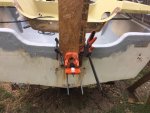
I didn't get any pictures of the process, but with alot of help we got the hull flipped over. Now I have 3 main parts to work on. The keel wasn't in too bad of shape. I still want to rework the scrapped up parts and then try to cover it with bed liner, like a cheap keel guard. Im a little nervous working on the wet side, so Ive got some reading to do. The trailer needs work, but again my goal here is to get it up and functional, so ill skip paint and cosmetics till probably never. For now its readjust the rollers, replace the bunk and add better side guide bunks. Luckily i was gifted about 20ft of 1X2 rectangular tubing a few months ago. The cap needs to have some plywood replaced. Ill probably just glue in some replacements to get me back on the water. Most of the original pieces were simply glued to the underside and shot with zolatone over spray. Ill figure that out later.
6-7-20-1.JPG6-7-20-6.JPG
 

Attachments

  • 6-7-20-4.JPG
    6-7-20-4.JPG
    83.8 KB · Views: 1
  • 6-7-20-2.JPG
    6-7-20-2.JPG
    158.8 KB · Views: 1
  • 6-7-20-3.JPG
    6-7-20-3.JPG
    79 KB · Views: 2
  • 6-7-20-5.JPG
    6-7-20-5.JPG
    185.1 KB · Views: 2

Hab

Petty Officer 2nd Class
Joined
Jul 4, 2017
Messages
158
I ground off a 4" path along 6 FT of the keel. I added some filler to the worst of the holes and did a marginal job of reshaping the keel. Ill never be able to make a sharp peak, but that's ok. I cant run CSM over a sharp bend anyway. Ill put 2 layers of CSM on it tomorrow and then go get some gel coat. I thought long and hard about fixing the outer smaller keels, but someone had fixed some of those spots in the past and as far as i know there not broken so i guess i wont try to fix them. Ill run new gel coat over all the spots when i do the keel. I should probably try to gel the first 6-7 ft of the entire bottom, it has lots of chips missing from road junk smacking into it.
I started looking at the trailer tonight also. I think I'm going to try to run the springs under the axle. The trailer seem to set pretty high, and if i remember, launching this thing wasn't just easy. If i can get it set lower it should help. I started by oiling the fasteners. Hopefully after of few days of oil, summer sun, and getting knocked around they'll come loose.

6-8-20-2.JPG6-8-20-1.JPG6-8-20-4.JPG
 

Attachments

  • 6-8-20-3.JPG
    6-8-20-3.JPG
    127.2 KB · Views: 1

Hab

Petty Officer 2nd Class
Joined
Jul 4, 2017
Messages
158
Did you add some glass to the inside of the keel? Can't remember.

Well...... I made a few small patches to the spots that I ground the snot out of. and then I put in the center stringer bedding, stinger and several layers of glass over that. Why..... Whatcha thinkin?
 

archbuilder

Vice Admiral
Joined
Sep 12, 2009
Messages
5,697
I would just try to get as much reinforcing in the outside as you can. It may not be the case, but you just want to make sure your reinforcing doesn't get thin along the keel line. You mentioned CSM, that would be good if you can fit it in. I will get in trouble here, but I don't care what anyone says CSM is structural.....granted 1708 is better in some applications, but CSM is also fairly stout.
 

chevymaher

Commander
Joined
Mar 29, 2017
Messages
2,932
I don't care what anyone says CSM is structural

I whole heatedly agree. I use it in auto body. In layers it is as strong as the original material it replaced. I saw accidents where the glass was fine and the metal tore loose and was sticking to the glass. It isnt weak at all. The cloth flexes more which keeps it form shattering as quickly.
 

Hab

Petty Officer 2nd Class
Joined
Jul 4, 2017
Messages
158
Thanks Arch and Chev, I'm right there with you guys. I don't understand how various concoctions of PB can be "structural" but CSM can have "no strength". Anyway, I put (2) 4" layers of CSM over my keel where it took the most abuse. I wasn't really looking for a structural element to strengthen the section. I didn't remove hardly any material when i ground off the gel. I did more or less want to replace the damaged area and add a few layers for extra protection in a high wear area. I'll still gel and then put truck bed liner over it. It ought to bounce off rocks when I'm done. this time I actually did a good job. then I started to mess with the trailer. That did not go so well. Did a test fit for the underslung spring set up. The spring stud on the axle is welded between the axle and the spindle. To fix it right i would have to cut and drill through the spindle or add a similar hidden fastener to the underside of my axle. Anyway i need to get the tape out and make sure Ive got enough clearance to cycle the springs and that my motor wont drag the ground. I guess Ill raise the fenders, although i am likeing the tucked under look, even if it costs me these ancient tires.

6-9-20-1.JPG6-9-20-5.JPG6-9-20-6.JPG
 

Attachments

  • 6-8-20-3.JPG
    6-8-20-3.JPG
    127.2 KB · Views: 1
  • 6-9-20-2.JPG
    6-9-20-2.JPG
    141 KB · Views: 1
  • 6-9-20-3.JPG
    6-9-20-3.JPG
    136.3 KB · Views: 1
  • 6-9-20-4.JPG
    6-9-20-4.JPG
    80 KB · Views: 1

emoney

Commander
Joined
Jul 19, 2010
Messages
2,551
You're getting close, great work so far. I have always liked the springs on top, but not for any reason. Probably convinced myself it made it "ride smoother". As it is, any way to lengthen the tongue of the trailer? Hard to tell in the pics, but if it doesn't "launch easy", that would help get it deeper into the water at least.
 

Hab

Petty Officer 2nd Class
Joined
Jul 4, 2017
Messages
158
Well..... Its been 25 years since it was launched, and I honestly just cant remember how difficult it was. Ill keep the tongue and tires suggestions in my hat, and revisit later. Im gonna table the trailer mods for now and finish the boat. I can actually get the trailer in the garage over the winter to modify, so for now ill try to stay focused on the boat.
 

Hab

Petty Officer 2nd Class
Joined
Jul 4, 2017
Messages
158
I finished the keel re-enforcement, then painted with a few coats of gel coat and then i laid over some of that slap on bed liner stuff. I wasn't too sure about it since it doesn't come with a hardener, but actually it seems all-rignt. Its darn sure not as tough as real bed liner, but it seems fairly tough and i laid it on thick enough it should provide some dampening from rocks and sand bars.

As for the trailer i couldn't help myself, i had to re-arrange the bunks, and replace the worst of the rollers. Also the suspension looked all wrong to me so i swapped the placement of the swing shackle. I dont know if the springs are shot or they are for something heavy like 1000lb springs each side, but they barely give at all when i pick the trailer up and drop it. It was only marginally better when i changed the shackle placement. I killed the side guide bunks for now (they were really just an inadequate cradle i added before i tore the boat apart). I want to add a step side and sturdier side guides later on, but I will wait till I make the final ride adjustments to the trailer suspension and final adjustments to the rollers and bunks for launching and recovery. Plan to put the boat back on the trailer tomorrow. I will finish the cap mods and start on the motor wiring.
6-13-20-1.JPG6-13-20-6.JPG
6-13-20-2.JPG
 

Attachments

  • 6-13-20-3.JPG
    6-13-20-3.JPG
    176.6 KB · Views: 0
  • 6-13-20-4.JPG
    6-13-20-4.JPG
    184.4 KB · Views: 0

Hab

Petty Officer 2nd Class
Joined
Jul 4, 2017
Messages
158
Got the boat flipped back over and the cap set back up. My Mom and Dad came by to help out. Thanks Mom & Dad. I have a few small things to finish on the cap. I started to re-attach the splash well with cap in the installed position. I thought i could raise it up and finish glassing it up but that wont work, there is too much flex in the section so ill have to put i back down and do the best i can without gluing it to the transom. I have several backing board to replace where stuff attaches to the cap, and after that i guess i will put in a few rivets and to dump it in some water. I didn't get a lot done Sunday, I stayed in the tree house with my son Saturday night, and i didn't sleep well, then it got hot, and well other excuses. went to the river on Monday and had a good float with friends, got a BBQ this evening. be back on the boat by Wednesday for sure.

6-14-20-3.JPG
6-14-20-2.JPG6-14-20-4.JPG
6-14-20-9.JPG6-14-20-8.JPG
 

Attachments

  • 6-14-20-6.JPG
    6-14-20-6.JPG
    173.1 KB · Views: 1
  • 6-14-20-7.JPG
    6-14-20-7.JPG
    165.7 KB · Views: 1

buxmj

Petty Officer 1st Class
Joined
Jun 9, 2018
Messages
294
Hi Hab, I just read your whole thread, thank you for the detailed process you are going through, it is inspiring me to get going again...if I can just finish some of the other projects I have started. I have been able to do a little but hope to have some whole days coming up where I can really get some work done.
 

Hab

Petty Officer 2nd Class
Joined
Jul 4, 2017
Messages
158
I got my splashwell mostly secured and ready for paint, and a few other minor items completed on the hull. took a break to play with my engine today and managed to finally get the lower unit shifting right. This was a bigger success to me than it may seem to most. we have fought that lower unit for years.

https://www.youtube.com/watch?v=1cECM7HroQE
 

Hab

Petty Officer 2nd Class
Joined
Jul 4, 2017
Messages
158
The punch out list keeps growing, even though i am nearing the end with the hull. I did manage to get most of the stuff on the front end of the cap completed. I think I am about finished with the major points of the rebuild. Now its back to the transom to button up a few things. I need to reinstall the tie down loops, the steering, the motor mounts, and the brass drain tubes for the bilge and the splash well. I need to re gel coat the transom as well it ended up with quite a few stress cracks after beating on it so much trying to get the old bedding material off of it. I also need to reinstall the rub rail and wire the helm. The cap fit back pretty good at least on the port side. All the rivet holes on the starboard side are off by about a 1/4", hopefully i can pull it around a bit without breaking it up too bad. All of that will be a treat now that the bulk of the glass work is completed. I was hoping to run it over to the lake for a float test next week, but the 4th holiday is coming up, so i better keep it in dry dock a little longer.

6-25-20-1.JPG
 

Attachments

  • 6-25-20-2.JPG
    6-25-20-2.JPG
    85.6 KB · Views: 1
  • 6-25-20-3.JPG
    6-25-20-3.JPG
    139.3 KB · Views: 1

Hab

Petty Officer 2nd Class
Joined
Jul 4, 2017
Messages
158
Made some time on the boat today. I started drilling my transom tie down loop holes and splash well drain. Mostly i was doing a dry run to make sure i could drill straight holes. the next set of holes is for the motor mount and steering. I bought one of those cheap harbor freight drill guides. It doesn't work worth a flip on its own, especially with large bore forstner bits. I bolted it to a piece of half inch osb and clamped the whole contraption to the transom. It worked much better and I was able to drill straight holes for the first time. I also took my lower unit off again, to get it sealed. I checked in with the motor guys and it turns out it wasn't necessary to seal it, but i went ahead and hit it with some RTV anyway. Re-checked the wiring and I'm still good. Next up is to finish the motor and layout the motor mount holes. Once all the holes are finished, Ill go ahead and re-gel the transom, and start mounting stuff in sealant.

6-28-20-2.JPG
 

Attachments

  • 6-28-20-3.JPG
    6-28-20-3.JPG
    135.4 KB · Views: 1
  • 6-28-20-4.JPG
    6-28-20-4.JPG
    111.2 KB · Views: 1
Top