'76 850 Gasket/seal replacements

mlbinseattle

Petty Officer 2nd Class
Joined
Aug 1, 2015
Messages
100
I'm starting a new thread about this. There's another thread, but it's quite long and I'm now looking for input regarding various areas.

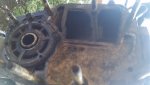
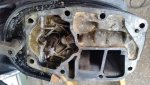
I've attached a couple of pics. One is the lower unit base (exhaust extension) and the other is the lower block area (lower crank seal, water input and exhaust output).

Notice the milky oil in the driveshaft area where it sticks out? Where do you suppose that's coming from? Lower unit seal below the water pump, or bad base gasket allowing water from the water input into the driveshaft area in addition to a leaky lower crank seal?

Any input regarding the lower block base area?

I'm in the process of drilling/tapping the last hole for the cylinder head cover (water jacket cover?), then I'm going to remove the exhaust plate/divider plate to inspect that area. I'll post more pics once I'm done with all that.

As always, your input is appreciated.

@emckelvy
@chris1956
bill kubiak
 

Attachments

  • photo227908.jpg
    photo227908.jpg
    67.7 KB · Views: 5
  • photo227909.jpg
    photo227909.jpg
    74.9 KB · Views: 5

Bill kubiak

Chief Petty Officer
Joined
Jan 31, 2004
Messages
629
First how the heck did you post pictures???? Is there a way to do that straight from your computer picture files???
Perhaps you should have pulled the lower until off first, I see the driveshaft sticking up
TIP for reassembly, do not put any shaft grease on the very top of that driveshaft, but grease the hell outa the spines.
All the bolts sticking out of the bottom of the power head are studs and I have one missing, it is beyond me how that happened
Can you jury rig up something like I did to see how the water flows up from the pump
Another Tip I received today from the Mercury dealer for cleaning out water passages. First blast them out with Air, then they suggested I use a mixture of Muriatic acid and water 50/50, to clean out water passages, and do not let it sit, run it through and flush it a lot, they said I may have to do that several times to get it spiffy clean and to do that prior to re-asembly. They showed me their rig it was a plastic watering can with a small hose on the end
I never heard of that one and I have no idea what th effects of that mix will be on the aluminum.
As far as that milky question, I don't know, but I do know if you pull the lower unit drain plug and the oil runs out milky white you have a leak in there and that leak is most likely a prop shaft seal caused by monofilament fishing line getting wrapped around the shaft at some point, there is actually two seals there, back to back, one to keep the oil in and the other to keep the water out

I did not work on mine today or yesterday, just too hot and humid, and the thought of picking up a wrench made me start sweating
 

mlbinseattle

Petty Officer 2nd Class
Joined
Aug 1, 2015
Messages
100
Bill, I uploaded those pics from my phone after I took the pics with it. I made the entire post from the phone. You can also upload pics from your PC or Mac. See the little camera icon on the top left side of the post area (where you're typing)? You can upload photos from your PC or phone gallery from there. It's pretty self-explanatory once you click on the icon. Or, if you have already uploaded pics to iboats, you can choose from one of those.

I thought about pulling the lower unit, first, but I just want to be done with the powerhead before I do anything else. Pulling the powerhead wasn't bad. It came right off after I gave it a good rockin' or two. I'll keep that tip in mind when it comes time to reassemble. What type of grease do you use for that?

You stuck a hose up to your water feed tube in the lower unit. Right? I could have done that had I left the powerhead attached, and there wasn't any way getting around that. I had to take the powerhead off just to can access to the lower bolts on the backside and exhaust side. Besides, I needed to replace that lower crank seal and base gasket, anyway.

If you're running Muriatic acid through the cooling system, you can't let that sit. I wouldn't worry about the aluminum. I'd worry about any old gaskets getting ate up. It'll probably eat up whatever old gasket is left in the area that it touches. So, yes, it has to get flushed through, continuously. Instead of acid, what if you tried some LCR or something like that? It's used to get corrosion of metal and many other things. Also, it's a lot less harmful.

I need to drain the oil in the lower unit before I pull the lower unit to install the water pump kit. If one of those seals is leaking, I'm sure the oil will be milky, as well. I was going to change that oil, anyway. Doing it prior to pulling the lower unit is as good a time as any.
 

mlbinseattle

Petty Officer 2nd Class
Joined
Aug 1, 2015
Messages
100
So, I finished drilling/tapping the last bolt hole on the cylinder head for the cover. Afterwards, I attempted to see if a few exhaust cover bolts would budge. The ones on the right side wouldn't budge. Nor would a few others. There's a few that will turn fairly easy.

I really need to know if there is water getting into the cylinders from the exhaust ports. So, I really need to pull that exhaust cover and inspect the inside. Without pulling that exhaust cover off, I came up with the bright idea of tilting the engine all the way up as high as I could get the prop, lowering the trailer jack all the way down, picking up the tongue, and turning the jack 90 degrees so the tongue would lay on the ground. The engine wasn't fully horizontal, but I figured it was enough that I could fill up the water channel around the cylinders (since I had that cover off) enough so that water would go into the water jacket area inside the exhaust area. Then, if that water jacket was leaking, some water should get into the cylinders through the exhaust port. I stuck all the spark plugs back in the holes so water couldn't get into the cylinders from there, and I began running water into the water jacket area around the cylinders. I got the water level up high enough several times so that water entered the water jacket area inside the exhaust through the passages. While the hose was running, I turned the crankshaft several times to allow the exhaust ports to open. Then, I turned the water off, lowered the engine, returned the trailer to it's normal position, and pulled the spark plugs. All in all, I don't think my bright idea was so bright. There wasn't any water on the plugs, but from looking at the tops of the cylinders, it appeared that the #1 piston was totally dry, but the remaining three piston tops were darker in color ... like they may have been wet or oily at some point in time. Then again, my eyes may have been playing tricks on me. Needless to say, I'm no further along than when I proceeded to do all that.

​So, I guess it's time to break out the heat and go for the gusto. I'm going to heat the bolt heads on the exhaust cover and pray I can loosen those bolts without snapping any of those heads. Talk about a royal PITA.
 

mlbinseattle

Petty Officer 2nd Class
Joined
Aug 1, 2015
Messages
100
Looking at the exhaust plate, right side, about midway down, there are two bolts that are side by side. I picked the top one to heat and to attempt to remove because, if the head snapped off, then there should still be sufficient tightness from the second bolt. Plus, these bolts were apparently installed with Loctite and are baked solid into the block. In essence, these bolts have become part of the block. I know that from removing the cylinder/water jacket cover on the back that, even with snapped bolts, I had major difficulty still getting that cover off. So, if just one snapped on the exhaust cover, I'm not going to lose too much sleep over it. I'll just RTV that hole and be done with it.

Well, the head of that bolt did snap off even after heating it up twice and working back and forth on the bolt head with a socket. So, I'm going to do as I said: RTV that hole. I will also gently tighten the ones that can be turned. Then, I'm going around the edges of the exhaust and divider plates with RTV as needed (if needed) after I get it running, again. At this point and after drilling/tapping four broken bolt studs on the cylinder/water jacket cover, I'm done drilling and tapping.

I looked into the transfer ports for the two bottom cylinders with the pistons all the way down so I could get a view of the cylinder walls. Those didn't appear milky colored or have any white streaks that would be a tell-tale sign of water getting into the cylinder. I still need to check the top two cylinders, and I'll do that, tomorrow. Point is, it doesn't appear that water has been getting into the cylinders, at least the bottom two cylinders. Also, as I mentioned in another comment, the piston heads look dark like carbon would look.

Because the area around top of the driveshaft where it connects to the crank looks milky white, I'm sure the lower crank seal is shot. Water is probably getting into the crankcase area. In any case, that seal will get replaced.

I have new plugs installed, so there really hasn't been enough time on those to determine if any are getting "washed". I know when I changed those plugs, none of the old ones appeared "washed". Of course, no telling how long those had been in there.

Does it sound like I'm trying to convince myself that there is no need to pull that exhaust cover and divider plate. Well, I am. I'm installing new transfer port gaskets, a new cylinder/water jacket cover gasket/ bottom crank seal, and powerhead base gasket (where it sits on the exhaust port extension). Going to install a new water pump kit, afterwards, and call it a day.

Unless anyone has anything to add or something for me to consider, I'll report back once it's all together and running.
 

Bill kubiak

Chief Petty Officer
Joined
Jan 31, 2004
Messages
629
No Title

Just how much is 2.00 mgb when I tried to upload one picture it said your file exceeds 2.00 mgb and it would not upload
 

Attachments

  • photo227964.JPG
    photo227964.JPG
    53.5 KB · Views: 1

Bill kubiak

Chief Petty Officer
Joined
Jan 31, 2004
Messages
629
OK I put the cylinder head cover on and the exhaust diverter and exhaust covers on and properly torqued them down, I have black perma gasket goo all over. Somehow I lost one exhaust bolt, there are 14 of them, but in my parts bin I found another one, cleaned it up and put it in. Now to find that missing bolt before I step on it and bust my A__
 

mlbinseattle

Petty Officer 2nd Class
Joined
Aug 1, 2015
Messages
100
The lower crankseals will stop the milky mix around driveshaft.

Thanks. I figured that's where it was coming from. I'm sure that and the transfer cover gaskets being shot weren't helping at all with the way the engine was running.
 

mlbinseattle

Petty Officer 2nd Class
Joined
Aug 1, 2015
Messages
100
Just how much is 2.00 mgb when I tried to upload one picture it said your file exceeds 2.00 mgb and it would not upload

Either reduce your picture file size to the smallest setting (in the camera settings ... usually expressed in pixels). Then take the picture. It should upload fine after that.
 

mlbinseattle

Petty Officer 2nd Class
Joined
Aug 1, 2015
Messages
100
What do you guys think about this as a way to tell if water is getting into the cylinders through the exhaust ports without having to pull the exhaust cover? I read a comment, last night, about someone who flipped the powerhead upside down and filled up the water jackets by pouring water into the water port on the bottom of the powerhead. Then, he watched the water level to see if it went down. If it went down, the water has to go somewhere and that would have to be in the cylinders assuming the powerhead isn't leaking from somewhere else. What do you think about this? Sound feasible?
 

Chris1956

Supreme Mariner
Joined
Mar 25, 2004
Messages
28,086
No need to do that, and it probably won't work. Remember gravity is used to keep water out of the cylinders, and you will violate that rule.

Just run the motor and examine the spark plugs. if they are real clean, the spark plugs are being steam cleaned by water infiltration. Spark plugs will also have water droplets sometimes, and maybe some rust....
 

mlbinseattle

Petty Officer 2nd Class
Joined
Aug 1, 2015
Messages
100
No need to do that, and it probably won't work. Remember gravity is used to keep water out of the cylinders, and you will violate that rule.

Just run the motor and examine the spark plugs. if they are real clean, the spark plugs are being steam cleaned by water infiltration. Spark plugs will also have water droplets sometimes, and maybe some rust....

That's what the intent was. To see if water was getting into the cylinders through the exhaust ports. So yes, violating the rule was intentional.

In any case, you were spot on about the bottom crank seal. The rubber had literally come off the seal and was flopping around the shaft.

Do gasket kits normally come with the crank top and bottom seals? Mine didn't have those. One more thing to run down.

Got the transfer port covers on and the bolts torqued. Cleaned the gasket surface on the cylinder water jacket cover. Now, to find a seal ...
 

Bill kubiak

Chief Petty Officer
Joined
Jan 31, 2004
Messages
629
Got mine all put back together and pressure tested with my jury rig water test system. I started with a little hose pressure and waiting until the block filled and water came out the pee hole, then continued watching as water then came out the mid leg. kept adding more and more pressure and the water just came out the pee hole faster as well as down the leg, went to full hose pressure about 30 PSI, no leaks anywhere. Still have the lower unit off, Tomorrow I will change the impeller and re install that and then fire the motor up.
 

mlbinseattle

Petty Officer 2nd Class
Joined
Aug 1, 2015
Messages
100
I called the outfit where I bought the gasket kit. Told them that they advertised the seals for the crank end caps came with the kit. They told me it was a mistake on their part, that the seals did not come with the kit, and that it was their fault because of their catalog was wrong. They overnighted the seals, so I should see those, tomorrow.

Today, I pulled the lower unit and installed the water pump kit. Talk about a PITA. Putting that lower unit back on wasn't as easy as it looked. Figured it out, so it shouldn't be too bad in the future. I replaced all the old fuel lines, and got the transfer port covers back on and bolts torqued. Tomorrow, I'll install the CDI box, connect all the wiring, replace the bottom crank cap seals, re-install the cap, and install cylinder cover plate with the new gasket. Then, it'll be time to fire it up. If things go as planned, it'll be late, tomorrow, or early Saturday. I'm also going to change the lower unit gear oil before taking it out to the lake. I probably should have done that while I had the lower unit off to see if the seal was leaking water into the gear oil, but I'll take my chances. If I have to remove the lower unit, again, oh well. I'll just be happy to get the engine running right, again.
 

Chris1956

Supreme Mariner
Joined
Mar 25, 2004
Messages
28,086
Mlbinseattle, to be clear, water runs down the outside of the exhaust baffle to cool the exhaust on the inside of the exhaust baffle, and then mixes with it at the exhaust extension. If you invert the block, and introduce water inside the exhaust baffle, it will have a clear path to the cylinders.

Also, do yourself a favor. When you install the block onto the midsection, have the gearcase removed. It will be hard enough to get the powerhead lined up, without having to mate the driveshaft and shift shaft splines, at the same time. There will be less chance to strip the crankshaft or driveshaft splines.
 

mlbinseattle

Petty Officer 2nd Class
Joined
Aug 1, 2015
Messages
100
Mlbinseattle, to be clear, water runs down the outside of the exhaust baffle to cool the exhaust on the inside of the exhaust baffle, and then mixes with it at the exhaust extension. If you invert the block, and introduce water inside the exhaust baffle, it will have a clear path to the cylinders.


What you say makes sense, but what I wasn't saying to introduce water inside the exhaust baffle through the exhaust. What this person said (where I read this) was to pour water into the water intake at the bottom of the block ... where it goes into the block, normally. That would be the only place where water was poured into. It would seem the water would take the same route as it normally does with the blocked upside down. Except now, gravity would keep the water from running out of the block since the water would have nowhere to go once the cooling passages were full. If there were a leak, water would get into an area where it's not supposed to be under normal conditions, and the water level at the water entrance on the bottom of the block would drop.

Also, do yourself a favor. When you install the block onto the midsection, have the gearcase removed. It will be hard enough to get the powerhead lined up, without having to mate the driveshaft and shift shaft splines, at the same time. There will be less chance to strip the crankshaft or driveshaft splines.

Too late. I've already re-installed the powerhead. It actually went on fairly smooth, and I've ran the engine since then.
 
Top