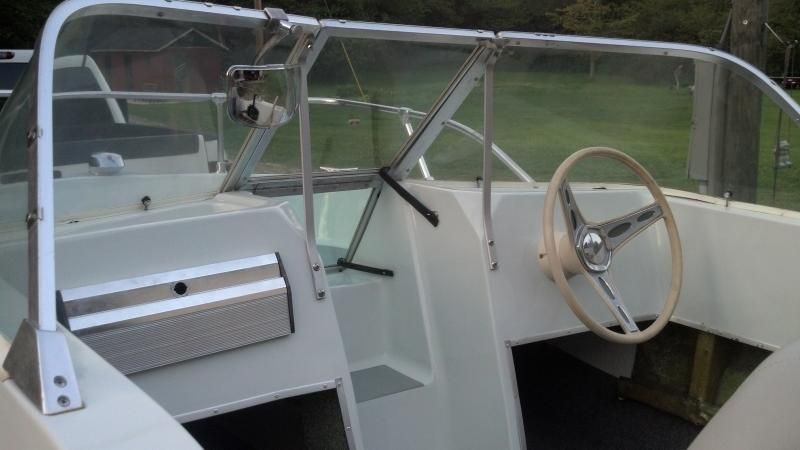
78' Columbian Floor Replacement Brand New Boater

Mark72233

Ensign
Joined
Jul 11, 2014
Messages
926
Smtred, tagging along. I started my restoration in July on my dad's boat that I also inherited. I have never done any fiberglassing. Everything I learned was from this forum and from my own mistakes which were few, again because of the folks on this forum. Just think twice, be ready to spend some $$ and a lot of work but it will be fun and the outcome is your grandfathers boat back in the water where it belongs being enjoyed by the next generation.
 

Smtred

Seaman Apprentice
Joined
Dec 6, 2014
Messages
48
Smtred, tagging along. I started my restoration in July on my dad's boat that I also inherited. I have never done any fiberglassing. Everything I learned was from this forum and from my own mistakes which were few, again because of the folks on this forum. Just think twice, be ready to spend some $$ and a lot of work but it will be fun and the outcome is your grandfathers boat back in the water where it belongs being enjoyed by the next generation.

Glad to have you Mark. I've learned a lot from everyone already very helpful forum.
 

Smtred

Seaman Apprentice
Joined
Dec 6, 2014
Messages
48
I had to recruit my dad and my cousin to move the engine. That sucker was hefty, after wrestling with the engine and exchanging a few words with my dad trying to get it mounted.

Here's all 70 horses.


Should be finishing up the removing the rivets tonight and getting the cap off.
HXSClu8.jpg?1.jpeg

I'm curious about this piece on the hull. It's on both sides.
e9MJykx.jpg?1.jpeg


I have a few questions for you guys.

Before I actually remove the Cap should I remove the windshields before hand? Reason I ask is because I think I read it on a thread but can't remember if it was important or not.

The picture with the arrow is hollow underneath. Is this piece part of the hull for structural integrity? Or is it there for a different purpose for wires maybe? I would personally like to remove it entirely, add room for custom bench seat/storage.

Also feel free to add any tips/tricks you wanna throw my way before I attempt to remove the Cap. :D
 

Attachments

  • XzLy2Df.jpg?1.jpg
    XzLy2Df.jpg?1.jpg
    1.8 KB · Views: 0
  • XzLy2Df.jpg?1.jpg
    XzLy2Df.jpg?1.jpg
    1.8 KB · Views: 0

Woodonglass

Supreme Mariner
Joined
Dec 29, 2009
Messages
25,929
Personally I'd remove the windshields before decapitation. I believe the rectangular boxes are somewhat structural from the deck to the hull and I would consider keeping them when you go back with the new deck. Once the demolition is complete you can make a better determination on how flimsy or strong the sides of the hull appear to be in relation to the attachment to the deck. As always, it's your boat and the final decision rests with you. ;)
 

rickryder

Commander
Joined
Jun 24, 2010
Messages
2,722
I see no need to remove windshield unless you need to work on the cap...gel coat or paint work...

not sure about the tunnel running along the gunnel...hard to see from the pic if it's attached to the hull... I have an L shaped piece that runs along my gunnel but its only function is for a place to attach the side covers and to form a pocket for storage....not really structural..
 

Smtred

Seaman Apprentice
Joined
Dec 6, 2014
Messages
48
Personally I'd remove the windshields before decapitation. I believe the rectangular boxes are somewhat structural from the deck to the hull and I would consider keeping them when you go back with the new deck. Once the demolition is complete you can make a better determination on how flimsy or strong the sides of the hull appear to be in relation to the attachment to the deck. As always, it's your boat and the final decision rests with you. ;)

Thanks for the input WOG. I think it'll probably be better to keep them, better safe than sorry. If anything I can always work around them. I guess I'll know a little more once I finish tearing everything down.
 

Smtred

Seaman Apprentice
Joined
Dec 6, 2014
Messages
48
I see no need to remove windshield unless you need to work on the cap...gel coat or paint work...

not sure about the tunnel running along the gunnel...hard to see from the pic if it's attached to the hull... I have an L shaped piece that runs along my gunnel but its only function is for a place to attach the side covers and to form a pocket for storage....not really structural..

​I will be doing some paintwork...also the center piece of glass on the windshield doesn't sit right. Going to need to work on it either way. So have no reason not to follow WOG advice.

Personally I'd remove the windshields before decapitation.

Advice I will follow.
 

jc55

Senior Chief Petty Officer
Joined
Nov 3, 2006
Messages
665
If your deck has sagged you may experience middle window sag. But you can sort that out and readjust everything when you put the cap back on. I'm a "fit guy" personally. We'd fit the body back on the frame of a car 3 or 4 times while building it.

When the cap is removed, run a straight edge across the top of the hull then measure down to the deck that's remaining under the open bow entry before removing. This is a crucial measurement for windshield fit. Just another suggestion as my '68 had a 3 piece windshield and steps that sat on the deck.
 

Smtred

Seaman Apprentice
Joined
Dec 6, 2014
Messages
48
When the cap is removed, run a straight edge across the top of the hull then measure down to the deck that's remaining under the open bow entry before removing. This is a crucial measurement for windshield fit. Just another suggestion as my '68 had a 3 piece windshield and steps that sat on the deck.

What's the main purpose of this measurement? Shouldn't the window sit the same no matter what, since it rests on the cap and not attached the deck? :noidea:
 

rickryder

Commander
Joined
Jun 24, 2010
Messages
2,722
I think more importantly is the width or the beam of the boat... The reason we measure across the width of the boat in a bunch of places is to assure that the hull isn't flexing or bowing in or out....if that happens the cap will not fit back on. Mark your gunnels with a sharpie along both sides about every 2' and have a helper hold one end of your tape and measure at each mark. you may need to measure down from under the lip a few inches so you go hull to hull not the cap...record these numbers. When you remove the cap remeasure to see if the numbers are the same...if not you will need to work the hull back to the original measurements...whether you have to jack up the sides of your cradle to bow in or straps across the top of the hull to pull it in etc. Hope you understand ;)
 

Smtred

Seaman Apprentice
Joined
Dec 6, 2014
Messages
48
Thank you rickryder. That makes sense :facepalm:.

I'm close to taking the cap off just have a few more things that need done. Thinking I'm going to have to wait awhile to have room. My cousin is having some engine problems so we have an extra car in the shop right now. Just changed out a shattered gear on the timing belt. Starting to think that it bent a few valves....not sure what we plan on doing but my dad is thinking of picking up a crate engine. So might be taking a break from the boat and doing an engine swap. :eek:hwell:

Got all the rivets out last night. Railing came off with little resistance. Going to take some of those measurements tonight after work, and hopefully get the windshield off as well. Might even be able to take a sample of the transom. Been crossing my fingers hoping its solid still but I've been expecting to have to replace it.

I took a few samples of my stringer last night, about 80% sure it needs replaced. A few spots came up dry and light colored. However there were just as many spots that came out dark and looked damp.
 

rickryder

Commander
Joined
Jun 24, 2010
Messages
2,722
On those bent valves....easy way to check is screw in a compression gauge hose or spark plug adaptor to and air line and pressurize each cylinder....if the valve is bent and not seating you will hear air rushing out of the intake ,exhaust or both.. ;)
 

jc55

Senior Chief Petty Officer
Joined
Nov 3, 2006
Messages
665
I had the cap on and off a couple of times during the build to check transom to splash pan fit and cap steps to new deck clearance.

I make marks on the hull every 2 feet and measure the distance from side to side on the hull as the cap is coming off. I run support braces and work around them to hold the shape of the hull when the cap is off. Just 2 or three braces.

Yup, that's why I covered it previously.

If your deck goes in 1/4" too high, the middle windshield piece gap may not fit. Too low, same thing. That's why that measurement is crucial as well as the hull width.
 

jc55

Senior Chief Petty Officer
Joined
Nov 3, 2006
Messages
665
This is what I'm taking about. You want the middle windshield to fit perfectly...
IMG_20140801_201025_258.jpg
 

Smtred

Seaman Apprentice
Joined
Dec 6, 2014
Messages
48
Yup, that's why I covered it previously.

Seems as tho I overlooked that :facepalm:

If your deck goes in 1/4" too high, the middle windshield piece gap may not fit. Too low, same thing. That's why that measurement is crucial as well as the hull width.

It all kinda clicked finally. I see what you mean, and I see how that could be a pain in the rear as well. Thank you.
 
Joined
Feb 17, 2015
Messages
5
Not sure how much you've accomplished on your project, but I am just about done with the interior of my 72 trihull, wasn't sure if anyone else even had a Columbian boat to compare to...So far it is quite interesting how this is going and the changes made between 72 and 78...I have been scouring the internet looking for others that have these boats and it looks like I finally found some here...very cool
I had to rebuild the entire floor and stringers without ant information on the manufacture. I did get tips from the former owners son (of Columbian boats) who helped me to find where the key components were so I didn't cut her in half while trying to take her apart.
 
Last edited:

Smtred

Seaman Apprentice
Joined
Dec 6, 2014
Messages
48
Not sure how much you've accomplished on your project, but I am just about done with the interior of my 72 trihull, wasn't sure if anyone else even had a Columbian boat to compare to...So far it is quite interesting how this is going and the changes made between 72 and 78...I have been scouring the internet looking for others that have these boats and it looks like I finally found some here...very cool
I had to rebuild the entire floor and stringers without ant information on the manufacture. I did get tips from the former owners son (of Columbian boats) who helped me to find where the key components were so I didn't cut her in half while trying to take her apart.


Welcome aboard Das Columbian Boot! :welcome: Glad to see I'm no the only one with a Columbian here. Any advise you could throw my way would be very much welcome. I'm not very far in my restore but I'm slowly making progress.
 

Smtred

Seaman Apprentice
Joined
Dec 6, 2014
Messages
48
I know it has been awhile since I have posted anything but I'm back with some progress pics. :bounce: Due to college and life in general I've been very busy and havn't made much headway. I was however able to get the cap off successfully this last weekend.

AvP4FfU.jpg

Here's a look at the top of the Transom

ffbLuXH.jpg

4awecMM.jpg

The bow
TSdrioR.jpg

Yg6336n.jpg

Should finish up alot of demo this week after i finished masking half the shop off. I'll have to wait untill i see more of it but the stringer actually looks really solid still. Would be nice if i only needed to replace the transom .
 
Top