81 Sea Ray 26 Sedan Bridge I/O to OB Conversion/Restore (Pics)

CaptainKickback

Lieutenant Junior Grade
Joined
Jul 23, 2011
Messages
1,060
At the strong suggestion of oops! and others experts on iBoats, I am opening this thread on my 1981 Sea Ray 255 Sedan Bridge restoration project. My hope for this thread is twofold. First, if I post the things I am doing or plan to do, the experts will help me limit my mistakes. Second, I believe this project will progress through a number of things that have not been found in other restoration projects.

I have owned boats for years (Wellcraft 23 Walkaround, Cruisers Yachts 2870, Sea Ray 355 Sedan Bridge) and have done whatever maintenance on those boats that I felt comfortable doing. So, this project is my first time digging deep into boat construction and fiberglass work. My goal is to learn new skills and hopefully, others will learn from it too.
Project Highlights:
  • Starting with just a hull (new everything)
  • Dealing with a bridge (a weak one)
  • Conversion from twin I/O to twin outboards
  • FG Stairway Construction (don?t want a ladder)
  • FG Transom Seating/Storage Modification
  • VacuFlush style head
  • Likely, will do different type of Bimini or T-Top & canvas
  • Back View/Backup camera
Since I am redoing everything on the boat, we?ll be getting into all areas of the boat. So, I hope this thread is of interest to you.
 

CaptainKickback

Lieutenant Junior Grade
Joined
Jul 23, 2011
Messages
1,060
Re: 81 Sea Ray 26 Sedan Bridge I/O to OB Conversion/Restore (Pics)

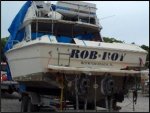
The Boat - Alright, the boat is a 1981 Sea Ray SRV 255 Sedan Bridge. It was a twin Merc 470 I/O (Alpha drives) configuration. Total HP was 340. The boat had been sitting on a trailer for years and obviously neglected. The hull and transom are sound but the stringers and bulkheads were rotten. The gel coat is old and faded. It had a second helm inside the salon which we removed. Water & fuel tanks were shot. We gutted the boat.

boatontrailerback.jpg

The Motivation ? We are building the boat we want but can?t buy! We are cruisers (we don?t fish), so our boating style is generally to anchor out for several days at a time. We will keep the boat in the water most of the time, but want to be able to trailer it occasionally to other boating areas. We don?t want a huge boat (had a 35 footer ? too much fuel cost), but still want all the amenities we had in our Cruisers 2870 (A/C, genset, etc). We want outboards for several reasons. One, keeping a stern drive boat in salt water is a nightmare (been there, done that). Outboards can be lifted completely out of the water while at the dock. Second, where we will anchor out most of the time has some very shallow water. Outboards allow us to take advantage of that shallow water because we can lift the engines up. Third, converting to OB frees up a lot of space in the engine room. So, we can have space for a generator, more batteries, bigger water tank, vacuflush head, etc.

The Concept ? We are starting with an old, very dated boat. I plan some FG mods to make it look a bit more modern. That gel coat is that old yellowish beige color that was used for several years around 1981. It really dates the boat. So, we will re gel coat the entire boat. To completely change the look of the boat, our theme will be a stealth look. The new gel coat will be a shade of grey consistent with that theme. We are planning other things to make the boat look more modern, like a FG staircase instead of the ladder, forward and rear facing seating where the top of the transom is now, built in cooler on the cockpit deck, and some other FG work to round out some of the boxy lines of the boat. We expect you will not recognize the boat in a year or so.
 

CaptainKickback

Lieutenant Junior Grade
Joined
Jul 23, 2011
Messages
1,060
Re: 81 Sea Ray 26 Sedan Bridge I/O to OB Conversion/Restore (Pics)

Work So Far - We have had the boat for several months now. To this point it has been mostly demo work: removing everything like second helm, head compartment, bow rails and all the stainless steel fittings, removing/grinding out stringers and bulkheads, etc. Also, we have done some experimentation with paints and gel coats. I?ll post that progress separately later. We gave away the engines and stern drives to the first person that was willing to do the work to get them out and pay for the crane to hoist them out.

Because of removing so much inner support, the cockpit deck and helm began to change shape. So, although the boat is on a trailer, we ordered some proper boat stands and made some keel stands. Along with that, we made some homemade beam supports to crank everything back into position. We are now ready to do the main bulkhead. I?ll post that separately as well.

We have purchased the new gas tank: 116 gal poly. It will sit side to side just behind the main bulkhead under the forward edge of the cockpit deck. The old tank was a 120 gal metal tank (with two holes and about 3 gallons of gas in it). We found the water tank we want. It is 50 gal (old one appeared to be about 20 gal) tank that will sit where the old gas tank was, between the center stringers under the salon sole. We will order that this week so we can be sure it fits as we put in the stringers.

Our Working Conditions - We own a hair salon and our primary work days on the boat will be Sundays and Mondays (although football season makes Sundays tough), and we have the boat at a yard about 4 blocks away. It?s one of the few yards around that will let you work on your boat. Since it is outside, our work scheduling will be greatly affected by the weather. Also, creating dust and overspray will be a concern since there are other boats and RVs in close proximity. The temperatures here in South Florida will make our resins cure very quickly. At least winter (still very warm) is coming. Another problem is that it is difficult to leave tools and supplies next to the boat. We have to keep them in the SUV and in the storage unit 100 yards behind our salon. At least everything is close.

BTW, I will have help with this project. My wife is the type of person to dig in and get her hands dirty. I?ll have to post a picture of her in her haz-mat suit, respirator and goggles sanding on the outside of the hull. Also, her son, who I will refer to a Q, is a very hard worker and is helping tremendously.
 

WeldZilla

Petty Officer 2nd Class
Joined
May 26, 2010
Messages
117
Re: 81 Sea Ray 26 Sedan Bridge I/O to OB Conversion/Restore (Pics)

I look forward to watching this major project come through to fruition. Lots of pics please.. It is a bummer you can't do the job in your own back yard or driveway, still 4 blocks is manageable. Good luck with this, I am watching

WZ
 

erwinner

Petty Officer 1st Class
Joined
Aug 8, 2011
Messages
369
Re: 81 Sea Ray 26 Sedan Bridge I/O to OB Conversion/Restore (Pics)

Looking forward to this rebuild! Best of luck to the 3 of you!!!
 

CaptainKickback

Lieutenant Junior Grade
Joined
Jul 23, 2011
Messages
1,060
Re: 81 Sea Ray 26 Sedan Bridge I/O to OB Conversion/Restore (Pics)

Thanks for the encouragement guys. I've just lost my 2 big work days to solid rain here in South Florida. So I guess I'll spend the time getting more education here on iBoate. All is not lost.
 

CaptainKickback

Lieutenant Junior Grade
Joined
Jul 23, 2011
Messages
1,060
Re: 81 Sea Ray 26 Sedan Bridge I/O to OB Conversion/Restore (Pics)

I got rained out here in South Florida yesterday and today, my 2 days when i can work on rhe boat. So, no progress. Bummer
 

oops!

Supreme Mariner
Joined
Oct 18, 2007
Messages
12,932
Re: 81 Sea Ray 26 Sedan Bridge I/O to OB Conversion/Restore (Pics)

time for the popcorn and chips guys......this is a major !
 

boatnut74

Lieutenant Commander
Joined
Aug 29, 2010
Messages
1,835
Re: 81 Sea Ray 26 Sedan Bridge I/O to OB Conversion/Restore (Pics)

Looking forward to watching this one unfold. Don't see to many IO to OB conversions that follow through.
 

CaptainKickback

Lieutenant Junior Grade
Joined
Jul 23, 2011
Messages
1,060
Re: 81 Sea Ray 26 Sedan Bridge I/O to OB Conversion/Restore (Pics)

Before we rehash a lot of discussion on the topic of gel coat vs paint, I should let everyone know that I?ve already made my decision for gel coat. This is based upon my experimentation and by the last few days reading and rereading the ?At the gel coat stage ? help needed!!!? thread. That thread is an excellent thread with lots of alternatives, both for the medium and for the methods. Yacht Dr. gave an especially compelling, step by step approach to doing the gel coat, including materials, tools, and methods. He made a statement that was important to the decision. ?Gel coat is very forgiving?.

Parallel to interior construction, we will begin working to prep the boat for gel coat. Part of that preparation work will be practicing with the tools and methods spelled out by Yacht Dr. By the time the boat is ready for the gel coat, I hope to have may spraying skills up to adequate.

Several immediate questions I have about gel coat:
  1. I have a number of places where I will be glassing in new structures to existing FG. Will poly resin bond well to the existing gel coat, or do I need to remove the old gel coat in those areas first?
  2. When spraying the gel coat, will I be able to control where the overspray goes. I will be outside, in close proximity to other boats and RVs. Is the overspray heavier than paint overspray? Will it drop to the ground quicker? Will building a tarp structure around the area I am working on be able to control the overspray?
 

zopperman

Lieutenant Commander
Joined
Jun 22, 2011
Messages
1,551
Re: 81 Sea Ray 26 Sedan Bridge I/O to OB Conversion/Restore (Pics)

I would grind down the old gel to fresh glass. I did on mine and had no problem with adhesion.

What are you going to putting on her for power? twin 200's?
 

oops!

Supreme Mariner
Joined
Oct 18, 2007
Messages
12,932
Re: 81 Sea Ray 26 Sedan Bridge I/O to OB Conversion/Restore (Pics)

Before we rehash a lot of discussion on the topic of gel coat vs paint, I should let everyone know that I?ve already made my decision for gel coat. This is based upon my experimentation and by the last few days reading and rereading the ?At the gel coat stage ? help needed!!!? thread. That thread is an excellent thread with lots of alternatives, both for the medium and for the methods. Yacht Dr. gave an especially compelling, step by step approach to doing the gel coat, including materials, tools, and methods. He made a statement that was important to the decision. ?Gel coat is very forgiving?.

Parallel to interior construction, we will begin working to prep the boat for gel coat. Part of that preparation work will be practicing with the tools and methods spelled out by Yacht Dr. By the time the boat is ready for the gel coat, I hope to have may spraying skills up to adequate.

Several immediate questions I have about gel coat:
  1. I have a number of places where I will be glassing in new structures to existing FG. Will poly resin bond well to the existing gel coat, or do I need to remove the old gel coat in those areas first?
  2. When spraying the gel coat, will I be able to control where the overspray goes. I will be outside, in close proximity to other boats and RVs. Is the overspray heavier than paint overspray? Will it drop to the ground quicker? Will building a tarp structure around the area I am working on be able to control the overspray?

i anwsered on my thread......but i will do it again here for all the iboaters learning from what you do....

you need to remove the gellcoat.....glass glass, to glass....nothing in between.....the bond should be glass on glass.....just a quick grind in those areas.....remove the gellcoat....and the top layer of resin only.....then tab away. (remember to clean with acetone)

just tarping around the basic area is fine.....over spray is heavy....and falls........however....dont shoot right beside a black cobalt ! ;)

i have no problems shooting a hull right on a trailer......if i do get overspray on it.....a quick acetone wipe....and its gone!
 

zopperman

Lieutenant Commander
Joined
Jun 22, 2011
Messages
1,551
Re: 81 Sea Ray 26 Sedan Bridge I/O to OB Conversion/Restore (Pics)

Just an addition, I used a wirebrush on a drill, a 4" angle grinder and a sander with a 60 grit pad and a rubber backing pad (very impt.) and the sander worked BY FAR the best
 

CaptainKickback

Lieutenant Junior Grade
Joined
Jul 23, 2011
Messages
1,060
Re: 81 Sea Ray 26 Sedan Bridge I/O to OB Conversion/Restore (Pics)

Thanks guys. If the rain breaks tomorrow, I'll start removing some gel coat.

Oops!, the shape the trailer is in, it could use its own coat of gel. Btw sorry about asking the question in two places, but like you, i thought documenting here would be good.

Zopperman, i initially thought bigger, like 225s or 250s. But am rethinking it smaller. The power discussion involves a lot about the original power options and about what the new weight of the boat will be. I'm typing on my phone now (slow) so i will post details tomorrow from my computer. Then we can discuss.
 

boatnut74

Lieutenant Commander
Joined
Aug 29, 2010
Messages
1,835
Re: 81 Sea Ray 26 Sedan Bridge I/O to OB Conversion/Restore (Pics)

Sorry if I missed this somewhere but are you building your own outboard bracket or are you planning to purchase one from somewhere?
 

CaptainKickback

Lieutenant Junior Grade
Joined
Jul 23, 2011
Messages
1,060
Re: 81 Sea Ray 26 Sedan Bridge I/O to OB Conversion/Restore (Pics)

Sorry if I missed this somewhere but are you building your own outboard bracket or are you planning to purchase one from somewhere?

I plan to buy one from Armstrong. I visited them and several other companies that make brackets (I'm lucky being in South Florida where many boating manufacturers are). I was extremely impressed with Armstrong's operation. Very neat, clean, and highly organized. They completely went over their design and answered all my questions. Instead of painting it the standard white, they will even mix to match my hull color. While they are a bit more expensive, I will save a bunch on shipping since I can pick it up.
 

CaptainKickback

Lieutenant Junior Grade
Joined
Jul 23, 2011
Messages
1,060
Re: 81 Sea Ray 26 Sedan Bridge I/O to OB Conversion/Restore (Pics)

[h=1]Weight Distribution[/h]OK, as promised, here is the start of the power discussion, which first requires a discussion of the weight the boat will be. I?ll post the power discussion separately. Here is a list of things that will affect weight change:
  • Removed two 4 cylinder engines and stern drives. Net -1500 lbs.
  • Adding two outboard engines at 500 lbs each. Net -500 lbs.
  • OB bracket provides flotation for 1 engine (per Armstrong). Net -1000 lbs.
  • Add generator at 250 lbs. Net -750 lbs.
  • Add FG staircase (help me with this estimate) 250 lbs. Net -500 lbs.
  • Add an additional Group 27 battery at 50 lbs. Net -450 lbs.
  • Add water capacity (from @25 gal to 50 gal) about 188 lbs. Net -262 lbs.
  • Add windlass at 30 lbs. Net -232 lbs.
So, the net effect doesn?t seem that significant, but we needed to document this list because it is one of the first questions people ask me because at first thought, people think the engines hanging on the back would pull the transom down. Not the case.
I believe I?ve covered the significant weight contributors. Let me know if you think of anything or have a different weight estimate for these things.

As far as weight distribution, since I was going to be lighter aft, I was concerned about being bow heavy (been told Sea Ray hulls tend to be that way anyway). Seeing the small difference,. I?m not worrying about that so much now. To offset the weight changes further there are three weight significant things that have been removed or moved back a bit. The second helm inside has been removed. The galley was on the port side forward near the forward berth. It will now be mid-ship starboard side. Lastly the 120 gal gas tank was mid-ship, under the salon floor, running fore and aft. The new 116 gal tank will run side to side just aft of the salon, under the forward edge of the cockpit deck.

Bottom line: I believe I am good on weight and its distribution. Will enjoy hearing everyone?s thoughts.
 

CaptainKickback

Lieutenant Junior Grade
Joined
Jul 23, 2011
Messages
1,060
Re: 81 Sea Ray 26 Sedan Bridge I/O to OB Conversion/Restore (Pics)

[h=1]Power Requirements[/h]Now for the power discussion.

Original Power Options ? I?m drawing a blank as to where I saw this information, but Sea Ray offered the following configurations: Single 264 HP I/O, Twin 130 HP I/O, and Twin 170 HP I/O. My boat was the twin 170 HP configuration.

This is a 26? boat with a bridge and 120 gal fuel tank. I just can't imagine that the configurations around 260 HP had anywhere near enough power for this boat. It had to be very underpowered. The 340 HP option seems to me to be about right, but not overpowered.

For the new power, I was originally thinking twin 250s. Q was definitely pushing for bigger engines (young guy, ya know). However, I?ve been getting worried these would be too much power for the boat. From what I can find, the original dry weight of the boat was between 6000 and 6500 lbs, and from my previous post, we see the overall weight shouldn?t change that much. Besides the extra stress from more power, my belief is that smaller engines will be easier on gas than larger ones. In our boating style, our engine use will be mostly idle/low speed (Intracoastal Water way, lots of no wake zones), and only occasionally get out on the ocean. We are definitely not concerned about a lot of top speed. Just get on plane adequately and maintain a nice cruising speed.

So, what are your thoughts on power/weight ratio?
 

ezmobee

Supreme Mariner
Joined
Mar 26, 2007
Messages
23,767
Re: 81 Sea Ray 26 Sedan Bridge I/O to OB Conversion/Restore (Pics)

I don't think you can have too much power for that sized boat. Twin V6 outboards of most any HP should be real nice.
 
Top