'86 liberator restore

rickryder

Commander
Joined
Jun 24, 2010
Messages
2,722
Re: '86 liberator restore

That first pic is some really nice glass work... :D
 

GracieBell1

Petty Officer 2nd Class
Joined
Jan 8, 2010
Messages
152
Re: '86 liberator restore

Thanks Rick for the kind word, but it looks nothing like yours. I needed to use biax glass like you. Man my typing was horrible on the last post. I am putting two more layers of mat/roven each 2" wider than the last. It should be about 5/16" thick. I have at least one full day this weekend to get a lot done. I do have a local supplier of mat and woven roven. They sell it for $6 a pount for either. The woven roven is 24oz. a bit thick but it will work. hope to get this stringer done. The second at least glued in. I know people have said to not use the existing glass but FW seems to think that it will be very good, Heck, he suggested it. I believe that they build there boats pretty heavy back then. On the transom I tabbed in three layer for the same thicknes. I planned on covering the whole transom in two layers of mat. Wonder if I should put one layer of roven in between? I wish my engine was like yours Rick. It needs rebuilt. I have all the parts in a build kit but I still want a new comp cam for 168 bux. The macjines said the cam I had would eventualy ware out the bearings. Then I either have to buy int. of get mine recoverd. The seats I put new wood in but the bench seat I have to build, or I can buy two pontoon boat bench seats that will fit perfect. But thans $450. Need to step up my poker game I guess:cool:

P.S. Just noticed I posted your pic instead of mine!!! As you can tell I did not realize it in the first part of my post. Man thats humiliating.:facepalm:
 

GracieBell1

Petty Officer 2nd Class
Joined
Jan 8, 2010
Messages
152
Re: '86 liberator restore

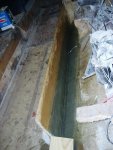
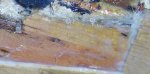
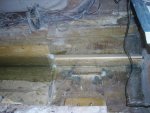
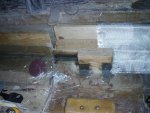
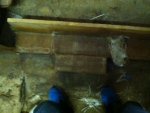
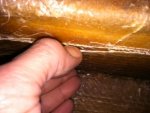
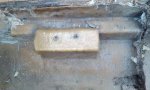
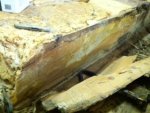
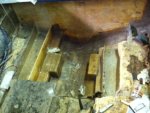
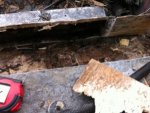
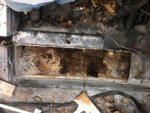
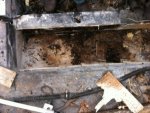
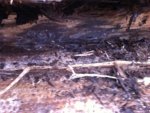
So I need some help on this one. I have been using the same poly resin and it is a good product. The first can was like a dark green after it cured. the second can was clearish yellow. The first can was dark from the start but the second time i used it, it was about 6 mos old(no problems). The third can was also dark green. The problem is that the third can was a lot older than I thought. About 2-3 years old. The MEKP was new and it did get hard like it should. When I realized it I had only used it for one row of tabbing on one side of stringer. Since it got hard I wonder if it will be OK? Its a shame that I have a heated garage but knowbody that has any boat knowledge to help out. I did get some done this week end. Need two full days to really get it moved along. Hoping to get it done by summer. I was reading in another thread about the gimbal bearing. I think I smashed mine because the shaft is pushed to one side and I remove the engine before pulling the outdrive. In the process I put the shaft in a slight bind, smashing the gimbal bearing. Guess I will have to get the shaft checked as well. Still need to finish second stringer. Glass and seal transom with mat, build a motor mount, hopefully use the exisisting mount on other stringer, build motor, clean, check and paint outdrive, put on deck, carpet and interior, all of it. Little work to do The third pic is my stringer and transom glass. The glass on the transom was from a can that was about 6 mos old and always in a pretty warm garage, maybe 60deg.
 

Attachments

  • IMAG0038.jpg
    IMAG0038.jpg
    147.5 KB · Views: 0

rickryder

Commander
Joined
Jun 24, 2010
Messages
2,722
Re: '86 liberator restore

I ran across your post on another thread about your carb.... I have the Weber on my 350....It's just like an Eldebrock easy to rebuild and tune.
 

GracieBell1

Petty Officer 2nd Class
Joined
Jan 8, 2010
Messages
152
Re: '86 liberator restore

Going this weekend to work on the boat. I need it to be a big weekend and get a lot done. I have the first stringer in and am ready to build the mount. If it goes well I will redo the second mount. If it is real hard I will epoxy the second second stringer to the existing glass like Four Winns said.
 

Woodonglass

Supreme Mariner
Joined
Dec 29, 2009
Messages
25,929
Re: '86 liberator restore

Don't forget the Camera. We need some Pics so we can see what you're doin!!!!:eek:
 

GracieBell1

Petty Officer 2nd Class
Joined
Jan 8, 2010
Messages
152
Re: '86 liberator restore

So I got somemore glassing done. On one part of my stringer the ends of the previous layer were sticking up a little(even though I sanded them). This caused the glass to have a slight air pocket about 3 inches long and maybe a 1/4" wide. The glass that FW did had airpocket on all of the turns and my stringer is floating so that would be a big airpocket. I guess I am trying to justify not grinding and re doing the last layer. I have three layers of 24oz woven roven with mat between and it will still get two more layers of mat for sealing and cover. Any coments would be appreciated. I will post pics tonight. I am also going to build the motor mount on Wed. I did not get to it this weekend. It has a lot of turns. The FW guy said it could overlap and be done in several pieces for each layer. I would like to try and do it in one piece for each layer. The second pic is the existing mount. The inside corners are not sealed, the right side can be seen from the pic. They will let water in. It looks like when FW built them that they wrapped the glas into the inside corners but never bridged them with any glass, thus sealing. The front and top is about 3/8" thick as is the fron and tops of the stringer. The sides of the mountsa are much thinner. Probably only half the thickness of the fronts and tops. What do you think Rick(or anyone else), I know yours should be the same.
 

Attachments

  • IMAG0037.jpg
    IMAG0037.jpg
    147.1 KB · Views: 0
  • IMAG0066.jpg
    IMAG0066.jpg
    143.4 KB · Views: 0

GracieBell1

Petty Officer 2nd Class
Joined
Jan 8, 2010
Messages
152
Re: '86 liberator restore

OK, so here is the pick of the glass problem. The prev. layer had some ends that I did not get sanded off. I will still be laying two layers of mat over the whole stringer. When FW made this, they had big gaps in the glass. Especialy on the stringer where they would use a block of wood up against the stringer, then glass over it with no fillets. The block of wood was to fill the gap for the gas tank. I will epoxy mine to the glass. Also, my stringer is floating so there is a gap as well. Although I plan to fill the gap below the stringer with foam. I just hate to grind it all down and put on another layer.The first picture has the glass issue:facepalm:
I still have to glass the front of the stringer about two feet. This is where I used epoxy to glue the scarf joint. It got a bit sloppy so I wanted to use epoxy to get a good bond. I have two fiberglass books(best two on market) and they both say that polyester resin will stick good to fully cured epoxy. But everyone on this site says don't do it. So, even though I sanded the wood it still has a little epoxy on it. Any input is appreciated.
 

Attachments

  • IMGP0166.jpg
    IMGP0166.jpg
    146.8 KB · Views: 0
  • IMGP0167.jpg
    IMGP0167.jpg
    144.4 KB · Views: 0
  • IMGP0164.jpg
    IMGP0164.jpg
    142.4 KB · Views: 0

GracieBell1

Petty Officer 2nd Class
Joined
Jan 8, 2010
Messages
152
Re: '86 liberator restore

I have a question for you. Hope you can help. I have started back on my Liberator and am questioning a stringer joint I made. I got the idea from a boat restoration book I have. It was a very popular book from the 80's with sound advice, I think. I copied a joint they used for connecting a new section of stringer to the existing section. I have listed a picture. My question is do you think it will be strong enough. I could scab one side but it would have to be a huge scab. I will be glassing this secton with mat, roving and epoxy. I have glassed it the new with poly up to about a foot from the joint. I figured epoxy would be stronger, plus I used epoxy to join them and on the back side where it attached to the existing glass. The pic showing the glued joint is to big, but I used thickened epoxy on the ends to bond the two pieces together. Please, anyone else chime in. Thanks Stefan
 

Attachments

  • IMGP0167.jpg
    IMGP0167.jpg
    144.4 KB · Views: 0
  • g.jpg
    g.jpg
    58.5 KB · Views: 0
  • f.jpg
    f.jpg
    64 KB · Views: 0
  • d.jpg
    d.jpg
    56.1 KB · Views: 0
  • untitled.JPG
    untitled.JPG
    55.1 KB · Views: 0

Woodonglass

Supreme Mariner
Joined
Dec 29, 2009
Messages
25,929
Re: '86 liberator restore

I would grind it down as smooth as you can on the side and then use 1/2" plywood to make a "Sister Joint" for reinforcement. Then Glass it in and fuhgitaboutit!:lol:
 

GracieBell1

Petty Officer 2nd Class
Joined
Jan 8, 2010
Messages
152
Re: '86 liberator restore

hey Wood these are the most current pics about the message I sent on the motor mounts and the glass that I should use with epoxy.
 

Attachments

  • IMGP0166.jpg
    IMGP0166.jpg
    146.8 KB · Views: 0
  • 002.jpg
    002.jpg
    148.1 KB · Views: 0
  • photo.JPG
    photo.JPG
    49.9 KB · Views: 0
  • 2.1.JPG
    2.1.JPG
    52.9 KB · Views: 0
  • 2.2.JPG
    2.2.JPG
    52 KB · Views: 0

GracieBell1

Petty Officer 2nd Class
Joined
Jan 8, 2010
Messages
152
Re: '86 liberator restore

Here are a coupl pics of the stringer behind the mount. Just want to make sure I do this right, I am sure I will have the family out in it.
 

Attachments

  • IMAG0061 (2).jpg
    IMAG0061 (2).jpg
    147 KB · Views: 0
  • IMGP0647.jpg
    IMGP0647.jpg
    148.6 KB · Views: 0
  • IMAG0066.jpg
    IMAG0066.jpg
    143.4 KB · Views: 0
  • IMGP0167.jpg
    IMGP0167.jpg
    144.4 KB · Views: 0
  • IMGP0164.jpg
    IMGP0164.jpg
    142.4 KB · Views: 0

GracieBell1

Petty Officer 2nd Class
Joined
Jan 8, 2010
Messages
152
Re: '86 liberator restore

I also plan on epoxy glueing the new stringer to the existing glass on the back side. The pic below is from when I was removing the old stringer but left one side of the glass. I want to glue the new stringer to it and in behind the existing motor mount on the side. I will then glass the other side of the stringer and in the motor area to the transom. The close up is where I glues my scarf joint I was originaly asking you about. May go in behind and sister it with a piece of plywood or just lay a couple extra layers of glass and epoxy. Not sure yet. Any advice from anyone is much appreciated. I want to clean up my glass work and get this boat done. Thanks All
 

Attachments

  • IMAG0037.jpg
    IMAG0037.jpg
    147.1 KB · Views: 0
  • IMGP0164.jpg
    IMGP0164.jpg
    142.4 KB · Views: 0
  • untitled.JPG
    untitled.JPG
    55.1 KB · Views: 0
  • 2.4.JPG
    2.4.JPG
    61.6 KB · Views: 0
  • 2.3.JPG
    2.3.JPG
    63.4 KB · Views: 0

Woodonglass

Supreme Mariner
Joined
Dec 29, 2009
Messages
25,929
Re: '86 liberator restore

I'd recommend building it back as close to the original configuration as possible. They built her like that for a reason. I'd take care when applying the Epoxy PB. Make sure and smooth it as best you can. That way you won't have any grinding to do when it sets up. That's one of the things I dislike about epoxy is that it tends to Run more since the set up time is longer. You have to babysit it a lot if you don't want Sags and Runs. Especially in cooler temps.
 

GracieBell1

Petty Officer 2nd Class
Joined
Jan 8, 2010
Messages
152
Re: '86 liberator restore

Yea it did run on me when I glues it. I did not have any voids but I had to keep pushing it back in. May have needed it to be thicker. I coated the wood with I thickened epoxy first then the PB. I think that made it run more. Need to use heat lamps next time.
 

GracieBell1

Petty Officer 2nd Class
Joined
Jan 8, 2010
Messages
152
No Title

I want to let everyone know I have started a new restore. It is a 1990 rinker 236 cuddy. The engine stringers and motor mounts have to be replaced. The problem is that I have never seen a design like this. The pics show that Rinker put down a 5/8" piece of plywood flat then put the stringer next to itvertically and glassed one side in. They glasse over the plywood and up the stringer. The stringer was only glassed in on one side. Then Rinker glasses in a motor mount by standing 3 pieces on plywood one the edge then 2 more pieces flat on top and glassed over it all. Over the stringer and a piece of plywood that is the deck for that section. The engine string in NOT continuos, it stops at the first bulkhead. Then a new stringer goes from the bulkhead to the front of the gas tank. When I redid my fourwinns it had a contiuos stringer from the transom to the cuddy. The wood in the stringer and motor mount were sitting about a 1/2 off of the hull and glassed in. THis Rinker design is crazy. It looked as if the sringer was sitting directly on the hull and the motor mout has a big oiece of ply for the motor mount base glued to the hull then glassed over and up the stringer on one side only. SHould I change this to the Fourwinns design or replace it exactly the way it is. The current Rinker design never failed and was fully wet and rotted. Any input or pics from other Rinkers woudl be great. Thanks in advance.
 

Attachments

  • photo239434.jpg
    photo239434.jpg
    69.6 KB · Views: 0
  • photo239435.jpg
    photo239435.jpg
    74.6 KB · Views: 0
  • photo239436.jpg
    photo239436.jpg
    77.1 KB · Views: 0
  • photo239437.jpg
    photo239437.jpg
    70.9 KB · Views: 0

GracieBell1

Petty Officer 2nd Class
Joined
Jan 8, 2010
Messages
152
It turned out well but we had an accident that sent it to the junk pile. I clkept it in my father in laws shop. This is a big metal building where he also stores some cars and his heavy equipment. Someone was moving the dozer and it got away from them and smacked the boat.
 

GracieBell1

Petty Officer 2nd Class
Joined
Jan 8, 2010
Messages
152
It could be fixed but he left it outside and it got really wet. Damaged the new work that was done. Basically it would have been like starting over. So I got the Rinker instead.
 
Top