87' Charger Mercruiser 200 restoration

dwolfenbarger

Seaman Apprentice
Joined
Jun 21, 2011
Messages
41
WOW its amazing how life can really take you in unexpected directions and delay a project. It has been 7 years since my last post. While I have done some work on the boat from time to time, I have mode more progress recently this year. I wanted to post some updated pics of what has happened since my last post.
 

Attachments

  • photo301822.jpg
    photo301822.jpg
    1.2 MB · Views: 4
  • photo301824.jpg
    photo301824.jpg
    1.6 MB · Views: 4
  • photo301825.jpg
    photo301825.jpg
    1.2 MB · Views: 4
  • photo301826.jpg
    photo301826.jpg
    1.7 MB · Views: 4
  • photo301827.jpg
    photo301827.jpg
    1.2 MB · Views: 4

dwolfenbarger

Seaman Apprentice
Joined
Jun 21, 2011
Messages
41
[No message]
 

Attachments

  • photo301828.jpg
    photo301828.jpg
    59.1 KB · Views: 4
  • photo301829.jpg
    photo301829.jpg
    56.9 KB · Views: 4
  • photo301830.jpg
    photo301830.jpg
    152.5 KB · Views: 4
  • photo301831.jpg
    photo301831.jpg
    74.5 KB · Views: 4
  • photo301832.jpg
    photo301832.jpg
    136.5 KB · Views: 4
  • photo301833.jpg
    photo301833.jpg
    116.7 KB · Views: 4
  • photo301834.jpg
    photo301834.jpg
    106.2 KB · Views: 4

dwolfenbarger

Seaman Apprentice
Joined
Jun 21, 2011
Messages
41
[No message]
 

Attachments

  • photo301837.jpg
    photo301837.jpg
    141.1 KB · Views: 4
  • photo301838.jpg
    photo301838.jpg
    105 KB · Views: 4
  • photo301839.jpg
    photo301839.jpg
    89.1 KB · Views: 4
  • photo301843.jpg
    photo301843.jpg
    44.1 KB · Views: 4

dwolfenbarger

Seaman Apprentice
Joined
Jun 21, 2011
Messages
41
I found some pitting on the aluminum gas tank, my gut is telling me to replace the tank but was curious if anyone has seen this before and did you fill the pitting or just replaced the tank. Appreciate any feedback.
 

Attachments

  • photo301845.jpg
    photo301845.jpg
    92.1 KB · Views: 1
  • photo301846.jpg
    photo301846.jpg
    56 KB · Views: 1
  • photo301847.jpg
    photo301847.jpg
    50.7 KB · Views: 1
  • photo301848.jpg
    photo301848.jpg
    83 KB · Views: 1

dwolfenbarger

Seaman Apprentice
Joined
Jun 21, 2011
Messages
41
Holy crap it has been a long time since I posted on here and also was a while where the boat stayed in the garage and didnt get much love for a while. I have been working on her quite a bit the past summer and made a lot of progress. I did end up getting a new gas tank so should not have to worry about that any longer. I will add some more pics to show where I am currently in the restoration project.
 

Attachments

  • 20210529_223136000_iOS.png
    20210529_223136000_iOS.png
    4 MB · Views: 5

dwolfenbarger

Seaman Apprentice
Joined
Jun 21, 2011
Messages
41
After I did the gelcoat I noteced there was bubling under the corners in the bilge, I think this happened because I didn't wipe the fiberglass with MEK before applying the gelcoat as the fiberglass in that area was applied a few fears ago versus the rest of the fiberglass was only a few days old. Just grinded the gecoat down, cleaned with MEK and then re-applied the gelcoat and now it is good to go.
20210829_235426715_iOS (1).jpg20210829_235419392_iOS (1).jpg
 

dwolfenbarger

Seaman Apprentice
Joined
Jun 21, 2011
Messages
41
Before I installed the transom place I replaced the trim sensors as one of the wires were broke I decided to replace them versus repair being I already had it all tore down. The intake water hose was dryrot so replaced it as well. Then I got the holes drilled out for the transom plate and then got it mounted. Had to reinstall a few times because I forgot the relief cuts for the steering arm plus the transom was rubbing on the top of the steering arm. The last issue I found was I had to cut an angle off the bottom of the transome where the Y pipe mounts because it was too close for a socket to fit the bottom mounting screws. 20211002_190615706_iOS (1).jpg
20211003_171831211_iOS.jpg
 

dwolfenbarger

Seaman Apprentice
Joined
Jun 21, 2011
Messages
41
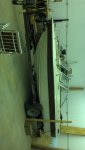
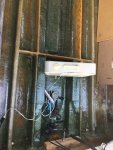
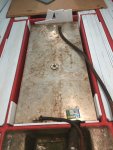
So finally get to drop the motor in! Took the motor of the make shift engine stand I used while it was sitting for so long. I did shoot some fog spray in the cylinders and rotated the motor crank to make sure everything was still free moving since it had not be used in over10 years and all looked good!20211003_170045150_iOS.jpg

Just raised up the motor and backed the trailer in place. Had it leave the back of the engine hoist on the concrete for the extra elevation and put wood blocks on the front arms. I had to do that when taking it out to clear the back of the boat so luckily remembered I needed to do the same to put it back in.
20211003_171821536_iOS (1).jpg

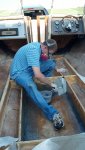
Pushed the limits of the engine hoist but she made it over the back! As I dropped the motor down had to pull the trailer up to get the back motor mounts to line up.
20211003_190237490_iOS (1).jpg

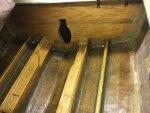
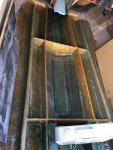
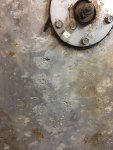
And got it bolted up. It did look like the right front engine mount is right against the lip where the floor meets the mounts, will probably have to do some modification there. Went ahead and bought the engine alignment tool so hopefully everything will line up correctly. My biggest fear at this point would be if the motor mount are too high to align the engine properly. I would hate to have to cut into them to make adjustments.
20211003_193152372_iOS.jpg
 

dwolfenbarger

Seaman Apprentice
Joined
Jun 21, 2011
Messages
41
Top