89 vip vison

Brien S

Seaman
Joined
Nov 30, 2018
Messages
68
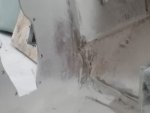
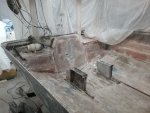
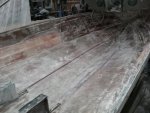
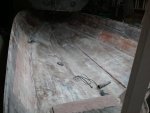
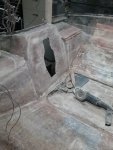
You guys are awesome !!!!! Ya, I tend to over think petty stuff. The old saying "Don't sweat the petty stuff, and don't pet the sweaty stuff". I had forgotten how much I like the 4" sanding disks for my angle grinder. Like a hot knife through butter on the glass. What a mess Someone has made of this poor boat. If you can see where I sanded way back around the sides and top of the transom, there where huge air pockets, more like cavities where the glass didn't bond or they didn't roll it down, or both. Then there's the layer of resin that was on top of the newer transom wood. Must have been 3/4" thick or better to bring it up to the level of the oem wood. Was going to work on it yesterday after work, but decided I didn't feel like getting covered in glass. Had I, I prob. could have been pretty close to start planing the stringers and bulkheads.
 
Last edited:

Brien S

Seaman
Joined
Nov 30, 2018
Messages
68
budget and boats are a dichotomy.

if your transom is wet, replace it

you need a lot more grinding..... a lot

read the links I suggested in the stickies. a lot more thorough than Oops thread.

You jinxed me !!!! Lol
holy cow the amount of resin in the transom !!! I'm talking inches of this stuff !!!!!
instead of making the transom to spec, they just filled fhe excess with resin or what ever it is.
 

Brien S

Seaman
Joined
Nov 30, 2018
Messages
68
This is what i'currently in the process of grinding out. About an inch thick and 1.5 wide so far and the while height of the transom.
 

Attachments

  • photo305265.jpg
    photo305265.jpg
    901 KB · Views: 0

Brien S

Seaman
Joined
Nov 30, 2018
Messages
68
Finally some progress on the transom. What i'm assuming was pb was bloody thick !!! Unlike the factory setup, i've decided to extend the transom wood all the way to the sides with the last layer of ply.
quick question. If at a later date I wanted to swap in a larger engine, is there any beefing up I sould do now ? I was thinking of extending the engine mounts in both directions about 6" to accommodate a swap.
 

Attachments

  • photo305287.jpg
    photo305287.jpg
    1.4 MB · Views: 0

Brien S

Seaman
Joined
Nov 30, 2018
Messages
68
Not much accomplished during the week, but yesterday was productive. Got all the stringer flashing ground off, except engine mounts, waiting until I get first part of the stringers so I can locate them, and the side pockets off (for lack of a better word). So ready to be done grinding, and so is the wife. The side pockets were filled with foam, any reason I need to fill the new ones ? With cup holders in them, they will just collect water unless I create drainage holes.
I figure a couple more hours grinding and on to cutting wood (YEA !!!!!!!), after I get a new respirator since I'm out of filters and can't find more.
 

steve_h7

Chief Petty Officer
Joined
Sep 16, 2018
Messages
401
I have no answers but just wanted throw out a little encouragement! I'm only slightly ahead of where you're at (done grinding, yea!!) so I'm following a long and was wondering about the same thing about cup holders and foam. My (I think they're called) float boxes in the back were just the same... full of foam with cup holders.
I also made the same mistake and unknowingly bought a respirator off Amazon and then went to buy more filters and found they'd come out with a new model and (of course) the new model's filters didn't fit the old one, and none were to be found for last years model. DOH! :rolleyes:
Keep up the good work!
 

Brien S

Seaman
Joined
Nov 30, 2018
Messages
68
Thanks.
i just can't see where that small amount of foam would help anything other that a little structural support for the sides.
i bought my Willson resperator some years back with extra filters. Just used them all up. Didn't think it would be a big deal to find screw in cartridges. I thought wrong. Went out today and boight a new 3m respirator and some extra p100 filters. I'm hopeing to be done grinding this week.
 

Brien S

Seaman
Joined
Nov 30, 2018
Messages
68
Have about 2 hours grinding left, mostly little stuff in the corners and some extra scuffing with the DA and 40 grit for the tabbing to stick to.. So looking forward to starting the stringers and bulkheads. I would have taken a picture, but I didn't bother cleaning up so all you would see is a bunch of white stuff (no, not snow).
 

Brien S

Seaman
Joined
Nov 30, 2018
Messages
68
Needed to know what was left so I spent some time cleaning today. Getting close to structure time !!!!!!
 

Attachments

  • photo305574.jpg
    photo305574.jpg
    1.4 MB · Views: 0
  • photo305575.jpg
    photo305575.jpg
    1.4 MB · Views: 0

AShipShow

Lieutenant Commander
Joined
Jul 8, 2016
Messages
1,803
Agree! Looks like your almost there! And then when you think you're done grinding....


YOU'RE NEVER DONE GRINDING! :frusty: lol
 

Brien S

Seaman
Joined
Nov 30, 2018
Messages
68
I figure i'll be done when it's on the water. Lol
And anyone that wants to volunteer to come help me clean up the garage this weekend ?????!!!!! HAHAHAHA !!!!
TWIN 20" box fans with filters and a air hose are in my future.
 

Brien S

Seaman
Joined
Nov 30, 2018
Messages
68
Thought I got it all, but once I cleaned up I saw I missed sanding a area for the stringer tabbing. DAM. All well. Pick up more 40 grit disks and have at it. The blue paint is marking the location of the engine mounts, and yes I took measurements before I started the deconstruction. lol Once I get the stringers marked for them, the paint will get sanded off.
With the door open yesterday, I noticed light through the hull from beaching. Going to lay a couple of layers down the length of the hull. Was toying with the idea of 2 layers of 12" wide Kevlar bow to stern.
Question about the drain plug. That pipe is at a angle and like 1/2-5/8" off the hull. Is it actually part of the drain plug assy, or prob a piece of pipe added ? It's doesn't appear to be Galvanized pipe, but I haven't checked yet. That really bothers me because it will hold water.
How are most bilge pumps held to the hull ? Mine was screwed down to the pieces of 1/2" ply that was running the length of the boat, and I would prefer not to put it back in. I have not found any evidence at all it was structural. I'm thinking it was to build up the bilge, and they just continued it up the hull for drainage. Any thoughts on that ?
 

Attachments

  • photo305676.jpg
    photo305676.jpg
    1.3 MB · Views: 0
  • photo305677.jpg
    photo305677.jpg
    1.4 MB · Views: 0
Last edited:

Brien S

Seaman
Joined
Nov 30, 2018
Messages
68
Also found what looks to be a repair on the starboard side just forward of where the controls would be. You can see the white color of the mat. Going to give that a couple layers of matting as well for extra precaution.
Getting excited that I will be cutting wood !!!!!! WOOOHOOO!!!!!!!!!!!!!
Also, looking to try and get my first order placed, and could use some help with a shopping list. Have two 4 day weekends coming up.
Scratch the Kevlar. I think a couple of layers of 18oz woven roving will be ample down the keel.
 
Last edited:

Brien S

Seaman
Joined
Nov 30, 2018
Messages
68
My thoughts on the tabbing. First layer with 6" 1708, second layer with 8" 12oz Db120, or 1st layer of 4" Db120, 2nd 6" 1708, 3 of 8" Db120.
 

Scott Danforth

Grumpy Vintage Moderator still playing with boats
Staff member
Joined
Jul 23, 2011
Messages
50,272
A good guide in the stickies for amount of CSM and 1708. I found that you will use more resine than you think as some of the resin will be turned into trophies (smoking bucket of resin with a brush stuck in it because it kicked early)
 
Top