'90 Maxum 2100SR - restoration & conversion

PC on the Bayou

Petty Officer 1st Class
Joined
Apr 27, 2020
Messages
234
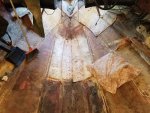
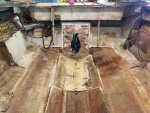
Got all of the floor and bulkheads removed now. As everyone points out, it's hot and dusty work.

After initial inspection of the transom via "hammer" method and the parts that could be seen in the keyhole (around the gimbal housing) I decided at a minimum deskinning the transom is a must.

When taking off the gimbal housing, I found out that 3 of the 6 bolts holding it on were completely corroded in two. Makes me glad that I'm doing this now since the outdrive wasn't securely attached. Once the housing was off, I'm pretty sure that a transom replacement is in order. If I'm going to all of this trouble I agree with kcassels and plan to "Make it all new".

Next on the agenda:
  • deskin the transom to begin removal.
  • Remove the stringers since I've decided all new is the best way to go.
  • Then start the cutting and grinding down all of the old glass where I can start reinstallation.
30 years reeks havoc on a boat. It is good to know that when this is completed, I'll have a sound boat that is at least as good as new structurally.
 

PC on the Bayou

Petty Officer 1st Class
Joined
Apr 27, 2020
Messages
234
Deskinning the transom was the easiest cutting I've done so far. Glad that I did it, too. Bottom half of the transom was pretty rotted and wet. Like some others have encountered, the bottom portion of the transom (by the drain hole) was a separate piece of wood and was completely saturated.

so the bottom line is, as was suggested in the early part of the thread, the rotted floor was indication of more deeper into the job.
 

AShipShow

Lieutenant Commander
Joined
Jul 8, 2016
Messages
1,803
Looks like you're getting into the grinding at the worst time of the year like we all inevitably do lol... Looking good though... Stay hydrated, load up with baby powder, and give'er
 

Reserector_

Chief Petty Officer" & 2021 Splash of the Year Win
Joined
Oct 15, 2019
Messages
618
Just joining this thread.
Looking at the tank gouge, it is hard for me to see exactly how deep it is. Maybe you could find a steel scale, or maybe a set of wire feeler gauges (Spark gap gauges) to determine how deep it actually is. It might be not be as deep as it seems because the plastic that was displaced to the sides makes it LOOK deeper.

I have repaired various poly tanks with a large soldering iron and some sacrificial material from elsewhere on the tank, or from another item altogether. Basically, you scrape the surface clean, heat the wound until it turns translucent, melt some filler material into and onto the area and build it up.
In your case, it is not all the way through, so if you did decide to do some plastic welding, that's all you'd be doing; filling the groove and building it up.
Here is a video that I did. (I'm sure there are many more on YouTube) https://youtu.be/GiBrIlpGSvU
 

PC on the Bayou

Petty Officer 1st Class
Joined
Apr 27, 2020
Messages
234
I decided attempting a repair was not a comfortable proposition; so, I have a new one ordered.

I got the stringers cut out today and started grinding. Was able to get one of the stringers out while, so hopefully I can use it as a pattern.

using the reciprocating multi tool, was awesome. I was able to do most of the cutting very close to the hull.
 

PC on the Bayou

Petty Officer 1st Class
Joined
Apr 27, 2020
Messages
234
Here are a couple pictures of the progress so far. I think that I have decided to wait to cut and grind above the deck stuff until after I have the deck back in.


Click image for larger version  Name:	20200613_121250_copy_800x600.jpg Views:	1 Size:	209.0 KB ID:	10881882Click image for larger version  Name:	20200613_121237_copy_800x600.jpg Views:	1 Size:	230.1 KB ID:	10881883
 

PC on the Bayou

Petty Officer 1st Class
Joined
Apr 27, 2020
Messages
234
Grinding Question???

When you all are grinding in preparation for new stringers, deck, etc. do you typically grind out all of the old gel coat (e.g., in the ski locker and bilge areas) or just enough to get down to good laminated glass?
 

Chris51280

Ensign
Joined
Jan 24, 2018
Messages
932
clean it up. you don't want to lay it on gelcoat. once you start laying glass, you don't want to start grinding again if not necessary.
 

Reserector_

Chief Petty Officer" & 2021 Splash of the Year Win
Joined
Oct 15, 2019
Messages
618
I ground away the gelcoat about four inches or so back from the stringers and left the rest. Basically, anywhere that I needed to put tabbing, I ground down the gelcoat until I met up with the topmost layer of glass. It still had gelcoat here and there, but it was down to the strength layer. I didn't try to clean up every last bit.
 

kcassells

Fleet Admiral
Joined
Oct 16, 2012
Messages
8,738
Grind 4" to 6" wide off stringer sides to fresh glass. That your bond.
Looking great!
 

AShipShow

Lieutenant Commander
Joined
Jul 8, 2016
Messages
1,803
I removed everything, but that's because I kept uncovering nice surprises from bayliner... lots of dry glass pockets, rotten wood embedded in the strakes, delaminated glass, etc... I'd go at least 8" each side of the stringers and bulkheads... probably only an extra hour of grinding and you wont lose sleep over it
 

PC on the Bayou

Petty Officer 1st Class
Joined
Apr 27, 2020
Messages
234
Thank you all for your inputs regarding removal of old gelcoat. So far, I can see what MadProps says about bayliner suprises. There are a couple items along these lines that I've run into.

One is that the bilge area appears to be a very thick coat of resin & gelcoat. It almost looks like it was a molded piece that was "glued" into the hull with resin rather than made in place. There are a lot of hollow spots around the perimeter of it that I've run into. I may go ahead and grind the whole thing out.

Another is that it looks like the installer poured resin around the old fuel tank "gluing" it in as well. I'm going to grind out as necessary to install the tank and stringers (opposite order of course).

I did receive my new tank in via UPS in the last couple days. It's a new 29 gallon Moeller tank that is very similar in size and shape to my old 30 gallon tank. I'm anxious to test fit in to the hull and see how it'll go in this weekend. I plan to use it to help layout the placement of the new stringers and bulkheads as well as their height. I got a great deal on the new tank by the way (nearly half price as an open-box deal).

Hope to get some more grinding done this weekend. More pics to come, too.

I'm also enjoying the planning ahead on how I'm going to layout the interior as a fish-n-ski conversion. This stuff is a good way down the road, but it is fun to think about.
 

PC on the Bayou

Petty Officer 1st Class
Joined
Apr 27, 2020
Messages
234
Another thing that I'm looking for pointers on is the installation of the drain hole in the lower transom as well as how to seal the wood well around the keyhole.

I want to try my best to have this replacement last a very long time avoiding future moisture in the wood.
 

PC on the Bayou

Petty Officer 1st Class
Joined
Apr 27, 2020
Messages
234
Another question for the experts. I've been looking on the forum and web for this but haven't answered my question completely.

When making scarf joints to build my stringers, everything I read says that epoxy is the way to go to glue the joint. My question is on the type of epoxy and specific gluing method.

1. When referring to epoxy, is this referring to epoxy resin as opposed to some other epoxy glues?
2. Does this sound like the proper glueing method?
  • Cut the scarf joints to a 10-12 to 1 ratio
  • wet out the scarf surfaces of both boards with unthinned epoxy
  • let the unthinned epoxy soak in for a bit
  • spread "mayo" thick epoxy resin (thickened with cabosil) over the surface
  • align and clamp into position (using wax paper under and over the joint to minimize the mess).
Your help is appreciated. I'm going to be to the point of making the stringers and transom soon and want to make sure that I have the right materials on hand.

Thanks
 

Reserector_

Chief Petty Officer" & 2021 Splash of the Year Win
Joined
Oct 15, 2019
Messages
618
When test fitting your tank and setting your stringers in place, be sure to allow for the additional thickness of the fiberglass that will cover the stringers. It adds up fast and could leave you with a tight fit between the tank and stringers.

Never had to replace a drain hole, so I won't bore you with what I saw on the Michael Romer YouTube channel. (He goes into great detail.)

Around the keyhole, I went with a layer of CSM and resin to seal the edge. I used sealant to seal the stud holes on both sides. Keeping the bilge dry is the best method, of course.

I did not bother with scarf joints. I butt jointed and then plated on both sides with 3/4 ply that was beveled on the front and back edges so that the glass could contour. I glued and clamped the plates to the stringer sections with polyester resin. I then pre-glassed the sides of the stringers out of the boat so that I could work with them flat on sawhorses. Then installed them as one-piece parts.
Keep in mind that they get bedded and tabbed to the hull, and later get bedded to the floor ply, so it's not like they are going to break apart at the joints.

I'm not saying that ANY of this is the "right" way, or how you should go about it. Just sharing my experiences.
 

Chris51280

Ensign
Joined
Jan 24, 2018
Messages
932
I thought abot the scarf joints too. I ended up splitting the long boards where they will meet the bulkheads. the manufacturer did the same since they don't want to spend all this time making scarf joints.
 

PC on the Bayou

Petty Officer 1st Class
Joined
Apr 27, 2020
Messages
234
Since my goal is to make this boat as good and preferably better / stronger than the original so that it will last me a long time to come, I'm going with the scarf joints on my stringers. Having them should make it easier to tab in the stringers and should make the stringers be as strong as if they were a single continuous piece of wood.

I did think about making the joints match the main bulkheads and also using overlapping pieces to sandwich the joints. However I like the scarf joint in that it makes a continuous beam that holds the similar characteristics for stiffness, width, etc. for the full length. Just a personal preference.

I'm very comfortable with making the joints but since they are a critical structural component of the boat, I just want to make sure that I glue them with the best and strongest possible method for this application.
 

kcassells

Fleet Admiral
Joined
Oct 16, 2012
Messages
8,738
You would use poly or EEppoxy as weapon of choice. Eppooxxyy being stronger. Its a reference to a "resin/hardener mix"
If you are using poly for the boat and opt to make the joint wih EEppooxxyyy when cured sand smoothe the surface to remove excess and wipe with soapy water.
Poly will then adhere as usual. .
 
Top