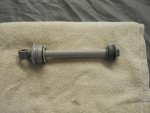
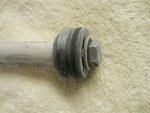
'92 DP-C trim ram/piston disassembly question

MotorheadTed

Seaman
Joined
May 2, 2011
Messages
50
I've looked at a bunch of threads re: trim cyl's, but none got to the point of the poster saying he got them apart. Well, I just did, and need to remove the piston from the rod. Piston is held on with a bolt at the end of the shaft. There is a strange washer under the bolt head which has six half circles around the outer diameter of the washer. As I unscrew the bolt,the washer raises with the bolt head as it is being pushed up by six small springs housed in the piston. They are probably part of the overpressure relief mechanism. Question: will the pressure be off the springs before I run out of threads on the bolt, or will I run out of threads before the spring pressure is relieved, causing them to shoot out at great speed to all corners of the garage, never to be seen again ????!!!!!!!!!
Anyone done this before?
 

MotorheadTed

Seaman
Joined
May 2, 2011
Messages
50
Re: '92 DP-C trim ram/piston disassembly question

I guess I'll answer my own question: the bolt is way long, no problem unloading springs.
STAY TUNED FOR POSSIBLE GOOD NEWS RE: SEAL KIT!!!!!!!!!!!!!!!
 

Don S

Honorary Moderator Emeritus
Joined
Aug 31, 2004
Messages
62,321
Re: '92 DP-C trim ram/piston disassembly question

I guess I'll answer my own question: the bolt is way long, no problem unloading springs.
STAY TUNED FOR POSSIBLE GOOD NEWS RE: SEAL KIT!!!!!!!!!!!!!!!

Glad you are posting it. Post some pictures if you can.
Since Volvo doesn't sell seal kits or show repair procedures in the manual, it's good that someone is telling us how it's done. Part numbers for your seals etc. will be handy also.
 

billbayliner

Chief Petty Officer
Joined
Jun 30, 2006
Messages
553
Re: '92 DP-C trim ram/piston disassembly question

There are rebuild kits on Ebay for the DPS, 290, 290A, DP-A with the older style cylinders with the square caps along with same cylinders that came with the DP / SP - C on. They have instructions that include photos.

Both sellers have 100% feedback
 

MotorheadTed

Seaman
Joined
May 2, 2011
Messages
50
Re: '92 DP-C trim ram/piston disassembly question

BIll: Thanks for the info. I looked at the kits on ebay, looks like the one from the place in Michigan would be the correct one for the cyl's I have . I have purchased 2 kits from Jerrys Marine SErvice thru Blue Water Marine Repair in Gulfport Fl, a Volvo repair shop who have done many of these and swear by them. I was hoping to have them installed and tested today, and then post here with results and details, however Murphy has reared his ugly head, and I can't get the piston back in the cyl. !!! Have ruined one of the bands that cover the piston O ring, reinstalled the old O ring and band (good condition) and still can't get it back into the cylinder! No instructions came with the kits, and the mechs at Blue Water were gone for the day when I called earlier. I tried to download the instructions on the michigan guys site , but I have not been able to get my computer to play with 4share site. Any thoughts on installing the piston/ram assy into the cyl ?? Need something like a ring compressor. Tried the coke can deal, didn't work, too soft.
Ted
 

billbayliner

Chief Petty Officer
Joined
Jun 30, 2006
Messages
553
Re: '92 DP-C trim ram/piston disassembly question

Ted, how did you gain knowledge of the Jerrys marine having the kits? Are you sure they are the proper kit for the cylinder? Shoot me a picture of the cylinder to PM account.
 

MotorheadTed

Seaman
Joined
May 2, 2011
Messages
50
Re: '92 DP-C trim ram/piston disassembly question

Bill: I drove up to Blue Water Marine after talking to them on the phone. They said what I had sounded like the cyl's used on the DP-D1(diesel units) and they keep the kits in stock. I took the ram/piston assy with me and we matched up the individual pieces in the kit.
The actual "cup" seal in the end piece (gland nut) in the kit was a slightly different configuration (o.d. of seal flared out so it was slightly larger O.D. than the original piece) the mech said they were a bear to get into the groove in the gland nut, but it "would never leak again !" I verified that the PN of the cyl's were the same as the diesel units, also known as the "black" cyls.
My problem right now is getting the teflon "piston ring" that rides in the O ring groove on top of the o ring to go into the cyl bore without catching in the chamfer ramp going into the bore.
 

billbayliner

Chief Petty Officer
Joined
Jun 30, 2006
Messages
553
Re: '92 DP-C trim ram/piston disassembly question

Ted, shoot me a picture of the piston bi-directinal ring you are trying to install. Hey Ted, what did they charge you for that kit?
 

MotorheadTed

Seaman
Joined
May 2, 2011
Messages
50
Re: '92 DP-C trim ram/piston disassembly question

Bill: Going to try to post pics here. Kit was $94 +taxvolvo trim ram 001.jpgvolvo trim ram 004.jpg
 

MotorheadTed

Seaman
Joined
May 2, 2011
Messages
50
Re: '92 DP-C trim ram/piston disassembly question

Forgot to mention: clik on pics for larger size. Fuzzy stuff is frost, had piece in freezer o'nite. Ring and o'ring had shrunk down and was able to slide right into cyl. Just inserted far enough to get piston in bore past chamfer. Letting the rest hang out till piece comes up to ambient temp to wipe off condensation, then will finish assembly and test.
 
Last edited:

thejetman

Seaman
Joined
May 1, 2011
Messages
53
Re: '92 DP-C trim ram/piston disassembly question

I have a 1993 Wellcraft Excel. Volvo SP outdrive....I just bought the "Cylinder Rebuild kit" off ebay, from Michigan, and will be rebuilding mine next week. Once you take the cap off, the whole ram comes out? Then its just basically matching o-rings and shoving it back into the cylinder correct? When I get the kit, I will post pics of the play by play. Seems like Volvo would have released some sort of kit. Mine are leaking bad.
 

MotorheadTed

Seaman
Joined
May 2, 2011
Messages
50
Re: '92 DP-C trim ram/piston disassembly question

Jetman: yeah, that's basically it. The devil is in the details: as I stated, getting the piston back in is the pi--er! the end plug is larger than the piston and cyl bore. There is a steep ramp from the threaded area for the end plug and the cyl bore. The soft teflon ring gets pinched trying to compress into the bore and deforms. The kit you are getting doesn't have the new rings in it, they are extra cost item in that kit, but you're still less expensive than what I bought. If you have trouble, put the ram/piston in the freezer overnight, it will shrink the ring and o-ring, and stiffen the teflon ring, and it should go right in !
 

thejetman

Seaman
Joined
May 1, 2011
Messages
53
Re: '92 DP-C trim ram/piston disassembly question

Have you had a chance to see if they are working>?
 

MotorheadTed

Seaman
Joined
May 2, 2011
Messages
50
Re: '92 DP-C trim ram/piston disassembly question

I only did one due to time restrictions. The other one is not leaking, I'll do it when it does. They are both working fine at the moment, not in the water yet., much more mech work to do in the next couple of days.
 

thejetman

Seaman
Joined
May 1, 2011
Messages
53
Re: '92 DP-C trim ram/piston disassembly question

My kit should be here thursday. Hopefully I will get this fixed by the weekend. Its suppose to be pretty nice out. Now only if I could get my trim gauge to work I would be battin 1.000!
 

thejetman

Seaman
Joined
May 1, 2011
Messages
53
Re: '92 DP-C trim ram/piston disassembly question

Ok, got the kit. But the spanner wrench is just rounding the holes out! How in gods' name do you get the end caps off! I may have to resort to using a pipe wrench. I know, bad idea. But, if I cant get the end caps off............Im sunk!:mad:
 

MotorheadTed

Seaman
Joined
May 2, 2011
Messages
50
Re: '92 DP-C trim ram/piston disassembly question

JM: I cut/ground the end of a deepwell socket so that It had 4 prongs at the end. Drilled out the holes in the end cap to 3/16" to clean them up (but don't drill deeper than stock depth) Used socket on my 1/2" air impact wrench and the caps practically flew off ! I'll post pics and more info later, I'm really on a tight schedule this weekend.
 

win-or-bin

Seaman Apprentice
Joined
Aug 14, 2011
Messages
37
Re: '92 DP-C trim ram/piston disassembly question

Hey JM, how are you getting on with the caps? Be sure to post pics as have just recieved my seal kit and am going to attempt this job next week!
Thanks
 

win-or-bin

Seaman Apprentice
Joined
Aug 14, 2011
Messages
37
Re: '92 DP-C trim ram/piston disassembly question

Hey JM, how are you getting on with the caps? Be sure to post pics as have just recieved my seal kit and am going to attempt this job next week!
Thanks
 

thejetman

Seaman
Joined
May 1, 2011
Messages
53
Re: '92 DP-C trim ram/piston disassembly question

Well, got mine rebuilt.
*CAUTION* Its more of a PITA then the instructions read! This is a MODERATE level job

Other tools you will need:
1. A vice
2. GOOD o ring picks
3. 24" pipe wrench
4. More scotch bright
5. Compressed air.
6. 1/2 " deep well socket
7. Some good parts cleaner/solvent.
8. Good apray lube

To start off. TO get your end caps off, is going to be one of the harder parts of this project. After using the supplied wrench, and a good wrench from my local Snap On guy, I said screw it. Luckily I am a mechanic by trade, so I was able to go to work saturday and do it there.

I ues a 24" ppe wrench to take the cap off. Yes, I gouged some of the outer edges up, but hey, it beats spending 800 on a new cylinder. After breaking the cap loose. I removed the cotter pin, and pin that holds the ram to the cylinder.
Heres what it looked like:


Uploaded with ImageShack.us

Next, I had my wife hold the outdrive up (so it wouldnt smash my hand all to bits) while I removed the ram from the cylinder.
2cpoqog.jpg


I then took the whole thing to work. Where I put the clevis end in a vice, that I put a rag around as to not ding anything up.
10hlzs9.jpg


I removed the bolt that holds the valve spring cover on very CAREFULLY! With a rag covering everything as to not loose any of the springs or balls underneith the cover.
2ptask1.jpg


Then I set all the parts of the valves aside and cleaned them with some parts solvent.

I removed the cap from the rod and carefully removed all O-rings from cap and ram assembly. IF YOU SET THEM ASIDE, IN ORDER YOU WONT GET ANY MIXED UP!

Then I went to town with the scotch bright. I cleaned EVERYTHING! Every little nook and cranny on the cap got cleaned. I cleaned the rod as well. when I was done. About 1 hour later, I then cleaned everything with solvent, then used shop air and a blow gun to remove any loose particles in/on the rod/cap assembly.

Now, after I have cleaned everything realy good, it was time to install new o-rings. I started with the cap, since it was going on the rod first. Getting the blue seal into the middle of the cap, was the hardest thig to do. I set the cap on a table, and with ALOT OF PATIENCE, a flat head screw driver and a pick. Was able to get it into it. Its going to want to fold over, and not go in right but it will, it just takes some time. Make note of which way the opening on the seal faces. IT SHOULD FACE THE CYLINDER!
5p1lra.jpg


I then installed the BLACK o-ring, with the spring around it, on the outside of the cap. No biggie. Goes right on. And the big o-ring on the end of the cap. BAM! You are home free at this point.

This is where a vice comes in handy. Having the rod supported in the vice, I Took a deepwell 1/2 " socket and pushed it through the center of the cap. Why do you ask? Because the new seals are so tight, you might tear them putting the back on the rod. Take cap/socket assy. and put onto rod. I used a bunch of spray lude during this entire project, it comes in handy here as well. Lube the rod and inner cap really well. Its gonna take some force, and push the cap onto the rod. BE CAREFUL NOT TO TAKE THE ROD INTO YOUR CHEST! Now you should have the cap on the rod! Try not to get excited and dance around the shop like I did.

Screw the Valve Assy back onto the rod. I used a little bit og threadlocker on the threads as to not have this thing come apart in the cylinder. EVER. I put the new o-ring on the valve assy and drove home. Once getting home, I wrapped the rod in paper towels and put it into the freezer. Why you ask? To shrink the seals so It will go into the rod easier.
f5bap.jpg


While it was chillin, I went into the garage and started to prep the boat for the new rod. I used a bunch of paper towels and shoved them into the cylinder to soak up and moisture, old fluid, whathaveyou in there. Pulled them out and did it again. Till it was bone dry in there. I used my drill pump/oil changer, to suck the rest of the old fluid out of the reservoir. Don't want to contaminate new fliud, and have to do this all over again. So now that I have a squeeky clean cylinder and all the fluid out of the reservoir. I dipped the rod into some new clean trim fluid. Gently put it into the cylinder. I lock tited the threads of the cap and screwed the whole works together!!!!!!!!!!!!!!! Reinstalled pin, and cotter pin, lit ciggerete and sat back for a moment. I then filled the reservoir with new clean fluid. With my wife at the helm. I then commanded UP! She the hit the trim button, and nothing happened. So I grabbed the lower unit and gave it some help going up. After about 10 minutes of button on/off. It started to raise. Slowly might I add, but it did. Then once at the top, I commanded DOWN!!!!!!!! And It did. We did this cycle, for about an hour, to bleed the cylinders of air. AND THATS IT!


Like I said, this project can be a PITA, if not careful. I will be happy to answer any questions.
Jet
 
Top