'92 Force 150 O/B problem

Markas

Seaman Apprentice
Joined
Jul 4, 2004
Messages
33
I just came in from the lake today after having some unexpected problems with my '92 Force 150 in-line 5 outboard.

I read through about 50 posts before posting this one, and have to admit that my head is spinning on where to start troubleshooting.

So for those of you who may advise me to read more posts - I am - but thought that while I'm trying to figure this out I'd also post the symptoms of what happened today to see if anyone could give me a probable starting point.

Got on the lake yesterday, after filling up the boat with gas - added about 14 gallons to the tank, which has a 36 gal capacity. Mixed the TCW/3 oil in at the same time - normal proportion of 50:1.

[point 1: my wife said that there was a news story yesterday about some gas stations having bad gas - I also put about 1/2 tank in my truck at the same time, no problem driving up and back to the lake at least with the truck]

got on the lake, engine started fine, no problems, WOT is about 5200. I was running about 3000-4000 varying for about 1 hour or so, no trouble at all. Stayed on the boat overnight, idling around fishing in the evening and again this morning - no problems. Ran for about 25 minutes this afternoon at about 4000-4500 - by this time reading from the fuel gauge (have a flow meter) used about 10 gallons of gas out of the 36 gallons. Kicked it up to around 5000 and was on plane for about 10 minutes then suddenly it stumbled a couple of times, then dropped down to lower RPMs even at WOT I couldn't get it above 3000-3300 RPM, but otherwise was not running rough or anything.

Tried to pump the fuel bulb thinking maybe there was a problem with the gas flow but bulb had pressure and pumping it didn't have any effect (still stayed at max 3000-3200 instead of the normal WOT of around 5000). Gas flow as indicated by the flow meter was 10-12 gph.

Decided to turn back to the dock - still smooth but only at 3000-3200 RPM max throttle. Got within no wake zone near dock, dropped down to 900 and ran for about 5 minutes in to the dock, engine stalled about 50 feet from the dock. Restarted, stalled again, then couldn't get it started at all.

Noticed that if I put it in neutral, then maxed out the throttle, it would start and run for about 10 seconds before stalling, but would not catch when at idle throttle.

Took cover off, noticed some of the noise insulation was chewed up by the flywheel and found 4-5 pieces lying around inside the engine area [point 2: read other posts about the dust created by the insulation getting into the carbs (?)].

Pulled the 5 plugs, cleaned them. While they were out, cranked it and found it turned freely as expected.

Put plugs back on (still on the water at the dock doing this), again got it to start sluggishly a couple of times, only when in neutral and max throttle, otherwise wouldn't catch. Even then, when it started it only ran for about 5-10 seconds before stalling out.

Decided to call it a day and packed it in and trailered it home.

Now I don't know where to start:

1) Suspect bad gas? Would the above be symptomatic of bad gas? - maybe try running from a good gas supply instead of the gas in the boat?

2) Clean out the carbs or whatever on the engine due to the ground up dust from the insulation?

3) Check compression/spark/fuel pump diaphragm/reed valves as suggested on other posts? (I don't have a compression or spark tester so I'd have to get one first)

4) Is there a chance the throttle linkage got loose, slipped or something, and it isn't actually applying max throttle when the lever is all the way down? Maybe by the time I got to the dock it slipped even more or something?

I really would hate to trailer it to a mechanic (1-2 hours away) only to find it was something simple I could have dealt with at home.

Anyway, thanks in advance for those of you who were patient enough to read this to the end and comment. Back to reading more posts on the forum...
 

Frank Acampora

Supreme Mariner
Joined
Jan 19, 2007
Messages
12,004
Re: '92 Force 150 O/B problem

Forget bad gas! Forget throttle linkage slipping! Forget the foam (for now)!

FIRST---check the compression. Second--while the plugs are out check for spark on all 5 plugs.


These engines will run on 3 or 4 cylinders, although not well, and that can be puzzling.

So: First and second, You need to eliminate mechanical damage such as a melted piston and electrical damage such as a malfunctioning ignition system
 

Markas

Seaman Apprentice
Joined
Jul 4, 2004
Messages
33
Re: '92 Force 150 O/B problem

Will do. Thanks for the quick answer. On my way to Harbor Freight for a compression tester in the AM.
 

maxum_man

Petty Officer 2nd Class
Joined
May 2, 2010
Messages
167
Re: '92 Force 150 O/B problem

I'm having the same problem with a 1992 120 hp 4 cylinder. Mine was running fine up to 3000 rpms max, but then yesterday while idling, it shut off and would not start back. Im not sure if yours has the same cylinder drain plates that mine does but I noticed that one of them was cracked and leaking gas/oil out onto the cylinder block.
I have also been in the process of changing my entire ignition system out. I cant find a problem with just one component, so i'm changing it all!! Kinda expensive but I bought the boat for $1500 under book value.
 

roscoe

Supreme Mariner
Joined
Oct 30, 2002
Messages
21,753
Re: '92 Force 150 O/B problem

Frank has you started in the right direction.

Another thing to keep in mind, if the compression and spark all checks out:

foam chunks may have been sucked thru carb - stuck in reed valves
 

Markas

Seaman Apprentice
Joined
Jul 4, 2004
Messages
33
Re: '92 Force 150 O/B problem

OK. Got the compression tester and spark tester and here are the results:

Cylinder 1: 125
Cylinder 2: 40 (after spraying WD-40 and retesting, 55)
Cylinder 3: 120
Cylinder 4: 125
Cylinder 5: 125

All 5 sparks tested good with spark tester.

Note: For the past couple of years I had noticed that cylinder 2 spark plug was always shiny - never dirty or grimy - I suspect that there was a pre-existing issue with cylinder 2 prior to this past weekend, now that I'm starting to understand more about diagnosing problems - I'm 'guessing' it's a blown head gasket (?) possibly but as the previous poster said, can run on 4 out of 5 pretty well - I suspect that is what has been happening over the past 2 seasons and don't think that the issue with cylinder #2 is a new one.

Also, took a flashlight and looked in at the cylinders - all five were the same, carbon/sooty color, no difference between any of them that I could notice. No major pitting or melted metal or anything like that, at least from what I could see.

So assuming I now have two issues, the pre-existing cylinder 2 low compression/clean plug, and the new problem that caused the symptoms this past weekend, what should I consider doing next?

Thanks,
 

Josh P

Petty Officer 1st Class
Joined
Aug 26, 2009
Messages
328
Re: '92 Force 150 O/B problem

pull the head, i would check for a scored cylinder, and inspect your head gasket as you may get lucky, but scored cylinders are common on 2 strokes.
 

Markas

Seaman Apprentice
Joined
Jul 4, 2004
Messages
33
Re: '92 Force 150 O/B problem

OK, now I'm going to need some wisdom from the gurus...

Took the cylinder head off. First of all, cylinders 1,3,4 and 5 all appear the same, the pistons are all smooth with some brown discoloration on them. The cylinder walls are smooth with no discernible grooves or uneven areas. I guess this is consistent with the 120-125 psi pressures measured earlier.

As far as I can tell, there is no obvious damage to the head gasket around cylinder #2.

However, as the attached pictures show, there's something more serious going on with cylinder #2.

The inside of the cylinder head cover for #2 is aluminum colored (no brown discoloration) and is rough - see picture of inside of cylinder head cover (cylinder 3 on left, 2 in center, 1 on right).

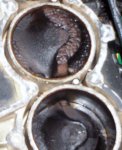
Piston #2 has a rough pitted surface, and there are a few spots around the piston edge that look like they are roughed up, right where the piston comes into contact with the cylinder wall (see picture of piston #2 (top) and piston #3 (bottom).

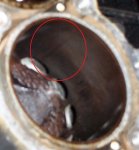
Cylinder #2 is scored (circled in red in the third picture). Not sure how to judge the depth of the groove, but if I had to guess, it's less than the thickness of a piece of paper - just enough to feel it. This I guess is consistent with cylinder #2 having a pressure much lower than the other 4 cylinders.

So, what's the prognosis? Do I have to take out the piston in #2, hone out the cylinder, and replace the piston? I've read some of the posts that talked about how to do this while the engine is still on the boat. I'm somewhat mechanically inclined but this is uncharted territory - never did a piston replacement on anything before. Does it make sense to do only one cylinder?

For the record, the Engine model # is 1501A92A, S/N: 26667.

Arrgh! But thanks for the continued advice!
 

Attachments

  • Cylinder Head 1-3.jpg
    Cylinder Head 1-3.jpg
    158.3 KB · Views: 0
  • Cylinders 2 and 3.jpg
    Cylinders 2 and 3.jpg
    142.8 KB · Views: 0
  • Cylinder 2 - scored w note.jpg
    Cylinder 2 - scored w note.jpg
    118 KB · Views: 0

Frank Acampora

Supreme Mariner
Joined
Jan 19, 2007
Messages
12,004
Re: '92 Force 150 O/B problem

That's classic detonation damage. Top carb was running lean for whatever reason and #2 cylinder suffered the damage.

I can not tell the degree of damage to the cylinder from the attached photo, HOWEVER: At 40 PSI it is probably severe enough to warrant an overbore. You may get lucky with removing the piston and honing the cylinder -----but I really don't think so. Of course, If you want the quick repair to finish the season and are willing to settle for reduced performance, by all means try honing. Then if it works, rebuild after the season is over

No matter what you do, find out why the top carb went lean and correct that before running the engine again. Look for junk in the needle, a stuck float, a stuck needle, the idle mixture screw set too lean, varnish or junk in the high speed jet, partial clogs in the low speed circuit, etc.
 

Markas

Seaman Apprentice
Joined
Jul 4, 2004
Messages
33
Re: '92 Force 150 O/B problem

Couple of questions:

1) Would detonation damage like this happen in 1 hour, or over months/seasons?

2) When you say remove the piston and hone the cylinder, do I automatically assume that the piston and rings have to be replaced, or does it depend on the condition of them when I take the piston out? Sorry to be asking, but not sure.

3) Before this is all done and back together I'll definitely be checking the carbs, and will check to see why the top one ran lean as you suggested.

Thanks,
 

Frank Acampora

Supreme Mariner
Joined
Jan 19, 2007
Messages
12,004
Re: '92 Force 150 O/B problem

Detonation damage typically occures at or near full throttle because the high speed circuit will not deliver any fuel therough the venturi until sufficient airflow is established. So: Yes, if you did a lot of partial throttle cruising, the damage coul have been cumulative over a couple of seasons. Usually, however, it happens fast--so fast that you can not react, even if you hear it.

If the piston skirt is in good condition, you may be able to "get away" with reusing the piston and, of course, if ultimately you intend rebuilding then it would be appropriate to try and reuse it. BUT--there's that little word again--But the only sure cure is to rebore and replace the piston. Reusing a piston in that condition COULD lead to more damage requireing an immediate rebuild.

If it were my engine, I would take it to a machine shop and have the bore "miked" first. Then, most likely I would bite the bullet and do the rebuild. And yes, it is ok to rebore and replace only one cylinder and piston.

BTW: see my PM to you
 

Markas

Seaman Apprentice
Joined
Jul 4, 2004
Messages
33
Re: '92 Force 150 O/B problem

Took the top carb off today; going to Sears in the morning to get the 12 point socket to take the two bolts out of the rod for piston #2.

Have a question: When I took off the cylinder head cover, in addition to the 20 bolts all around the outside holding the cover down (and the two to the left), there were five smaller bolts - one each right next to the spark plug holes. What are these for? They had a very small amount of something on the end of them when they came out - looked like black RTV or gunk or something. They aren't called out in the Clymers or online that I could see, anyway.
 

Markas

Seaman Apprentice
Joined
Jul 4, 2004
Messages
33
Re: '92 Force 150 O/B problem

OK!

Got the old piston out, ordered the new Wiseco piston, got the rod off the old piston and on to the new one with no problems.

Now I spent the whole morning trying to get the connecting rod big end with the 16 bearings lined up and back on the crankshaft.

Have no problems getting the piston back into the block (used Frank's advice to use a screwdriver to get the rings in).

What is the sequence that works the best ???

This is on #2 of 5 cylinders, so the reed port or whatever it's called is vertical, which makes it more difficult.

I've tried everything: Using grease to glue 8 of the 16 bearings with 1/2 the cage to the connecting rod, then insert the piston, then try to get the end cap with the other 8 bearings glued to it into position through the reed port; getting the end cap with the bearings already on it through the vertical port was beyond my dexterity.

Tried to put the end cap and bearings in place on the crankshaft first (through the cylinder), then put the piston with the other bearings on the rod in to the cylinder; wasn't able to get them to all line up without at least one roller falling out of position.

Tried putting the roller bearings and the cages on to the crankshaft first, the put the piston in; then the end cap - seemed to be the approach that had the best chance but it didn't work.

When putting the piston in, should the crankshaft be rotated so that the piston is at TDC?

For those of you who have done this successfully, in what order did you do it?

For example:

1. Rotate crankshaft so #2 is TDC
2. Put end cap and 8 of 16 bearings and 1 cage on to crankshaft through cylinder
3. Put other 8 bearings and other cage on rod big end and then insert piston into cylinder
4. Line up screws and hand tighten etc...

Or:

1. Put all 16 bearings and cages on to crankshaft with end cap
2. Rotate crankshaft so #2 is 180 degrees from TDC (lowest point)
3. Install piston
4. Line up screws and tighten

1. Put 8 bearings and one cage on big end of rod
2. Install piston
3. Make sure lined up on crankshaft
4. Install other 8 bearings and cage through port (ugggh!)
5. Install end cap & then hand tighten screws, etc.

or what?

Sorry but I sure could use some advice on what is the best approach.

Thanks,
 

Markas

Seaman Apprentice
Joined
Jul 4, 2004
Messages
33
Re: '92 Force 150 O/B problem

OK. I figured it out. Took a lot of trial and error, but for the benefit of others, here's the process that worked for me:

1. Turn the crankshaft until it is TDC (for cylinder #2, which was the one I'm working on)
2. Liberally coat the cages and the roller bearings with grease.
3. Put 7 of the 8 roller bearings into one cage, slathered with grease
3. Working from the cylinder end (not the reed end) insert it on to one side of the crankshaft - turn the crankshaft slightly in either direction to give your finger(s) room to put it in. When done, it will be on either the left or right (as opposed to the back or front).
4. Do the same for the other cage, grease it up good and get the 7 of 8 roller bearings in it, then insert it on the other side of the crankshaft, rotating the crankshaft a little either way to get your fingers in there.
5. When you get both cages on the crankshaft, use a small flashlight and a straightened coat hanger to position them so that the two "gaps" - where the two remaining roller bearings will go - are evenly proportioned and that the two cages butt up against each other (not overlap). Rotate the crankshaft 180 degrees (is that BDC?) and do the same for the other gap.
6. Now this is the fun part - using either your finger, or a coat hanger with a dab of grease on it, or whatever works for you, jockey one of the remaining two roller bearings into place - the hardest part is getting it in the 'slot' - but it has to be positioned just like the others - grease helps keep it in place.
7. Rotate the crankshaft back to TDC and do the last remaining roller bearing the same way.
8. Once you have the roller bearings and cages in place, rotate the crankshaft with a flashlight sitting in the cylinder to make sure that you didn't jar the cages out of alignment - use the straightened coathanger to very gently push/position them back into alignment. When you're done, you should be able to turn it a full rotation and see that all roller bearings are evenly aligned, and the cages are meeting snugly but not overlapped or too far away from the shaft.
9. Now comes the fun part. I got lucky - it worked the first time but if you don't get it right you may have to start all over at #1. You rotate to TDC (crankshaft closest to top of cylinder, furthest away from carbs) and gently place the end cap for the rod in place. Don't push too hard or you'll knock all the roller bearings out of place. Just put in on snugly enough that it is in position. I found that 'buttering it up' on the inside with a thin layer of grease helped.
10. Now rotate the shaft 180 degrees, in preparation for inserting the piston and rod. At this point, take another look at the roller bearings and the end cap with a flashlight to make sure they are in place - use the coat hanger to nudge the cages if necessary, but don't mess with it too much or you'll mess it up and have to start all over.
11. Position the connecting rod small end inside the piston to be at the 'top' of the piston' so that when you slide the piston in it will match up with the crankshaft. "Butter" the inside with grease like the end cap above. Insert the piston, use Frank's screwdriver method to get the rings on, and get the piston and rings just inside the cylinder.
12. Push gently, first to align the rod with the crank shaft gap, then press smoothly to get it on to the roller bearings.
13. If the boat gods are on your side it should be aligned with the end cap enough to tighten it down etc.
 

Markas

Seaman Apprentice
Joined
Jul 4, 2004
Messages
33
Re: '92 Force 150 O/B problem

So, had everything back together, compression great on all cylinders, put on the muffs and it started right up!

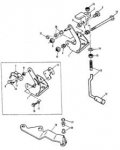
Idled a few minutes, moved gear shift to make sure it was working, and SNAP! - what turned out to be the "ARM-INTERLOCK" P/N:819932 1 snapped - # 2 in attached picture.

Long story short, got the broken part out (after an almost unbelievable disassembly effort) and now have to either make one or buy one.

It is aluminum. I am assuming it is designed to fail before something more expensive, so steel is out.

Oh well, at least the engine is running well.
 

Attachments

  • 45.jpg
    45.jpg
    8.7 KB · Views: 0

Markas

Seaman Apprentice
Joined
Jul 4, 2004
Messages
33
Re: '92 Force 150 O/B problem

Good news. Spent the morning making a replacement Arm Interlock, put it on the outboard, with some fine tuning with a dremel once in place it works fine. Got the engine back together, tried it out and it works on muffs.

Next step is head for the lake later this week to do the break-in of the new piston, and also set the idle adjustments.

Whoopeee!
 

Markas

Seaman Apprentice
Joined
Jul 4, 2004
Messages
33
Re: '92 Force 150 O/B problem

So had it running on the water for a little while before dark. Didn't have time to do any diagnostics but think water is getting in to at least one if not two cylinders - running rough and underpowered at slow no wake speeds. When tilted saw milky white liquid in top and bot carb intake covers - got dark before I could pull plugs and see what is happening.

Have all the tools - will start with plug condition, then check compression, then check torque on cyl head cover now that it warmed up - however using old gasket and no external leaks.

One question - pee holes really strong - lots of flow at idle - didn't mess with impeller - seems more than usual. Any chance this could be related to water in cylinders? If all above checks then I guess I will pull head cover dockside and take a closer look. Haven't had the exhaust plate cover off - r whatever its called - but if that gasket is messed up I am assuming water could get into cylinders. So I guess that's next - brought a roll of gasket paper and rtv in case I have to redo that gasket. Ugh.

Pulled plugs one at a time and got spark on all. Pulling 1, 3, 4, 5 killed engine, pulling 2 had no effect but 2 has a spark.

Anything else I should check before diving into exhaust plate?

Thanks
 

N Wolf

Petty Officer 3rd Class
Joined
May 17, 2010
Messages
89
Re: '92 Force 150 O/B problem

Sorry I didnt see your post before you put it back together. When you lost compression to #2 there was also no vacume to draw in fuel and oil so nothing to lube bearings and seals. You probably have no internal pressure on that cylinder and thats why you have spark and no fire. Do a search for two cycle theory and you will see what Im talking about. I had the same thing happen to two of my last three motors.
In case your wondering, I have no idea why this afects one cylinder and not the ones next to it, but it does.
 

Markas

Seaman Apprentice
Joined
Jul 4, 2004
Messages
33
Re: '92 Force 150 O/B problem

Ok. I am on the water this morning - trying to adjust the idle and timing. Can't get idle timing to zero. Closest I get is about -25 or so, maybe -20.

Carbs closed; throttle link rod disconnected; idle adjustment screw backed out all the way, timing adjustment screw all the way out (both blocks about 3/8 or less apart - as close as they can get) and idle rpm about 800. Checked flywheel position - dead on at 0 for TDC for piston 1.

What's next diag step, at least something I can do on the water? I am going to try static wot timing check next, but was expecting idle to be closer to zero first. Thanks!
 

Markas

Seaman Apprentice
Joined
Jul 4, 2004
Messages
33
Re: '92 Force 150 O/B problem

Got the static test set up. Best I can tell timing is off the scale btdc between 40 and 50. Same type of offset as at idle.

idle tower is at full wot and plastic stop is up against engine. Gap on plastic timing block adj screw is at minimum. Resistance of trigger coils all within spec. As far as I can tell all magnets on flywheel in position. What else can I check?

Thanks
 
Top