'93 Pursuit 2150 - Fuel tank questions

BOAH

Petty Officer 1st Class
Joined
Mar 15, 2010
Messages
298
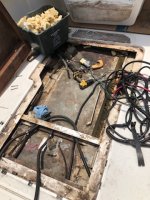
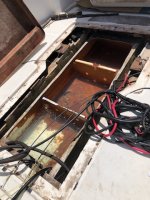
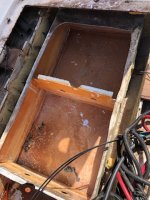
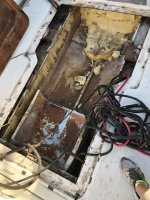
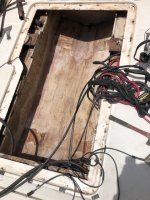
I picked up a '93 Pursuit 2150 that only had 56 hours on it. One of the first things I'm doing is trying to check out the gas tank. Below is a picture of the float that I pulled out that was basically melted and the other pictures of the best shots I could get of the inside of the tank. I pressure tested it and it held with no noticeable leaks but am still concerned about it. I'm thinking about pulling it and at a minimum trying to clean it and or just replace it. I've looked online for tanks for that model but I'm not finding much. Any help would be appreciated!IMG_0178.jpgIMG_0232.jpgIMG_0263.jpgIMG_0270.jpg
 

mike_i

Ensign
Joined
Jun 28, 2017
Messages
959
That does not look good. At minimum it needs to be cleaned out. Depending on where you are there should be places that build tanks and depending on the size and shape of your tank you may be able to get a new plastic tank. Looks like the boat/gas was sitting around for awhile. Good on you for being proactive.
 

76SeaRay

Lieutenant Junior Grade
Joined
Aug 24, 2017
Messages
1,071
My sending unit was completely eaten away and I couldn't find anyone to clean it, pressure test it, and certify that it was good. I had a new aluminum tank custom made to match it (about $850 for 60 gallon tank) so now I don't have to worry about it at all... It included epoxy coating on the tank. If you have a new tank made, make sure you use someone that is Coast Guard certified to make tanks. They will give you a label to put on the tank showing it is for Marine Use.
 

BOAH

Petty Officer 1st Class
Joined
Mar 15, 2010
Messages
298
So I decided to replace it and I'm glad I got that one out. The amount of crap that was in it was unbelievable. I can't imagine any type of cleaning that would have gotten all of that out. Anyway, the tank was foamed in so I had to cut out the foam the best that I could. Once I had the sides removed, I filled it with water and cut it up into pieces and removed them one at a time. IMG_0289.jpg
 

Attachments

  • IMG_0306.jpg
    IMG_0306.jpg
    70.6 KB · Views: 13
  • IMG_0376.jpg
    IMG_0376.jpg
    67.4 KB · Views: 13
  • IMG_0379.jpg
    IMG_0379.jpg
    65.7 KB · Views: 13
  • IMG_0381.jpg
    IMG_0381.jpg
    71.4 KB · Views: 13
  • IMG_0382.jpg
    IMG_0382.jpg
    105.9 KB · Views: 13

BOAH

Petty Officer 1st Class
Joined
Mar 15, 2010
Messages
298
Now, I need to put some type of sleeve in the both of the drainholes at the front and rear of that compartment so I'm not sure how to go about that since I only have access from inside of that fuel compartment. Then I would like to reseal that compartment but again not sure what to use. And lastly, should I get another aluminum tank or maybe a poly tank?

If you've got experience with any of that, please let me know. I'm in uncharted territory for myself.

Thanks!
 

76SeaRay

Lieutenant Junior Grade
Joined
Aug 24, 2017
Messages
1,071
I haven't installed my new tank yet but had a similar problem. It appears you had a plastic pipe running from the forward bilge underneath the tank to the aft bilge for drainage of any water to your bilge pump. This was the same as mine. It appears the pipe was used since the tank was foamed in place and water would collect under the tank in the foam without the pipe. The Coast Guard regs say you can't foam tanks in place anymore. The company that supplied my tank said the same thing and has neoprene strips that are used to cushion and secure the tank. That means that you probably wouldn't need the pipe, only an opening in each bulkhead. I plan to leave the pipe out since I will be using the neoprene strips and that will leave a channel open under the tank. Here is a picture of my aft bulkhead that I just installed and you can see where the short piece of water pipe goes through the base of the bulkhead (white). My tank goes right in front of the bulkhead and will have another short piece of pipe in the forward bulkhead. (The 2x4 between the inboard stringers is only a temporary spacer).

I should add that my tank is a V bottom tank. It looks like yours is a flat bottom tank so you may need to replace the wood under it to rebuild the support. Just guessing here..

Engine Bay Stringers Set.jpg
 

BOAH

Petty Officer 1st Class
Joined
Mar 15, 2010
Messages
298
Yes, exactly. I'll do the same by gluing in cut off pieces of pipe in those holes for drainage. The tank that was in there was a flat bottom but I'm looking at different tanks and will probably get more of a V bottom tank. They said to then put neoprene strips on the bottom to allow for drainage. I'd also like to reseal the whole compartment. Not sure what to use but I guess I could just glass it unless there's an easier way to do it.
 

76SeaRay

Lieutenant Junior Grade
Joined
Aug 24, 2017
Messages
1,071
Actually, the correct term for my tank is a belly tank, a flat about 4 inches wide on the bottom of the V. I used Speedy Tanks (Atlantic Coastal Welding in New Jersey) for my new tank. They have tank profiles on their website. I went with a new KUS incremental sending unit for mine.
 

BOAH

Petty Officer 1st Class
Joined
Mar 15, 2010
Messages
298
Very cool. Yeah I meant a belly tank and I'll give them a call and see what they have to say. Figuring out a replacement has been an education.
 

BOAH

Petty Officer 1st Class
Joined
Mar 15, 2010
Messages
298
I went ahead and ordered a Moeller 64 gallon tank that will hopefully be here before too long. Question, on the aluminum tank that was in the boat. There was a ground wire that was run from the fuel fill to the tank and then to the negative battery terminal. Do I need to worry about grounding the poly tank in case of static electricity?
 

BOAH

Petty Officer 1st Class
Joined
Mar 15, 2010
Messages
298
Also, I'm looking for some guidance in the correct way to secure the new tank.
 

BOAH

Petty Officer 1st Class
Joined
Mar 15, 2010
Messages
298
Here is a picture of the new tank that I bought that just came in. I'm still trying to figure out how to secure it in the front and back because there's quite a bit of space there now. Also, I would like to place some type of foam or something buoyant in the open spaces. They say specifically do not foam it into place so I need another idea.

Any thoughts?IMG_0600.jpg
 

todhunter

Canoeist
Joined
Sep 15, 2020
Messages
1,323
What about using pour-in foam into a plastic bag that can conform to the shape of the void, but not "glue" the tank in place?
 

zool

Captain
Joined
Aug 19, 2012
Messages
3,432
You can use straps and neoprene strips to secure it, then fill in the voids with varying thickness foam insulation boards from HD/pink or Lowes/blue green. Thats not technically foaming it in cuz the tank can still expand and contract if you dont pack it too tight.
 

dingbat

Supreme Mariner
Joined
Nov 20, 2001
Messages
16,320
The 92 gallon tank on my Grady is just “blocked” in with 2x4 so air can circulate completely around it.
The whole thing was then covered with a sheet of heavy plastic
 

BOAH

Petty Officer 1st Class
Joined
Mar 15, 2010
Messages
298
Thank you for that! All of those could definitely work. I'll give it some thought. I still have a little bit of time because I was told that the tank will expand up to 3% when it's full. So for that reason, I filled it with water and I'm going to let it sit for a month to get the final size. Thanks for your suggestions!
 

kcassells

Fleet Admiral
Joined
Oct 16, 2012
Messages
8,738
A very good read.


Might have plastic mentioned.
 
Top