A couple rookie trailer q's

Brian WV

Seaman
Joined
Mar 3, 2012
Messages
71
I've been having light issues with my load rite trailer so i got frustrated and just yanked the harness today. I fished the new wires through and began to mount up the amber side marker lights...

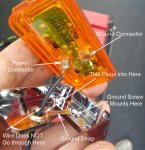
From what i understand i just splice into the brown wire from the harness.. i open the package and it comes with one wire with a quick connect to the back of the lense. What threw me off is that there are two connection points on the back of the lense..I thought there would be just one? Am i missing something? Do i pick a winner?

its a basic harness with 2 tail lights and 2 amber lights for the fenders.

Pic below...
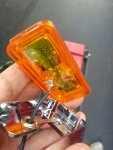
20130613_184527_resized.jpg


2nd question

I have a extension for the harness. 1 ground on the original harness and 1 for the extension. Ground both? Combine them and ground together?

3rd question

Rear light bar. brown wire so i just slice into the harness where i connect the harness and the tail light? so a three point connection?

Thanks in advance, sorry im a novice to this stuff!
 

batman99

Petty Officer 1st Class
Joined
Sep 13, 2012
Messages
393
Re: A couple rookie trailer q's

.

For me, I never trust any factory or store bought harness. And, I never trust their colors either. Been caught too many times where one end of the wire is one color and other end is a different color - because someone did re-join with different color wire.

Using a 12V probe test light ( AutoLoc? AUTTSLIGHT - 12V Test Light with Clamp ), simply test each color wire (in the harness) and write down its behavior. re: Stop/Left Signal, Stop/Right Signal, Marker lights and frame ground. Always double check color wires before soldering / taping up their connections.

For 12 volt lighting, always remember that bulbs (normal or LEDs) need a "+" flow into it and a "-" flow out of it. Thus, either 2 x wires or perhaps 1 x wire and the light assembly is grounded (frame ground) by its own mounting screws. Always remember that 12V lighting needs a loop and most "weird" behavior problems are from poor frame ground. Especially from boat trailers - that are dipped in/of out water.

For your little light (shown in picture), it appears to have a plastic mount. Thus, a current flow wire and ground wire must be connected. For its ground wire, simply create a 6" long wire and connect to its steel frame (for frame ground).

For your ID light bar with 3 x wire leads, 1 wire is for Maker, 1 wire for ground and 1 wire might be for Brakes. Some ID light bars are combo brake or signal lights as well. Using some spare 12 volt wiring, simply connect each of the ID light bar wires leads to you vehicle's 12V battery, and see how the ID bar lights up. Try different lead combinations to confirm which lead is which. Or, perhaps you a use internet Search Engine (like Google) and find the online instructions - for your specific ID light bar. Perhaps your ID light bar has a part number stamped on it - that can be used as internet search text.

Good picture at:
http://www.accessconnect.com/images/4 way wiring.jpg
http://www.horsecountrydirectory.com/ltrailerwiring.html

Hope this helps.
 

Brian WV

Seaman
Joined
Mar 3, 2012
Messages
71
Re: A couple rookie trailer q's

i believe it will help. I didnt know That i had to create a ground and would have thought it would have come included with the light. I'll give it a shot tomo!
 

batman99

Petty Officer 1st Class
Joined
Sep 13, 2012
Messages
393
Re: A couple rookie trailer q's

i believe it will help. I didnt know That i had to create a ground and would have thought it would have come included with the light. I'll give it a shot tomo!

In looking at your little light (light picture) again, it appears to be a self grounding light. re: Its steel mounting screw is connected to a tab. When the light glass is pushed into the base, this tab makes contact its 2nd pin (which is a "-" lead). If testing light outside its base, simply connect 12V ground wire on the 2nd tab. If you have a 12V test probe tool, one can touch its tip to this ground pin as well.
 

Mason78

Petty Officer 1st Class
Joined
Sep 20, 2011
Messages
224
Re: A couple rookie trailer q's

Just don't cut the red wire!!
 

payton1803

Cadet
Joined
Jun 15, 2013
Messages
15
Re: A couple rookie trailer q's

do yourself a fovor and solder all connections and shrink wrap, it will save you headaches in the end:)
 

LippCJ7

Vice Admiral
Joined
Sep 20, 2010
Messages
5,431
Re: A couple rookie trailer q's

In looking at your little light (light picture) again, it appears to be a self grounding light. re: Its steel mounting screw is connected to a tab. When the light glass is pushed into the base, this tab makes contact its 2nd pin (which is a "-" lead). If testing light outside its base, simply connect 12V ground wire on the 2nd tab. If you have a 12V test probe tool, one can touch its tip to this ground pin as well.

This...


do yourself a favor and solder all connections and shrink wrap, it will save you headaches in the end:)

And this,

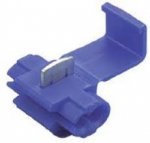
Do not use the scotch locks that are most likely provided in the harness kit like these,
scotch lock.jpg

They will fail in short order, either solder and heat shrink with heat activated glue or run down to Lowes and get heat shrink butt splices with heat activated glue like these,
Butt Splices.jpg

You can run a new ground to your lights, trailer ground wires are white, you can then use a ring terminal and attach the ground wire to one of your light mounting bolts, attach the brown wire to your black wire from the light(your picture)
 

LippCJ7

Vice Admiral
Joined
Sep 20, 2010
Messages
5,431
Re: A couple rookie trailer q's

What concerns me is that it looks like your wire is routed through the ground ring lug and into the light, this terminal could come in contact with the ground ring and short everything out, is there any chance you can tell us what kind of light system you have or post the instructions for it? Seems a little risky to me but you could always use heatshrink over the terminal to insulate it from contacting the ring lug of the ground..
 

UncleWillie

Captain
Joined
Oct 18, 2011
Messages
3,995
Re: A couple rookie trailer q's

What concerns me is that it looks like your wire is routed through the ground ring lug and into the light, this terminal could come in contact with the ground ring and short everything out,...

I was thinking the same.

Assuming the wire has not been moved from one connector to the other... Consider this....

Light1.jpg

Or something very similar.
 

scubacuda

Seaman Apprentice
Joined
May 27, 2013
Messages
31
Re: A couple rookie trailer q's

it's the blue wire , don't cut the blue wire
 

Brian WV

Seaman
Joined
Mar 3, 2012
Messages
71
Re: A couple rookie trailer q's

I was thinking the same.

Assuming the wire has not been moved from one connector to the other... Consider this....

View attachment 198857

Or something very similar.

Im sorry i have been away for a little. Short version is that i have no running lights as of now. i have brakes, signals, but no running lights.

The lights were the LED waterproof replacement lights from advanced auto, brand name is Blazer. Im just exhausted of this and feel like an idiot.

Tomorrow i plan on using this diagram you provided with hopes of better success.
 

ajax5240

Petty Officer 2nd Class
Joined
Aug 6, 2011
Messages
134
Re: A couple rookie trailer q's

do yourself a fovor and solder all connections and shrink wrap, it will save you headaches in the end:)

^^^ that is great advice there! Watch a few YouTube videos on correct soldering. You don't just gob the stuff on the wire, it should soak in.

The side marker lights ground to the trailer via one of the screws. There is a metal tab that sticks into one of the screw holes. Make sure your ground wire by the plug in the front has a good connection.
 
Top