And now for something completely different!

Sea18Horse

Chief Petty Officer
Joined
Jun 1, 2008
Messages
626
Well, a little different anyway.
I'm doing a restoration on my drift boat. A 1983 14' ClackaCraft. In comparison to the other restos we see on here this is a very simple project. But since the pacific nw in general and driftboats in particular are severely under-represented on here I thought what the heck!

I usually hang out in the Johny/Rude outboard section so this will be more or less my first post in this section so greetings! :)

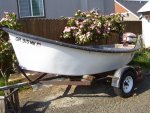
First order of business was to go through the trailer. Here is an overview of the boat before I started.DCP_1240.jpg. I don't have a very good overview of the trailer after I went through it last summer But this shows the winch stand and the spare tire ok;DCP_0049.jpg. The winch that I inherited from my grandfather is solid brass from Albina engine and machine works right here in Portland Or. They made landing craft used in WWII as well as tug boats and other kinds of work scows. I still need to find a way to secure it better. I shudder to think what's going to happen when the tweakers at the boat ramp see the 5 lbs of solid brass!
My two main points of concern were the transom and the fiberglass doublers or stiffeners in the floor/hull.

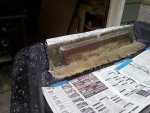
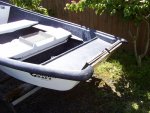
Here is an overview of the transom;DCP_1229.jpg. The transom is mostly the wood on the outside. The core was just 1/2" structural foam sandwiched between layers of fiberglass. Great for strength but not so good for crush factor with the through bolts and the transom clamps.
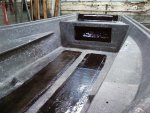
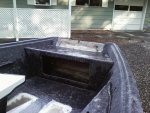
The stiffeners on the floor were also structural foam core with fiberglass laid up over it. After years of being walked on it was all cracked and the foam soaked.DCP_1220.jpg.

To be continued;

Cheers.................Todd
 

Sea18Horse

Chief Petty Officer
Joined
Jun 1, 2008
Messages
626
Re: And now for something completely different!

Here is pic of the transom work so far;0808111834.jpg. I'm using 1/2'' Marine mahogany plywood for the core and the outer wood. I cut the inner fiberglass off on both the top and bottom and then dug out the old soggy foam and cleaned out the void. Then I cut and trimmed a piece of the plywood that would slide down into place. When it came time to glue in the new core I wrapped a loop of wire around it in three places so that when I slid it into place there would be room for the epoxy. I mixed up some epoxy and swabbed the inside of the void with it and then mixed with fumed silica, troweled it on and slid it into place. Then I snipped the wires and pulled them out and clamped it tight. I chose to use marine epoxy for several reasons. First it's a relatively small project so the price wasn't that huge of a hit plus I needed good adhesive properties since I was gluing the core in to existing laminate. And as I understand it for oily wood like teak or mahogany epoxy is the best choice. Not sure how much truth there is to that. Next I'll have to get some chopped fibers in addition to the cab-o-sil and mix up some pb to fillet around the core before glassing it in.

I got some 1.5oz csm and woven roving to lay up with. My plan was to start with csm and alternate csm and roving ending with roving. And now for the first of what may wind up being many questions. How much thickness am I likely to get from each layer? In other words will two layers of csm and two layers of roving give me somewhere between 1/8'' and 1/4''?

Second question, here is a closer pic of the transom core. 0821111456.jpg, am I likely to have problems getting the fiberglass to conform to these compound curves? And if so is it acceptable to cut the fabric where it wants to pooch out as long as no two cuts are in the same spot?

Also I can see having problems blending the roving for the last layer. The whole finish on the inside of the boat is basically exposed roving and mat painted with pigmented resin or gel-coat. Will I want to tear off strips of csm and lay along the edges to help blend?

Thanks in advance for any and all suggestions or help!

Cheers................Todd.
 

Sea18Horse

Chief Petty Officer
Joined
Jun 1, 2008
Messages
626
Re: And now for something completely different!

The next issue is the stiffeners on the floor/hull. Originally my plan was to redo the stiffeners using the 1/2'' plywood as a core. But I was concerned about how much the floor flexes in rough water. I spoke to a gentleman at ClackaCraft about it and he said if it was his he would cut them off and leave it at that. He said that in the early days the hull/floor would flex a lot. Maybe as much as four of five inches at times. He said when you slid over a rock you could see it flex all the way down. He said walking around on the floor felt like walking on a water bed and people didn't like it. So they added the stiffeners, first with the foam core which didn't hold up well as is evident with my boat. Then later they used plywood cores and even later yet they went to just an extra thick floor. Which was nice and stiff but very heavy. Now they have a separate floor so the hull can flex as much as it wants and no one knows.

So now I think I'll just scuff up the existing areas and cover it with a layer of csm and a layer of woven roving. Then if later on I decide I can't stand the flexing I can always grind it back down a bit and add the stiffeners with the plywood core.

This brings me to the subject of interior finish. As mentioned the existing finish appears to be a black pigmented resin or gel-coat with white splatters over raw fiberglass as opposed to a paint. I'm quite sure it was sprayed on but it doesn't seem to be thick or rough enough to be gel-coat. My plan at this point is to add black pigment to the epoxy and brush or roll it on as the final couple of coats over my lay-ups and then add some white and splatter it on. I'm wondering if anyone has tried this at all. I know that raw epoxy resin doesn't have any innate resistance to uv but as I understand it the pigment will add some resistance. Which to me seems ideal because the existing finish is very dull at this point. And if it dulls to match fairly quickly, so much the better.

Does anyone see a serious flaw in this reasoning? The exterior uv resistant epoxy resin is obscenely expensive and available only in gallons.

Thanks again,

Cheers.......................Todd
 

oops!

Supreme Mariner
Joined
Oct 18, 2007
Messages
12,932
Re: And now for something completely different!

welcome to the dry dock seahorse !

we accept refugees of the other sections regularly. :D sooner or later.....every boat has to come up on the hard !:rolleyes:

as far as the thickness of the csm and roving you are using....that depends on the roving. (i know its 1.5 csm)

but i have some concerns......is the roving you are using a really thin silky kinda stuff?....between 6 and 8 oz? possibly even 10?. (the kind in wallmarts fiberglass kits by bondo)

if it is ....it has NO STRUCTURAL VALUE....it is only a finishing cloth used to smoothen out csm for fairing purposes.
another thing.....the binders in csm do not break down with epoxy....that means the csm will remain semi rigid, and you wont get the tight to the corner bond you wish.
epoxy does not contain the styrene. and the binders break down in styrene.

so....... this means....that you might have to go to a thicker cloth product......and cloth does not like corners....especally a thick woven roving..
the weave of the cloth hates 90 degree corners.
this is where a good fillett of epoxy peanut butter comes in......OR you could just use epoxy on the inner maghony transom.....and poly resin for the rest of the boat.
this will solve the csm issues....

you can cut the glass in the corners to get the air out....a thicker woven product just wont do it....you might give a bi axe cloth a try....the standard here is 1708.....you can just get it in 17 oz values if its for epoxy alone....(however....the csm on the back of the 1708 is stitched on....so the binder issues are not there with this type of glass fabric)

lol....that should be enough to get your head spinning.....
post more questions if i have confused you.....( its 545 am here (kelowna) and i havent slept since 3)

cheers
oops
 

Sea18Horse

Chief Petty Officer
Joined
Jun 1, 2008
Messages
626
Re: And now for something completely different!

Oops, thank you very much for taking the time to respond in your exhausted state. Very much appreciated!

Yes that does give me something to think about! It just goes to show, you can research on your own for months and months and still not find the answers you need. If you don't know what questions to ask you can't possibley get the answers you need. Iow you can learn enough to get youself into trouble but not enough to get yourself back out again! :)

So it looks like I need to switch gears and start thinking in terms of polyester. It's just after years of building fly rods and golf clubs I'm comfortable with epoxy. I like the simple mixing ratios and the consistent results. Two pumps of this and one pump of that (or whatever it might be) and I know exactly what kind of pot life and working time I can expect. Working with polyester always sounded a bit like alchemy. One false move and you find the stuff hardening in your hands and melting the bottom off your mixing cup or not curing at all.

Well ok that's good, poly is a whole lot cheaper than epoxy. So the roving I have is 18oz stuff from tap plastics. (As is the epoxy I was using.) When using poly, is alternating layers still a good plan? Or should I rethink that?

Thanks again!

Cheers........................Todd
 

oops!

Supreme Mariner
Joined
Oct 18, 2007
Messages
12,932
Re: And now for something completely different!

alternating layers is a must using poly.......poly resin by it self is very brittle....it needs the glass.....

the csm will form a boundary layer between the layers of roving.....the pockets between the weave of the fabric create resin rich pockets....this is a weak area...the csm will conform to these areas and give you a very strong laminate.

and the 18 oz is fine.
a lot of people say the have roving.....and it is the stuff out of the kits at wallmart or other big box stores......this woven product, is very weak structurally.

poly is fun to work with because you can adjust it to your needs....
you wont get the half hour or longer working time you get with epoxy. you get 15 mins...thats it....

when you buy the poly resin and mekp.....buy a little measuring cup that looks like a shot glass....(they are plastic) it will have the amounts on it...

if you can.....switch over to the metric system....it is far simpler....and everything is marked on the buckets.

you mix the mekp at 2% of the resin. you can go anywhere between 1.5 to 2.5. but it get hairy outside of those peramiters....thats why i always go 2%. i know how long it will take to go, and how much time i have working with it.

when you glass.....just use enough resin to saturate the glass.....no more....you are looking to a 50% resin to glass ratio....but the less resin the better. some glass vac bagging or infusion shops are down to a 70% glass to 30 % resin mix.......very strong.

cheers
oops
 

oops!

Supreme Mariner
Joined
Oct 18, 2007
Messages
12,932
Re: And now for something completely different!

btw.....if you really want detalies on glassing with poly......the first 16 pages of the link in my sig have a very good detiles on glassing
 

Sea18Horse

Chief Petty Officer
Joined
Jun 1, 2008
Messages
626
Re: And now for something completely different!

Thanks oops, woodonglass, friscoboater, Yacht Dr. ondarver, et-all(too many to name). Been doing a bunch of reading.

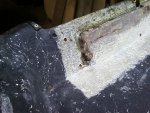
Making slow progress. Got the PB mixed up and applied;20110910_130850.jpg20110910_130841.jpg.

Got it all ruff 'n' scuffed;0911111128.jpg. If I had it to do over I would do something different with the 1/4" chopped. The stuff I got from tap plastics was like bundles of glass fibers chopped at 1/4". I think I might try blending or mixing them some way to try to break up the bundles into more individual fibers. To me it looks like a lot of resin and not much glass even though it looked ok in the mixing cup.

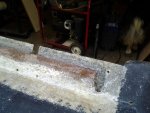
Then laid up the alternating layers of csm and roving, two each top and bottom;0911111355.jpg0911111354.jpg. It worked out pretty well. I had a fair amount of wasted resin, maybe 30-40 %. It's really been too hot out to be fiberglassing. Even early in the morning, but I figured screw it, just gotta bite the bullet and git-r-done! I didn't have too much trouble getting the glass to conform to the various surfaces. Couple of bubbles here and there. But for a first time I don't feel too bad. I figure I'll cut the excess off along the top with a whiz wheel or a fine blade sabre saw, not sure yet.

I'll have to see where I'm at as far as thickness after that. May have to add some more layers here and there. If I do have to add after it's cured for a few days do I need to ruff 'n' scuff before hand? (unwaxed laminating resin) I really don't want to cut through the fibers of the roving if I can help it. oops, I know I read where you ruff 'n' scuffed between lay-ups on your project but I thought the idea behind using unwaxed resin was so that you didn't have to? stays tacky.

Thanks to all!

Cheers.....................Todd
 

ondarvr

Supreme Mariner
Joined
Apr 6, 2005
Messages
11,527
Re: And now for something completely different!

Depending on the conditions and exact type of resin, you have up to several days before you need to sand the surface.

If you keep it out of the sun and its cool out, you have several days, put it in the sun and you may have less than a day.

You may not know the exact type of resin though.
 

Sea18Horse

Chief Petty Officer
Joined
Jun 1, 2008
Messages
626
Re: And now for something completely different!

Thank you ondarvr. You're right about the type of resin. I can't find anything specific about it. Near as I can tell it's just basic general purpose resin. It's from tap plastics. It's not the isophthalic, it's not their vinyl-ester or what they call their "surfboard" resin. Manufactured by AOC, it's got the dye that changes color when the catalyst is mixed in as I think most probably do.

Is there a way that a novice can tell if that ship has sailed so to speak? Or should one just play it safe and sand anyway?

Cheers........................Todd
 

ondarvr

Supreme Mariner
Joined
Apr 6, 2005
Messages
11,527
Re: And now for something completely different!

It's probably their General purpose resin, it's an ORTHO / DCPD blend, its the DCPD component that surface cures rapidly.

You have about 2 days before it needs to be sanded.
 

Sea18Horse

Chief Petty Officer
Joined
Jun 1, 2008
Messages
626
Re: And now for something completely different!

Thanks ondarvr, I went over to work on it today and yeah there was no sign of any tackiness by then. It was pretty hot here on Sunday even though the boat wasn't in the direct sun. So I went ahead and sanded before adding a couple more layers. Thanks again!

Cheers.....................Todd
 

oops!

Supreme Mariner
Joined
Oct 18, 2007
Messages
12,932
Re: And now for something completely different!

keep on pluggin bud
 

Sea18Horse

Chief Petty Officer
Joined
Jun 1, 2008
Messages
626
Re: And now for something completely different!

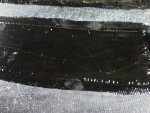
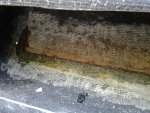
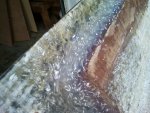
Making slow progress. Have the fiberglass portion of the work pretty much done.1015111817.jpgOn the spots on the floor where the stiffeners were removed I added one layer of mat and one layer of roving. And then coated all the new stuff with Tap Plastics surfboard resin (uv and impact resistant) to which I added black pigment. I still need another coat on the right side and maybe a third coat on all. Plus I still need to mix up some white to add the spatters. I'm anxious to see how it holds up over this winter. I may paint the whole inside with it to blend it better.

I have a question about curing. I put on the last coat with surface curing agent added on Monday. Since then it's been between 55F and 65F in the shop. Today it feels cured to the touch, no tackiness. but as can be seen in the photo my knee and sock stuck to it so it's clearly not fully cured yet. Is this to be expected at these temps? I could tarp the boat and stick a small heater inside for a few days. Will this do the trick do you think? Or did I not add enough surface curing agent?1015111818a.jpg Thanks in advance!

Cheers....................Todd
 

ondarvr

Supreme Mariner
Joined
Apr 6, 2005
Messages
11,527
Re: And now for something completely different!

It's most likely a combination of temp, wax and catalyst ratio, so you may need to recoat it.

You need about 2+% wax (surface agent), plus 2% catalyst and a slightly higher temp to ensure a good solid cure in a thin film.
 

Sea18Horse

Chief Petty Officer
Joined
Jun 1, 2008
Messages
626
Re: And now for something completely different!

Ah, thanks for the tip. I hadn't really thought about how thin just a coat of resin is. Meantime the sun has just come out. Finally! So I'll wheel it outside for the afternoon and see what happens. Thanks again!

Cheers.....................Todd
 

Brent93

Recruit
Joined
May 12, 2019
Messages
1
What kind of paint did you use for the bottom and sides? I need to re do my clack and I want to repair the bottom and repaint the sides. Any advice?
 

Sea18Horse

Chief Petty Officer
Joined
Jun 1, 2008
Messages
626
I'm embarrassed to admit that I haven't gotten that far yet. My plan still is to patch up the gel coat underneath where it's worn through. And then use the tractor paint and hardener that Woodonglass shows in his signature line.

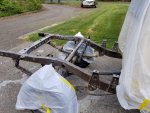
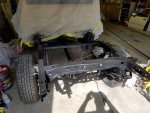
The boat is actually at my sons house. He is currently restoring the 84 Toyota 4WD pickup we used to haul it around with. I bought it new in 1984. It now has 325,000 miles on it. The back of the truck can be seen in the second photo in the thread. He sent me this picture yesterday before he started encapsulating, priming and painting the rear half of the frame.
IMG_0510_s.jpg The boat can be seen in the background.
Here's the frame after he was done.
IMG_0511_s.jpg
It's gonna look great. And once the truck is done, finishing the boat will be next.

Cheers...........................Todd
 
Top