Another transom tale **Update**

onenomad

Seaman
Joined
Dec 14, 2007
Messages
55
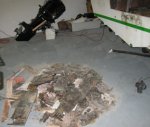
My current project boat; 1978 Olympic (Seattle area mfg.) cuddy. I knew there was soft (rotten) wood, I just didn't know how much! It came with a 140hp, in-line 6 and I have a 2.5 liter, 200hp V6 to replace it. Originally, the transom was 2" thick. I am starting over with 2 1/2" goal. Three laminations of 3/4" ply, plus 24oz woven roving. Also am replacing rotten sole,(or deck?, floor?). At my current rate of progress, 3 or 4 hrs/day, it will be well into fishing season before it hits water. The pile of rubble on shop floor is the old transom. Sometimes my back feels like that pile on the shop floor looks.
Gerry


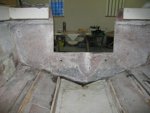
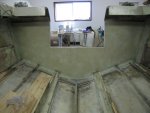
FINALLY, some progress! Through demolishing (I hope) and starting to rebuild. New transom: 2X of 3/4" ply and 3 layers of 1708 fabric, stuck together with #12 SS screws and epoxy. Stringers, fuel tank compartment and cockpit sole are next.
Gerry
 

Attachments

  • IMG_0743.JPG
    IMG_0743.JPG
    52.5 KB · Views: 0
  • IMG_0744.JPG
    IMG_0744.JPG
    51.2 KB · Views: 0
  • new transom.jpg
    new transom.jpg
    88.4 KB · Views: 0

tashasdaddy

Honorary Moderator Emeritus
Joined
Nov 11, 2005
Messages
51,019
Re: Another transom tale

Re: Another transom tale

just a note, besure you engine and outdrive will mate correctly, with the extra thickness.
 

andy6374

Lieutenant Commander
Joined
Aug 4, 2005
Messages
1,617
Re: Another transom tale

Re: Another transom tale

just a note, besure you engine and outdrive will mate correctly, with the extra thickness.

Agreed!

Remember it is not the plywood that gives the transom it's strength, rather it is the inside and outside fiberglass skins. 2 sheets of 3/4 marine grade ply with fiberglass is more than enough.
 

Robj

Lieutenant
Joined
Mar 22, 2007
Messages
1,441
Re: Another transom tale

Re: Another transom tale

I believe he is using an outboard so mating to the ourdrive should not be an issue.

Have a great dy,

Rob
 

drewmitch44

Lieutenant Commander
Joined
Jun 26, 2005
Messages
1,749
Re: Another transom tale

Re: Another transom tale

I agree. The outdrive should not be presant at all. As outboards hang off the back of the transom. Just had to throw in my wise guy 2c
 

onenomad

Seaman
Joined
Dec 14, 2007
Messages
55
Re: Another transom tale

Re: Another transom tale

Hi all,
Yes, it is outboard powered. As to transom thickness; I had planned on adding fg cloth to the inner side of the existing skin, and then plywood with another layer of woven roving. Do you think that 2 laminations of 3/4" ply would then be enough? The original layup had a layer of mat between the outer skin and the ply. I had planned on using a layer of cloth instead of the mat. Do you think that would be stronger?
Thanks for the replies,
Gerry
 

andy6374

Lieutenant Commander
Joined
Aug 4, 2005
Messages
1,617
Re: Another transom tale

Re: Another transom tale

I would beef up the existing outside skin with a layer of 1.5 oz mat and then something heavy like 24 oz roven, 1708 etc.

Then bond the two sheets of plywood together. Remember to wet out the wood prior to lamination because the dry wood will soak up some resin..once tacky then wet out some 1.5 oz mat on one sheet (or thickened resin) and clamp together.

When installing the new transom core, either trowel some thickened resin on the outer skin or wet out a layer 1.5 oz mat...then clamp the core to the outer skin. Sometimes here it's better to have predrilled some holes for thru-bolts to ensure a voidless bond.

Then I would put alternating layers of 1.5oz mat and 24 oz roven..if using a biax (1708) then the mat isn't necessary. You'll want to build up ~ 1/4" thick inner skin. Remember to make the last layer 1.5oz mat to avoid print thru of the roven pattern.
 

onenomad

Seaman
Joined
Dec 14, 2007
Messages
55
Re: Another transom tale

Re: Another transom tale

Andy6374,
Thanks much for the details. Are you saying to sandwich a layer of cloth between the plies, and then mat+cloth on the inner side of the exterior skin? Then a mat+woven roving in laminate on the inner face of the plywood, right?
Gerry
 

BillP

Captain
Joined
Aug 10, 2002
Messages
3,290
Re: Another transom tale

Re: Another transom tale

Clamping ply over wet glass is going to produce a layer full of bubbles...and they won't find their way out though holes drilled in the skin (but resin will and that gives a high possibility of making a dry brittle layup with even more bubbles). That method isn't going to give best results unless you are vacuum bagging.

If you want to build the outer skin up do it first with laminating resin and let it kick until just tacky, then set the ply in with thickened resin and clamp. Don't worry about print through on the outer transom skin...it won't happen on existing glass. After that do the interior glass with alternating layers of mat/roven woven or biaxial. The most critical part is securing the ply to the hull. Do extra glass around the perimeter to take the fwd thrust...6" overlap is plenty. The interior "field" of the new ply needs glass only for weather and ding protection.
 

onenomad

Seaman
Joined
Dec 14, 2007
Messages
55
Re: Another transom tale

Re: Another transom tale

BillP,
Thanks for the input. This is definitely a learning process.
Gerry
 

andy6374

Lieutenant Commander
Joined
Aug 4, 2005
Messages
1,617
Re: Another transom tale

Re: Another transom tale

Bill-
I always laminate ply together with thickened resin as well as install the transom core into the existing outer skin with thickened resin....However I know plenty of people who do the lamination and installation of the transom core with mat, with no problem, even years down the road.


Also, I don't why you would use resin to build up the outer skin. To get any strength out if it you'd have to use glass as well.
 

oops!

Supreme Mariner
Joined
Oct 18, 2007
Messages
12,932
Re: Another transom tale

Re: Another transom tale

nomad


just a little light at the end of the tunnel for you

3-4 hours a day is 30 - 40 hours in 10 days.....thats 3-400 hours in 100 days

approx 3 1/2 months....thats mid may......but.....the guesstmates have put total stringer floor transom at approx 200-250 hrs.....

and it looks like your half way done.....construction goes quite quickly

youll be done by mid april....just in time....:)

cheers
oops
 

flounderman

Petty Officer 3rd Class
Joined
Dec 20, 2005
Messages
93
Re: Another transom tale

Re: Another transom tale

Gerry, When I began re-doing my boat in '01 I volunteered at a boat repair shop in Bellingham. what they would do is use mat not cloth because of "wet out" capabilities, they would place mat between the plywood layers all being resin coated and rolled to remove air, screws were added to draw it all up till cured. Mat and resin was then applied to the inside of the transom skin, then the plywood was picked up, the mating surfaces were wet out and it was all put together , clamped , screwed , bolted as necessary. Then 24hrs later alternating mat and roving was layered, 3 mat 2 roving, to encapsulate the new transom. I used 3 layers of 1/2" with lots of mat on my boat and then 4 layers of a combo mat on the inside. My original transom was 1.5". Good luck, Jerry
 

onenomad

Seaman
Joined
Dec 14, 2007
Messages
55
Re: Another transom tale

Re: Another transom tale

Thanks, guys. I just discovered a disappointing situation. I found some moisture seepage from what I thought was the hull inner ply. Nope, it is water saturated and rotten end core balsa. Balsa planks(1/2") were laid fore and aft, between the stringers and strake forms and covered with mat. Looks like I will have to gut the boat, from the cockpit to the hull skin. I will start another thread, to get some input on what material, if any, to replace the balsa with. Maybe foam would be enough. ???
Gerry
 

BillP

Captain
Joined
Aug 10, 2002
Messages
3,290
Re: Another transom tale

Re: Another transom tale

Bill-
I always laminate ply together with thickened resin as well as install the transom core into the existing outer skin with thickened resin....However I know plenty of people who do the lamination and installation of the transom core with mat, with no problem, even years down the road.


Also, I don't why you would use resin to build up the outer skin. To get any strength out if it you'd have to use glass as well.


There are exceptions to everything...I'm not saying ply clamped over wet glass doesn't work. What I am saying is a better glass job happens when building the inner skin up first and letting it dry before clamping ply to it. When adding the ply consider that very few (exceptions again) pros clamp ply over wet fabric because it has a high chance of giving an inferior bubble prone glass layer if vacuum bagging isn't used. Also consider that few pros use anything but straight resin to clamp the ply to the hull with. Again, some do nothing between the skin or between the ply layers. All work fine and there is no definite winner over one or the other method for longer life. The winners are those who do the job for least hassle and cost.

About the resin to build up the outer skin. I guess it wasn't clear that I meant use FABRIC WITH THE RESIN and then let it tack off before installing the ply. BUT..."Building" the skin gives little structure compared to what the ply gives so it's mostly a case of time and materials that could be used in a better place. The glass would give a lot more structural integrity if used to glass the transom in around the edges. It's the very reason most boats have thin transom skins compared to the rest of the boat lamination schedule.

To summarize. If you want to do it the easiest and largely proven successful way...Build up (glass) the inner skin first with fabric (if it needs "building" at all) and let it tack off hard enough so clamping pressure won't disturb the glass. Join the transom ply layers together with resin, glue or screws. Coat the mating surfaces of ply to inner hull skin with straight or thickened resin and clamp. Follow up with glass tabs all the way around the transom (pick your own lamination schedule) and finalize with glassing over the entire wood surface to seal it.
 

onenomad

Seaman
Joined
Dec 14, 2007
Messages
55
Re: Another transom tale

Re: Another transom tale

BillP,
Thanks for the detailed procedure. I will post some pics when completed. May be awhile tho. I ran into some additional, unforeseen problems (another thread) with balsa core mat'l.
 

andy6374

Lieutenant Commander
Joined
Aug 4, 2005
Messages
1,617
Re: Another transom tale

Re: Another transom tale

To summarize. If you want to do it the easiest and largely proven successful way...Build up (glass) the inner skin first with fabric (if it needs "building" at all) and let it tack off hard enough so clamping pressure won't disturb the glass. Join the transom ply layers together with resin, glue or screws. Coat the mating surfaces of ply to inner hull skin with straight or thickened resin and clamp. Follow up with glass tabs all the way around the transom (pick your own lamination schedule) and finalize with glassing over the entire wood surface to seal it.

Onenomad-
This is exactly how I would do it..except instead of resin I'd use thickened resin for joining to transom ply layers.
 

onenomad

Seaman
Joined
Dec 14, 2007
Messages
55
Re: Another transom tale

Re: Another transom tale

andy6374,
I think that is the method I will use. Seems very straight forward to me, and if it's easy for me to understand, it must be fairly simple (I know, not that simple).
Thanks, everyone for all your input and help.
Gerry
 

onenomad

Seaman
Joined
Dec 14, 2007
Messages
55
Re: Another transom tale

Re: Another transom tale

mini update: as of todays load to the dump, I have removed 1000 lbs of rotten/water saturated wood, foam and some woven roving from this project. This according to the scales at the dump.
 

oops!

Supreme Mariner
Joined
Oct 18, 2007
Messages
12,932
Re: Another transom tale

Re: Another transom tale

nomad.....

1000 lbs......i think thats fantastic.....

every time i took out a 200 lb rotted soaked board......i just kept thinking......less weight.....i can now carry more beer:D:D

sorry to hear bout the core problem... im gonna go read that one.....mines all glass.

when its done your gonna have a first class refit that you know is done correct.. a pride and joy:)...you dont get that outta a show room !!!!

oops
 
Top