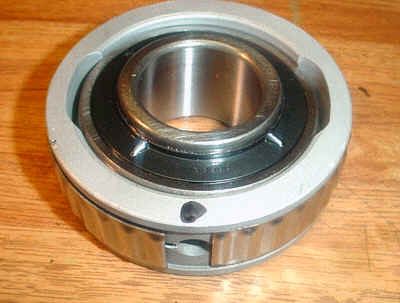
Are my u joints bad??

findinghomer

Petty Officer 1st Class
Joined
Nov 7, 2009
Messages
271
As removing the bearing requires pulling on the inner race, you'll damage it. Pull it only to toss in the trash. If you're happy it's all the way in, leave it.

yeah, I was afraid of that. But I was thinking maybe I'll buy an OEM bearing because I'm not entirely convinced it's in all the way. Do you think there's anyway it could survive a pull if I use a puller rather than a slide hammer? is there any other tricks , ideas to pinpoint if its bad u joints or gimbal bearing not in all the way in? Or is it just going to have to be trial and error?
 

findinghomer

Petty Officer 1st Class
Joined
Nov 7, 2009
Messages
271
As removing the bearing requires pulling on the inner race, you'll damage it. Pull it only to toss in the trash. If you're happy it's all the way in, leave it.

hey Chris, thanks a lot for your input. I inspected the u joint more closely. Turns out the one on the outside does have play in it, visually and by feel. So I guess that is my problem. How are the u joints held into the yoke assembly, is it just those c clip?
 

Watermann

Starmada Splash of the Year 2014
Joined
Jan 12, 2013
Messages
13,822
Personally I would drop the LU and take it to a machine shop where they can use their press to remove and install new ujoints correctly, it's easy to mess things up without having a press. So do the joints have grease zerks on them?
 

findinghomer

Petty Officer 1st Class
Joined
Nov 7, 2009
Messages
271
Personally I would drop the LU and take it to a machine shop where they can use their press to remove and install new ujoints correctly, it's easy to mess things up without having a press. So do the joints have grease zerks on them?

No grease zerks. dropping the lower unit, is that how the assembly is removed from the upper housing? Also what about the gimbal bearing grease going behind it. is that because of my grease pumping too thick, or was I supposed to line up another grease hole? In case you missed my post, I lined up the tolerance ring cut out with the hole in the bearing outer race. then i lined that up with the grease inlet inside the bore, and whacked it in. That's it. when I installed it, I was kind of confused because if you looked inside the hole on the bearing it was just solid inside , I don't see where the grease is going any way lol. Was I suppose to spin the inside of the bearing and line up another hole in the bearing?
 
Last edited:

achris

More fish than mountain goat
Joined
May 19, 2004
Messages
27,468
Wouldn't worry about where the grease is going on the gimbal bearing. It will follow the 'path of least resistance', so if it finds an easier path out through the back of the bearing rather than the front, that's the way it'll go...

To remove the yoke, uni joints, drive gear as an assembly, you'll need the tool for removing the lock ring. I see many people doing that (removing the bearing pack assembly), but I have NEVER had any problems removing and replacing unis in-situ. It's a matter of getting the yoke turned the right way.

Flick the C clips off (beware, they will fly around the workshop and never be seen again!). Then using a soft face hammer, knock the front joint (the one closest to the engine coupler) so it 'self-drives' one of the cups out. Pull that cup out of it's 'holder', then drive the cross all the way through to push the cup out of the other side. Do the same with the other section of the cross. You now have the front uni out and just the back on in. For this one I use a couple of sockets and a sliding F clamp. Use the sockets and F clamp to again drive one side out, pull the cup, push the cross back and through. Same with the other side.

Reassembly is almost the direct opposite of pull apart. Just be very careful about the small needle bearings inside the cups. Don't let any fall down.... Once you have it all back together, give them a knock with the hammer to 'centre' the cups and crosses.

Chris.........
(Yes, the next one I do I will video)
 
Last edited:

Watermann

Starmada Splash of the Year 2014
Joined
Jan 12, 2013
Messages
13,822
No grease zerks. dropping the lower unit, is that how the assembly is removed from the upper housing? Also what about the gimbal bearing grease going behind it. is that because of my grease pumping too thick, or was I supposed to line up another grease hole? In case you missed my post, I lined up the tolerance ring cut out with the hole in the bearing outer race. then i lined that up with the grease inlet inside the bore, and whacked it in. That's it. when I installed it, I was kind of confused because if you looked inside the hole on the bearing it was just solid inside , I don't see where the grease is going any way lol. Was I suppose to spin the inside of the bearing and line up another hole in the bearing?


No it's just the outer ring that has the slot that lines up like the pic below. You mark the bearing with a sharpie and the grease inlet so you can line them up before setting the bearing. Also you're not the only one that's had issues with the gimbal bearing, here's a thread to read with a similar problem.

http://forums.iboats.com/forum/engi...tdrives/593181-gimbal-bearing-greasing-issues

gimbalbrgb5.jpg


If you want to do the ujoint job yourself like Achris explained, grab your trusty BHF and go for it. :lol:

Best of luck to you!
 

findinghomer

Petty Officer 1st Class
Joined
Nov 7, 2009
Messages
271
No it's just the outer ring that has the slot that lines up like the pic below. You mark the bearing with a sharpie and the grease inlet so you can line them up before setting the bearing. Also you're not the only one that's had issues with the gimbal bearing, here's a thread to read with a similar problem.

http://forums.iboats.com/forum/engin...reasing-issues

gimbalbrgb5.jpg


If you want to do the ujoint job yourself like Achris explained, grab your trusty BHF and go for it. :lol:

Best of luck to you!

Thanks. Yes that's what I did. I marked the bearing with a sharpie. So if that's the only slot I needed to align, I'm absolutely positive it's lined up. And did you mean BFH? Lol.
 
Last edited:

findinghomer

Petty Officer 1st Class
Joined
Nov 7, 2009
Messages
271
Wouldn't worry about where the grease is going on the gimbal bearing. It will follow the 'path of least resistance', so if it finds an easier path out through the back of the bearing rather than the front, that's the way it'll go...

To remove the yoke, uni joints, drive gear as an assembly, you'll need the tool for removing the lock ring. I see many people doing that (removing the bearing pack assembly), but I have NEVER had any problems removing and replacing unis in-situ. It's a matter of getting the yoke turned the right way.

Flick the C clips off (beware, they will fly around the workshop and never be seen again!). Then using a soft face hammer, knock the front joint (the one closest to the engine coupler) so it 'self-drives' one of the cups out. Pull that cup out of it's 'holder', then drive the cross all the way through to push the cup out of the other side. Do the same with the other section of the cross. You now have the front uni out and just the back on in. For this one I use a couple of sockets and a sliding F clamp. Use the sockets and F clamp to again drive one side out, pull the cup, push the cross back and through. Same with the other side.

Reassembly is almost the direct opposite of pull apart. Just be very careful about the small needle bearings inside the cups. Don't let any fall down.... Once you have it all back together, give them a knock with the hammer to 'centre' the cups and crosses.

Chris.........
(Yes, the next one I do I will video)

Hi Chris, I have contracted a local Marina, to get a cost to put these u joints in. I do have a couple questions from someone like yourself with experience in this though. Is it likely that little bit of play in my joint, is what is causing the knocking noise while turning? Also I already purchased permalube Sierra u joint. But is there any other cheaper alternative?
 

achris

More fish than mountain goat
Joined
May 19, 2004
Messages
27,468
ANY play is bad. The uni joints should be tight. When they're new they are almost stiff. How much are you looking to save? $3, $5? Get good quality and don't risk a very expensive repair should a 'cheap' alternative let go.

As much as I despise Mercury Marine, I must acknowledge their parts warranty policy. If a Merc part fails within the warranty period (and you can prove it was a genuine part failure), not only do they replace that part, but also anything else damaged by the failure of that part. Show me any other manufacturer who does that....
 

findinghomer

Petty Officer 1st Class
Joined
Nov 7, 2009
Messages
271
ANY play is bad. The uni joints should be tight. When they're new they are almost stiff. How much are you looking to save? $3, $5? Get good quality and don't risk a very expensive repair should a 'cheap' alternative let go.

As much as I despise Mercury Marine, I must acknowledge their parts warranty policy. If a Merc part fails within the warranty period (and you can prove it was a genuine part failure), not only do they replace that part, but also anything else damaged by the failure of that part. Show me any other manufacturer who does that....

Ok thanks! I'll just keep the ones I bought then. They were 55 Dollars a piece, I was just reading about other guys using autozone ones that were 15-20 dollars lol. Sounds tempting
 

findinghomer

Petty Officer 1st Class
Joined
Nov 7, 2009
Messages
271
ANY play is bad. The uni joints should be tight. When they're new they are almost stiff. How much are you looking to save? $3, $5? Get good quality and don't risk a very expensive repair should a 'cheap' alternative let go.

As much as I despise Mercury Marine, I must acknowledge their parts warranty policy. If a Merc part fails within the warranty period (and you can prove it was a genuine part failure), not only do they replace that part, but also anything else damaged by the failure of that part. Show me any other manufacturer who does that....

hi Chris, sorry to keep bothering you on this topic. But calling around, these marinas are wanting $250 just pop the old u joints out of yoke assembly and install new one (I am supplying the u-joint, and taking the outdrive to them, so they don't even have to pull or install the outdrive) it seems pretty high to me. does that sound high to you? So I am back on researching on trying to do this myself. can this be done without pulling the yoke assembly completely from the upper unit? and even if it is possible, is it not recommended to do so? I think my joints have inside clips also, doesn't this make the job more difficult?
 

achris

More fish than mountain goat
Joined
May 19, 2004
Messages
27,468
Absolutely you can do the job yourself, and the yoke does not need to be removed. Most of the ones I have done have had inside clips. If you check the Merc manuals none of them say anything about removing the yoke first. And $250 does sound too high. Job takes an hour at best.

Chris. ....
 

findinghomer

Petty Officer 1st Class
Joined
Nov 7, 2009
Messages
271
thanks buddy, I have a diesel truck mechanic who has a lot of experience with u joint , he is going to help me. So I'm going to go for it.
 

findinghomer

Petty Officer 1st Class
Joined
Nov 7, 2009
Messages
271
Absolutely you can do the job yourself, and the yoke does not need to be removed. Most of the ones I have done have had inside clips. If you check the Merc manuals none of them say anything about removing the yoke first. And $250 does sound too high. Job takes an hour at best.

Chris. ....

oh one more question, the new u-joint came with A little fitting with an allen head that goes to the middle the cross bearing (not a grease zerk). But these are supposed to be permalume bearings. What is that fitting for?

Sierra 18-2097
 
Last edited:

achris

More fish than mountain goat
Joined
May 19, 2004
Messages
27,468
I'm guessing Sierra are still using crosses with the grease nipple port drilling in them, and supply the hex socket head grubscrew to close the hole. That's about all I can think of.
 

findinghomer

Petty Officer 1st Class
Joined
Nov 7, 2009
Messages
271
I'm guessing Sierra are still using crosses with the grease nipple port drilling in them, and supply the hex socket head grubscrew to close the hole. That's about all I can think of.

hi chris, I'm glad it I took your advice and did this myself, because I got them out very easily. However before I removed them I had someone give me a second opinion and he didn't think that the joint felt bad. I showed him the play that I was talking about, it was a side to side play where the seal meet the cap, he said that kind of play is ok. Also once I got them out, I inspected all the needles and all the needle bearings look good. is there anything in particular that may stand out visually to tell me these were bad? Obviously I'm going to replace them anyway, but it may inpact my decision on which ones to use. because if there is really no visual way for me to know if these were bad I'm thinking I'll get an automotive set of u joints and just see if it fixes my problem, bc now I am feeling like my problem will not be resolved with new joints. And the Mercruiser part was a lot more expensive. And I really don't want to play trial and error with expensive parts lol. if this doesn't fix my problem, I guess I'll get another gimbal bearing, maybe I damaged it when I drove it in?
 

achris

More fish than mountain goat
Joined
May 19, 2004
Messages
27,468
I wouldn't use automotive unis. They are generally not built as solid as the genuine ones. Also, I have pulled unis out that were definitely bad, you could feel them, but looked fine. A visual inspection won't pick up a lot of problems.

Chris......
 

findinghomer

Petty Officer 1st Class
Joined
Nov 7, 2009
Messages
271
Hi chris, thanks for your input. Unfortunately it's too late for me to listen for the change in sound . but I am beginning to think it is not seated properly. Bc when I grease from the zerk fitting, the grease is pumping behind the bearing. I know I have the grease hole aligned, and if it is misaligned, it would not be much at all. So my question is, is it possible for gimbal to not be fully seated, yet the out drive still go on and work properly ( with the exception of that chattering noise)? Bc if that is possible, then that's my problem. But the bearing will not go in any further, with some heavy wacks. so I guess my only option would be to pull it and put another bearing in. But I really don't want to waste another bearing either if it is in all the way already.

Chris, thanks a lot for your encouragement to do this myself! I put them in today and it was a piece of cake, took me 20 minutes to switch them out. By far, the Easiest boat Repair I've ever done. I'm really excited, because I was ready to pay up to $100 to have somebody switch them for me. Now after doing it myself, I would have been mad to pay somebody that much to do it lol . When I get home , I'm going to put the outdrive back on to see if it fixes my problem.
 

findinghomer

Petty Officer 1st Class
Joined
Nov 7, 2009
Messages
271
Glad to hear it....

ok Chris, the noise was completely gone while in my driveway on muffs. I'm on the lake now and it's alot better!. However with the drive all the way down and 98 to 100% sharp left or right it still does it. other than that its operating fine at all trim/ turn angles, or if I trim up just one inch it works completely fine. Inferior u joint? or do you think I have something else going on?
 
Top