iboats.com
Recruit
- Joined
- Apr 5, 2011
- Messages
- 4
[FONT=Trebuchet MS, Lucida Grande, Arial, sans-serif][FONT=Trebuchet MS, Lucida Grande, Arial, sans-serif]Remember the famous disclaimer: "Don't try this at home"? Well, for updating your pontoon boat, DO TRY THIS AT HOME!!! [/FONT][/FONT]
[FONT=Trebuchet MS, Lucida Grande, Arial, sans-serif][FONT=Trebuchet MS, Lucida Grande, Arial, sans-serif] [/FONT][/FONT]
[FONT=Trebuchet MS, Lucida Grande, Arial, sans-serif][FONT=Trebuchet MS, Lucida Grande, Arial, sans-serif]Rain, sun, wind and weather can wreak havoc on your pontoon boat furniture and carpet if you don't keep it covered or stored inside. Carpet fades, stains, upholstery cracks, seams open and the vinyl can become sticky. [/FONT][/FONT]
[FONT=Trebuchet MS, Lucida Grande, Arial, sans-serif][FONT=Trebuchet MS, Lucida Grande, Arial, sans-serif]In many cases there's no need to replace the whole pontoon boat. The deck is sound, the logs don't leak and the engine purrs like a kitten. But, sitting on cracked, sticky seats and walking on hardened, dirty carpet is not what you and the family wants to do for another year of boating. Or, you just got a great deal on a pontoon boat but your significant other insists you make it look good before any family member comes aboard. [/FONT][/FONT]
[FONT=Trebuchet MS, Lucida Grande, Arial, sans-serif][FONT=Trebuchet MS, Lucida Grande, Arial, sans-serif]With a modest investment, one friend (or family member), some common household tools (screw drivers, hammer, sockets, scissors, utility knife, wrenches and drill), baggies, marking pen and a little patience you can breathe new life into your pontoon boat that is looking old before its time. [/FONT][/FONT]
[FONT=Trebuchet MS, Lucida Grande, Arial, sans-serif][FONT=Trebuchet MS, Lucida Grande, Arial, sans-serif]I got a call from a local dealer with just such a pontoon boat. We had been in search of just such a project over the winter; a perfect time for working on your boat so it will be ready for summer fun. The folks at Nimmer Marine Service in Fond du Lac, WI had such a project. Remember, I did say "you can do this at home" and you absolutely can. In fact, you can do it in one weekend. It just happened they had a customer who wanted the work done for them. [/FONT][/FONT]
[FONT=Trebuchet MS, Lucida Grande, Arial, sans-serif][FONT=Trebuchet MS, Lucida Grande, Arial, sans-serif]It is also very convenient that during March, iboats has Wise Pontoon Boat furniture sets and Dorsett Carpet on sale. [/FONT][/FONT]
[FONT=Trebuchet MS, Lucida Grande, Arial, sans-serif][FONT=Trebuchet MS, Lucida Grande, Arial, sans-serif]It's not difficult to order carpet or new furniture for your boat. Many boats are 8' wide, so carpet manufacturers make their carpet in 8' widths. Standard lengths are available for common length boats. And, there are colors that will come pretty close to your new furniture and the trim colors on the boat. There are varying levels of quality for your carpet. The owner wanted the 18oz textured carpet in ocean blue to match the boat and new Wise seats. [/FONT][/FONT]
[FONT=Trebuchet MS, Lucida Grande, Arial, sans-serif][FONT=Trebuchet MS, Lucida Grande, Arial, sans-serif] [/FONT][/FONT]
[FONT=Trebuchet MS, Lucida Grande, Arial, sans-serif][FONT=Trebuchet MS, Lucida Grande, Arial, sans-serif]Good quality boat carpet is rubber backed. The rubber backing isn't overly thick and isn't there for padding. It holds the threads together and helps keep too much water from getting to the plywood under the carpet that could cause mold, mildew and rot in the wood and deteriorate the carpet. Dorsett carpet is used by many pontoon builders. [/FONT][/FONT]
[FONT=Trebuchet MS, Lucida Grande, Arial, sans-serif][FONT=Trebuchet MS, Lucida Grande, Arial, sans-serif]Selecting your replacement furniture is very easy, once you and the family settle on the color. The owner of this boat selected the Wise Premier line in Platinum-Navy-Cobalt. Wise assembles common groupings of seats for "sets". No, it's not "idiot proof" but it's close. Wise has sets for cruising pontoons, fishing pontoons, long or short pontoons. If you want to change the floor plan of your pontoon boat to tailor it to your pontooning needs, now is the time. Consider the popular "L" layout for the rear seating area; or add pedestals for fishing style seats or add laybacks where straight back seating was originally. Before you place the order, look at the options listed on the pontoon furniture pages in iboats.com. Compare the seating arrangements from Wise Seats to make your boat more user friendly for you and your family. Measuring for the new seats is extremely simple; just measure the old seats and take note of their orientation on the boat. We needed three bench seats, two left hand and one right hand arm rests, helm seat, one lean back recliner and one corner section. They elected not to replace the steering console. We were able to salvage parts of the sundeck pad at the stern and were very lucky the vinyl color matched the new furniture almost perfectly. [/FONT][/FONT]
[FONT=Trebuchet MS, Lucida Grande, Arial, sans-serif][FONT=Trebuchet MS, Lucida Grande, Arial, sans-serif]You'll want to get your carpet and furniture ordered ahead of time for your DIY weekend. It should only take a week from the time you order until it arrives on your doorstep. Don't wait until the middle of the season though because then it will take a bit longer. [/FONT][/FONT]
[FONT=Trebuchet MS, Lucida Grande, Arial, sans-serif][FONT=Trebuchet MS, Lucida Grande, Arial, sans-serif]Some disassembly required:
Disconnect the boat battery. You'll be disconnecting lights or other equipment and you may have to cut some power wires in the process. We left the controls and steering connected because they were routed close to the edge and we weren't replacing the steering console. [/FONT][/FONT]
[FONT=Trebuchet MS, Lucida Grande, Arial, sans-serif][FONT=Trebuchet MS, Lucida Grande, Arial, sans-serif]Using a power drill/screwdriver (the Nimmer folks really like their Craftsman brand drill with lithium ion battery power), a couple sockets, rubber mallet, standard and Phillips screw drivers all the deck fencing and furniture was removed in just under one hour. [/FONT][/FONT]
[FONT=Trebuchet MS, Lucida Grande, Arial, sans-serif][FONT=Trebuchet MS, Lucida Grande, Arial, sans-serif] [/FONT][/FONT]
[FONT=Trebuchet MS, Lucida Grande, Arial, sans-serif][FONT=Trebuchet MS, Lucida Grande, Arial, sans-serif]Yes, you need two people because you don't have 10' long arms to reach the bolts on top and below the deck. Use the marking pen to label the back sides of large hardware or trim pieces you remove. The baggies come in handy at this point too. Put the nuts, bolts and/or screws from each area you work on into a baggie and label where it came from. That will come in handy later when you try to figure out which part went where. [/FONT][/FONT]
[FONT=Trebuchet MS, Lucida Grande, Arial, sans-serif][FONT=Trebuchet MS, Lucida Grande, Arial, sans-serif]Removing the old carpet was easy. You don't need to be too neat about it and you can cut it into sections for easier removal. [/FONT][/FONT]
[FONT=Trebuchet MS, Lucida Grande, Arial, sans-serif][FONT=Trebuchet MS, Lucida Grande, Arial, sans-serif] [/FONT][/FONT]
[FONT=Trebuchet MS, Lucida Grande, Arial, sans-serif][FONT=Trebuchet MS, Lucida Grande, Arial, sans-serif]There will be some residue from the old adhesive and some of the threads from the old carpet. A scraper easily takes care of that. Carpet removal and scraping (with the grain of the wood) took one hour for one person. [/FONT][/FONT]
[FONT=Trebuchet MS, Lucida Grande, Arial, sans-serif][FONT=Trebuchet MS, Lucida Grande, Arial, sans-serif]Clean the scraped deck with a shop vac or compressed air (even a leaf blower will work) before you start to apply the adhesive for the new carpet. [/FONT][/FONT]
[FONT=Trebuchet MS, Lucida Grande, Arial, sans-serif][FONT=Trebuchet MS, Lucida Grande, Arial, sans-serif]Some assembly required:
We used a latex based adhesive. It allows for some movement after you put down the carpet and makes clean up much easier. Roll out the new carpet the length of the boat and trim to leave a little over one end (enough to grab with your hands) and a foot or so at the other end (just in case). Spread the adhesive on one half the deck. Spread the adhesive out evenly using a toothed trowel. [/FONT][/FONT]
[FONT=Trebuchet MS, Lucida Grande, Arial, sans-serif][FONT=Trebuchet MS, Lucida Grande, Arial, sans-serif]Don't put too much adhesive down. More is not better. Even though Dorsett carpet has the rubber backing you don't want any adhesive to ooze through any cracks or tiny holes. It will harden into a hard, nasty blob and stain that part of the nice new carpet. [/FONT][/FONT]
[FONT=Trebuchet MS, Lucida Grande, Arial, sans-serif][FONT=Trebuchet MS, Lucida Grande, Arial, sans-serif] [/FONT][/FONT]
[FONT=Trebuchet MS, Lucida Grande, Arial, sans-serif][FONT=Trebuchet MS, Lucida Grande, Arial, sans-serif]Lay the carpet over the adhesive, pull at each end and smooth out from the center. Do the same to the other side and another hour later, you and your helper are done with the carpet. Let the carpet adhesive cure overnight. Resist the urge to trim the edges at this point. Honest, don't do it. Don't walk on it after you smooth it out either. Let it cure. Go relax or clean off the fence pieces you'll be putting back on the boat the next day. Scrub brush, warm water and mild soap work well. [/FONT][/FONT]
[FONT=Trebuchet MS, Lucida Grande, Arial, sans-serif][FONT=Trebuchet MS, Lucida Grande, Arial, sans-serif]It's not a jigsaw puzzle.
On the second day, you get to finish the project. [/FONT][/FONT]
[FONT=Trebuchet MS, Lucida Grande, Arial, sans-serif][FONT=Trebuchet MS, Lucida Grande, Arial, sans-serif] [/FONT][/FONT]
[FONT=Trebuchet MS, Lucida Grande, Arial, sans-serif][FONT=Trebuchet MS, Lucida Grande, Arial, sans-serif]Now is when you trim the carpet around the perimeter of the deck. The adhesive has cured and the carpet isn't moving anywhere. [/FONT][/FONT]
[FONT=Trebuchet MS, Lucida Grande, Arial, sans-serif][FONT=Trebuchet MS, Lucida Grande, Arial, sans-serif]Place all the fencing back on the boat. All the holes for the bolts that hold the fence on probably haven't moved. They're just covered with carpet. Use an ice pick or awl and just poke through the existing hole up through the bottom of the deck to locate them; same for the wires for lights or speakers. It's starting to look pretty good now isn't it? Remember to put the spacers under the fence; they let water drain out under the fence from rain or wet passengers and pets. You can use simple bullet connectors to join any wires you needed to cut in the disassembly process. Tape them and move them out of the way. They'll be fine. Install the fence and work on the wiring; about 90 minutes for two people. [/FONT][/FONT]
[FONT=Trebuchet MS, Lucida Grande, Arial, sans-serif][FONT=Trebuchet MS, Lucida Grande, Arial, sans-serif]Get ready for making it look like a real boat again. [/FONT][/FONT]

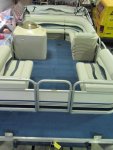
[FONT=Trebuchet MS, Lucida Grande, Arial, sans-serif][FONT=Trebuchet MS, Lucida Grande, Arial, sans-serif]Place the new Wise seats where they will be located in the boat. Leave the protective plastic covering on them for now. It helps keep them clean. [/FONT][/FONT]
[FONT=Trebuchet MS, Lucida Grande, Arial, sans-serif][FONT=Trebuchet MS, Lucida Grande, Arial, sans-serif]Make sure everything is in the right place and fits. The fence is your guide, that's all the room you have. The furniture should fit snug because they're new, haven't shrunk and are probably a bit more stuffed than the original seating. Go ahead, have a seat. You're almost there. [/FONT][/FONT]
[FONT=Trebuchet MS, Lucida Grande, Arial, sans-serif][FONT=Trebuchet MS, Lucida Grande, Arial, sans-serif]Wise includes some hardware for seat installation but they can't accommodate the variables for every different installation. The only extra hardware needed for this installation were some replacement, stainless steel, self-tapping screws to hold the seats to the deck. Your local home improvement center or hardware store should have them for you. You'll need to attach the base and the back just the way the old seats were attached. Just make sure the screws go into the framing for the back or frame of the seats so they are secure in the boat. This took a couple hours. You want to make sure it fits and it's secure. [/FONT][/FONT]
[FONT=Trebuchet MS, Lucida Grande, Arial, sans-serif][FONT=Trebuchet MS, Lucida Grande, Arial, sans-serif] [/FONT][/FONT]
[FONT=Trebuchet MS, Lucida Grande, Arial, sans-serif][FONT=Trebuchet MS, Lucida Grande, Arial, sans-serif]You'll notice that most of the Wise seat bases have drain holes. That's a great feature and helps keep items inside from soaking up a lot of water. Some bases do not have drain holes and are meant to keep dry things dry. Still, it's best to make sure they are dry or dry them out during seasonal use. [/FONT][/FONT]
[FONT=Trebuchet MS, Lucida Grande, Arial, sans-serif][FONT=Trebuchet MS, Lucida Grande, Arial, sans-serif]There will be some more time spent on details. Remember why you marked pieces? That comes in handy when you have trim pieces that look alike. [/FONT][/FONT]
[FONT=Trebuchet MS, Lucida Grande, Arial, sans-serif][FONT=Trebuchet MS, Lucida Grande, Arial, sans-serif] [/FONT][/FONT]
[FONT=Trebuchet MS, Lucida Grande, Arial, sans-serif][FONT=Trebuchet MS, Lucida Grande, Arial, sans-serif]The speakers in the old seats were under the rear lounge. We placed them in a location where they will project sound better and fit better. The new seats are a bit more padded so we moved the location for the small table out an inch from the old base. [/FONT][/FONT]
[FONT=Trebuchet MS, Lucida Grande, Arial, sans-serif][FONT=Trebuchet MS, Lucida Grande, Arial, sans-serif]
Reconnect the battery, make sure everything works; lights, stereo, engine starter, etc. [/FONT][/FONT]
[FONT=Trebuchet MS, Lucida Grande, Arial, sans-serif][FONT=Trebuchet MS, Lucida Grande, Arial, sans-serif]You did it. Two days of actually working on the boat. It wasn't too difficult. There was no part of this project that required skills outside that of an everyday home owner. All it took was a little drilling, screwing, pounding, scraping, lifting and sitting. [/FONT][/FONT]
[FONT=Trebuchet MS, Lucida Grande, Arial, sans-serif][FONT=Trebuchet MS, Lucida Grande, Arial, sans-serif]You can do this at home. It will make your boat more useful again. You and the family will enjoy it more. It doesn't cost a fortune and it could save you one. [/FONT][/FONT]
[FONT=Trebuchet MS, Lucida Grande, Arial, sans-serif][FONT=Trebuchet MS, Lucida Grande, Arial, sans-serif][EDITOR'S NOTE] You'll find all the supplies you need to restore pontoon at iboats.com [/FONT][/FONT]
[FONT=Trebuchet MS, Lucida Grande, Arial, sans-serif][FONT=Trebuchet MS, Lucida Grande, Arial, sans-serif](Bill Gius is a three-plus decade marine industry veteran with extensive, hands-on accessory, boat and engine experience. Bill has been working with iboats.com for six years to help manufacturers and dealers use iboats' online marketing, advertising and lead generation services. Bill can be reached at 800-869-1686 x199 or bill@iboats.com.) [/FONT] [/FONT]
[FONT=Trebuchet MS, Lucida Grande, Arial, sans-serif][FONT=Trebuchet MS, Lucida Grande, Arial, sans-serif]
[/FONT][/FONT][FONT=Trebuchet MS, Lucida Grande, Arial, sans-serif][FONT=Trebuchet MS, Lucida Grande, Arial, sans-serif]Rain, sun, wind and weather can wreak havoc on your pontoon boat furniture and carpet if you don't keep it covered or stored inside. Carpet fades, stains, upholstery cracks, seams open and the vinyl can become sticky. [/FONT][/FONT]
[FONT=Trebuchet MS, Lucida Grande, Arial, sans-serif][FONT=Trebuchet MS, Lucida Grande, Arial, sans-serif]In many cases there's no need to replace the whole pontoon boat. The deck is sound, the logs don't leak and the engine purrs like a kitten. But, sitting on cracked, sticky seats and walking on hardened, dirty carpet is not what you and the family wants to do for another year of boating. Or, you just got a great deal on a pontoon boat but your significant other insists you make it look good before any family member comes aboard. [/FONT][/FONT]
[FONT=Trebuchet MS, Lucida Grande, Arial, sans-serif][FONT=Trebuchet MS, Lucida Grande, Arial, sans-serif]With a modest investment, one friend (or family member), some common household tools (screw drivers, hammer, sockets, scissors, utility knife, wrenches and drill), baggies, marking pen and a little patience you can breathe new life into your pontoon boat that is looking old before its time. [/FONT][/FONT]
[FONT=Trebuchet MS, Lucida Grande, Arial, sans-serif][FONT=Trebuchet MS, Lucida Grande, Arial, sans-serif]I got a call from a local dealer with just such a pontoon boat. We had been in search of just such a project over the winter; a perfect time for working on your boat so it will be ready for summer fun. The folks at Nimmer Marine Service in Fond du Lac, WI had such a project. Remember, I did say "you can do this at home" and you absolutely can. In fact, you can do it in one weekend. It just happened they had a customer who wanted the work done for them. [/FONT][/FONT]
[FONT=Trebuchet MS, Lucida Grande, Arial, sans-serif][FONT=Trebuchet MS, Lucida Grande, Arial, sans-serif]It is also very convenient that during March, iboats has Wise Pontoon Boat furniture sets and Dorsett Carpet on sale. [/FONT][/FONT]
[FONT=Trebuchet MS, Lucida Grande, Arial, sans-serif][FONT=Trebuchet MS, Lucida Grande, Arial, sans-serif]It's not difficult to order carpet or new furniture for your boat. Many boats are 8' wide, so carpet manufacturers make their carpet in 8' widths. Standard lengths are available for common length boats. And, there are colors that will come pretty close to your new furniture and the trim colors on the boat. There are varying levels of quality for your carpet. The owner wanted the 18oz textured carpet in ocean blue to match the boat and new Wise seats. [/FONT][/FONT]
[FONT=Trebuchet MS, Lucida Grande, Arial, sans-serif][FONT=Trebuchet MS, Lucida Grande, Arial, sans-serif]
[/FONT][/FONT][FONT=Trebuchet MS, Lucida Grande, Arial, sans-serif][FONT=Trebuchet MS, Lucida Grande, Arial, sans-serif]Good quality boat carpet is rubber backed. The rubber backing isn't overly thick and isn't there for padding. It holds the threads together and helps keep too much water from getting to the plywood under the carpet that could cause mold, mildew and rot in the wood and deteriorate the carpet. Dorsett carpet is used by many pontoon builders. [/FONT][/FONT]
[FONT=Trebuchet MS, Lucida Grande, Arial, sans-serif][FONT=Trebuchet MS, Lucida Grande, Arial, sans-serif]Selecting your replacement furniture is very easy, once you and the family settle on the color. The owner of this boat selected the Wise Premier line in Platinum-Navy-Cobalt. Wise assembles common groupings of seats for "sets". No, it's not "idiot proof" but it's close. Wise has sets for cruising pontoons, fishing pontoons, long or short pontoons. If you want to change the floor plan of your pontoon boat to tailor it to your pontooning needs, now is the time. Consider the popular "L" layout for the rear seating area; or add pedestals for fishing style seats or add laybacks where straight back seating was originally. Before you place the order, look at the options listed on the pontoon furniture pages in iboats.com. Compare the seating arrangements from Wise Seats to make your boat more user friendly for you and your family. Measuring for the new seats is extremely simple; just measure the old seats and take note of their orientation on the boat. We needed three bench seats, two left hand and one right hand arm rests, helm seat, one lean back recliner and one corner section. They elected not to replace the steering console. We were able to salvage parts of the sundeck pad at the stern and were very lucky the vinyl color matched the new furniture almost perfectly. [/FONT][/FONT]
[FONT=Trebuchet MS, Lucida Grande, Arial, sans-serif][FONT=Trebuchet MS, Lucida Grande, Arial, sans-serif]You'll want to get your carpet and furniture ordered ahead of time for your DIY weekend. It should only take a week from the time you order until it arrives on your doorstep. Don't wait until the middle of the season though because then it will take a bit longer. [/FONT][/FONT]
[FONT=Trebuchet MS, Lucida Grande, Arial, sans-serif][FONT=Trebuchet MS, Lucida Grande, Arial, sans-serif]Some disassembly required:
Disconnect the boat battery. You'll be disconnecting lights or other equipment and you may have to cut some power wires in the process. We left the controls and steering connected because they were routed close to the edge and we weren't replacing the steering console. [/FONT][/FONT]
[FONT=Trebuchet MS, Lucida Grande, Arial, sans-serif][FONT=Trebuchet MS, Lucida Grande, Arial, sans-serif]Using a power drill/screwdriver (the Nimmer folks really like their Craftsman brand drill with lithium ion battery power), a couple sockets, rubber mallet, standard and Phillips screw drivers all the deck fencing and furniture was removed in just under one hour. [/FONT][/FONT]
[FONT=Trebuchet MS, Lucida Grande, Arial, sans-serif][FONT=Trebuchet MS, Lucida Grande, Arial, sans-serif]
[/FONT][/FONT][FONT=Trebuchet MS, Lucida Grande, Arial, sans-serif][FONT=Trebuchet MS, Lucida Grande, Arial, sans-serif]Yes, you need two people because you don't have 10' long arms to reach the bolts on top and below the deck. Use the marking pen to label the back sides of large hardware or trim pieces you remove. The baggies come in handy at this point too. Put the nuts, bolts and/or screws from each area you work on into a baggie and label where it came from. That will come in handy later when you try to figure out which part went where. [/FONT][/FONT]
[FONT=Trebuchet MS, Lucida Grande, Arial, sans-serif][FONT=Trebuchet MS, Lucida Grande, Arial, sans-serif]Removing the old carpet was easy. You don't need to be too neat about it and you can cut it into sections for easier removal. [/FONT][/FONT]
[FONT=Trebuchet MS, Lucida Grande, Arial, sans-serif][FONT=Trebuchet MS, Lucida Grande, Arial, sans-serif]
[/FONT][/FONT][FONT=Trebuchet MS, Lucida Grande, Arial, sans-serif][FONT=Trebuchet MS, Lucida Grande, Arial, sans-serif]There will be some residue from the old adhesive and some of the threads from the old carpet. A scraper easily takes care of that. Carpet removal and scraping (with the grain of the wood) took one hour for one person. [/FONT][/FONT]
[FONT=Trebuchet MS, Lucida Grande, Arial, sans-serif][FONT=Trebuchet MS, Lucida Grande, Arial, sans-serif]Clean the scraped deck with a shop vac or compressed air (even a leaf blower will work) before you start to apply the adhesive for the new carpet. [/FONT][/FONT]
[FONT=Trebuchet MS, Lucida Grande, Arial, sans-serif][FONT=Trebuchet MS, Lucida Grande, Arial, sans-serif]Some assembly required:
We used a latex based adhesive. It allows for some movement after you put down the carpet and makes clean up much easier. Roll out the new carpet the length of the boat and trim to leave a little over one end (enough to grab with your hands) and a foot or so at the other end (just in case). Spread the adhesive on one half the deck. Spread the adhesive out evenly using a toothed trowel. [/FONT][/FONT]
[FONT=Trebuchet MS, Lucida Grande, Arial, sans-serif][FONT=Trebuchet MS, Lucida Grande, Arial, sans-serif]Don't put too much adhesive down. More is not better. Even though Dorsett carpet has the rubber backing you don't want any adhesive to ooze through any cracks or tiny holes. It will harden into a hard, nasty blob and stain that part of the nice new carpet. [/FONT][/FONT]
[FONT=Trebuchet MS, Lucida Grande, Arial, sans-serif][FONT=Trebuchet MS, Lucida Grande, Arial, sans-serif]
[/FONT][/FONT][FONT=Trebuchet MS, Lucida Grande, Arial, sans-serif][FONT=Trebuchet MS, Lucida Grande, Arial, sans-serif]Lay the carpet over the adhesive, pull at each end and smooth out from the center. Do the same to the other side and another hour later, you and your helper are done with the carpet. Let the carpet adhesive cure overnight. Resist the urge to trim the edges at this point. Honest, don't do it. Don't walk on it after you smooth it out either. Let it cure. Go relax or clean off the fence pieces you'll be putting back on the boat the next day. Scrub brush, warm water and mild soap work well. [/FONT][/FONT]
[FONT=Trebuchet MS, Lucida Grande, Arial, sans-serif][FONT=Trebuchet MS, Lucida Grande, Arial, sans-serif]It's not a jigsaw puzzle.
On the second day, you get to finish the project. [/FONT][/FONT]
[FONT=Trebuchet MS, Lucida Grande, Arial, sans-serif][FONT=Trebuchet MS, Lucida Grande, Arial, sans-serif]
[/FONT][/FONT][FONT=Trebuchet MS, Lucida Grande, Arial, sans-serif][FONT=Trebuchet MS, Lucida Grande, Arial, sans-serif]Now is when you trim the carpet around the perimeter of the deck. The adhesive has cured and the carpet isn't moving anywhere. [/FONT][/FONT]
[FONT=Trebuchet MS, Lucida Grande, Arial, sans-serif][FONT=Trebuchet MS, Lucida Grande, Arial, sans-serif]Place all the fencing back on the boat. All the holes for the bolts that hold the fence on probably haven't moved. They're just covered with carpet. Use an ice pick or awl and just poke through the existing hole up through the bottom of the deck to locate them; same for the wires for lights or speakers. It's starting to look pretty good now isn't it? Remember to put the spacers under the fence; they let water drain out under the fence from rain or wet passengers and pets. You can use simple bullet connectors to join any wires you needed to cut in the disassembly process. Tape them and move them out of the way. They'll be fine. Install the fence and work on the wiring; about 90 minutes for two people. [/FONT][/FONT]
[FONT=Trebuchet MS, Lucida Grande, Arial, sans-serif][FONT=Trebuchet MS, Lucida Grande, Arial, sans-serif]Get ready for making it look like a real boat again. [/FONT][/FONT]
[FONT=Trebuchet MS, Lucida Grande, Arial, sans-serif][FONT=Trebuchet MS, Lucida Grande, Arial, sans-serif]Place the new Wise seats where they will be located in the boat. Leave the protective plastic covering on them for now. It helps keep them clean. [/FONT][/FONT]
[FONT=Trebuchet MS, Lucida Grande, Arial, sans-serif][FONT=Trebuchet MS, Lucida Grande, Arial, sans-serif]Make sure everything is in the right place and fits. The fence is your guide, that's all the room you have. The furniture should fit snug because they're new, haven't shrunk and are probably a bit more stuffed than the original seating. Go ahead, have a seat. You're almost there. [/FONT][/FONT]
[FONT=Trebuchet MS, Lucida Grande, Arial, sans-serif][FONT=Trebuchet MS, Lucida Grande, Arial, sans-serif]Wise includes some hardware for seat installation but they can't accommodate the variables for every different installation. The only extra hardware needed for this installation were some replacement, stainless steel, self-tapping screws to hold the seats to the deck. Your local home improvement center or hardware store should have them for you. You'll need to attach the base and the back just the way the old seats were attached. Just make sure the screws go into the framing for the back or frame of the seats so they are secure in the boat. This took a couple hours. You want to make sure it fits and it's secure. [/FONT][/FONT]
[FONT=Trebuchet MS, Lucida Grande, Arial, sans-serif][FONT=Trebuchet MS, Lucida Grande, Arial, sans-serif]
[/FONT][/FONT][FONT=Trebuchet MS, Lucida Grande, Arial, sans-serif][FONT=Trebuchet MS, Lucida Grande, Arial, sans-serif]You'll notice that most of the Wise seat bases have drain holes. That's a great feature and helps keep items inside from soaking up a lot of water. Some bases do not have drain holes and are meant to keep dry things dry. Still, it's best to make sure they are dry or dry them out during seasonal use. [/FONT][/FONT]
[FONT=Trebuchet MS, Lucida Grande, Arial, sans-serif][FONT=Trebuchet MS, Lucida Grande, Arial, sans-serif]There will be some more time spent on details. Remember why you marked pieces? That comes in handy when you have trim pieces that look alike. [/FONT][/FONT]
[FONT=Trebuchet MS, Lucida Grande, Arial, sans-serif][FONT=Trebuchet MS, Lucida Grande, Arial, sans-serif]
[/FONT][/FONT][FONT=Trebuchet MS, Lucida Grande, Arial, sans-serif][FONT=Trebuchet MS, Lucida Grande, Arial, sans-serif]The speakers in the old seats were under the rear lounge. We placed them in a location where they will project sound better and fit better. The new seats are a bit more padded so we moved the location for the small table out an inch from the old base. [/FONT][/FONT]
[FONT=Trebuchet MS, Lucida Grande, Arial, sans-serif][FONT=Trebuchet MS, Lucida Grande, Arial, sans-serif]
Reconnect the battery, make sure everything works; lights, stereo, engine starter, etc. [/FONT][/FONT]
[FONT=Trebuchet MS, Lucida Grande, Arial, sans-serif][FONT=Trebuchet MS, Lucida Grande, Arial, sans-serif]You did it. Two days of actually working on the boat. It wasn't too difficult. There was no part of this project that required skills outside that of an everyday home owner. All it took was a little drilling, screwing, pounding, scraping, lifting and sitting. [/FONT][/FONT]
[FONT=Trebuchet MS, Lucida Grande, Arial, sans-serif][FONT=Trebuchet MS, Lucida Grande, Arial, sans-serif]You can do this at home. It will make your boat more useful again. You and the family will enjoy it more. It doesn't cost a fortune and it could save you one. [/FONT][/FONT]
[FONT=Trebuchet MS, Lucida Grande, Arial, sans-serif][FONT=Trebuchet MS, Lucida Grande, Arial, sans-serif][EDITOR'S NOTE] You'll find all the supplies you need to restore pontoon at iboats.com [/FONT][/FONT]
[FONT=Trebuchet MS, Lucida Grande, Arial, sans-serif][FONT=Trebuchet MS, Lucida Grande, Arial, sans-serif](Bill Gius is a three-plus decade marine industry veteran with extensive, hands-on accessory, boat and engine experience. Bill has been working with iboats.com for six years to help manufacturers and dealers use iboats' online marketing, advertising and lead generation services. Bill can be reached at 800-869-1686 x199 or bill@iboats.com.) [/FONT] [/FONT]