Bass boat keel crack, need help

Eddie1920

Seaman Apprentice
Joined
Jun 21, 2007
Messages
35
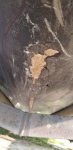
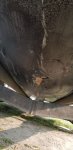
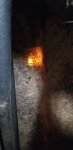
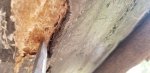
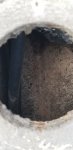
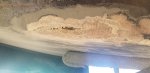
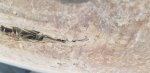
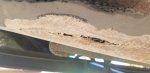
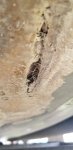
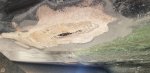
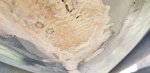
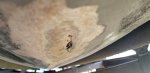
I have a late 80s or early 90s sprint bass boat that the previous owner had cracked the keel about 3 feet down from the tip of the bow. He had previously had a repair of glass Matt over it however it has let go and now takes on water from this point. Not sure how I should repair it i know the basics of fiber glass, I have not sanded the area yet but I'm estimating the crack to be about 8 inchs long, as well as there is quite a thick chunk of the laminate that is loose and half way separated from the haul. I'm in need of direction on how to go about this repair I have bondo long hair strand filler resin and cloth Matt as well as the hair Matt. I'm not looking to go full pro repair on this if its gonna be highly costly it's an old boat and no means worth more then $4k CAD boat motor and trailer package. Info post would be highly appreciated, thanks. (I can take pictures if needed)
 

gm280

Supreme Mariner
Joined
Jun 26, 2011
Messages
14,605
Yes, do post a few pictures. I think that fact that you say it is taking on water make this a little more repair then you may have first thought. That means you allowed water into the structure of the hull. If that has been going on for any length if time, you may have more repairs to fix. Get some pictures and let us see what you are talking about.
 

Eddie1920

Seaman Apprentice
Joined
Jun 21, 2007
Messages
35
[No message]
 

Attachments

  • photo312928.jpg
    photo312928.jpg
    1.6 MB · Views: 2
  • photo312929.jpg
    photo312929.jpg
    509.8 KB · Views: 2
  • photo312930.jpg
    photo312930.jpg
    731.4 KB · Views: 2
  • photo312931.jpg
    photo312931.jpg
    691.9 KB · Views: 2
  • photo312932.jpg
    photo312932.jpg
    641.6 KB · Views: 2

Redtruck12

Petty Officer 1st Class
Joined
Jan 25, 2018
Messages
344
I think you’re kind of lucky that you can access both inside and out.
is your centre bilge channel the full length of the boat?
A proper repair will likely include grinding out the damaged area and taper grinding the thickness roughly 3-4” beyond the damaged area, building up in layers both inside and out with 1708 (biaxial cloth with chop strand mat backing, grinding roughly to contour and flatness, fairing with thickened resin and then applying gel coat or bottom side paint (or possibly tractor paint-depends on your boats usage).
i have tried to use simple terminology. If you have difficulty figuring out what is being mentioned then you likely need to read the how to sticky’s at the top of the restoration forum.

probably a good idea to core drill and evaluate your stringers and transom too.
 

Eddie1920

Seaman Apprentice
Joined
Jun 21, 2007
Messages
35
There seems to be like a inner and outer shell and the crack/broke open spot is in the outer shell (water side of the hull) and the inner sell seen from the floor vent looking down is a thin sell and feels like about 3/16 inch gap between the too, this kinda confusing me a bit.
 
Last edited:

Redtruck12

Petty Officer 1st Class
Joined
Jan 25, 2018
Messages
344
What is 3/16”?
As usual pictures will help
have you checked transom and stringers yet?
 

Scott Danforth

Grumpy Vintage Moderator still playing with boats
Staff member
Joined
Jul 23, 2011
Messages
50,261
most likely you have a cored boat hull

if so, repairing a cored hull is difficult (about twice the work)
 

Eddie1920

Seaman Apprentice
Joined
Jun 21, 2007
Messages
35

Attachments

  • photo313547.jpg
    photo313547.jpg
    310 KB · Views: 0
  • photo313548.jpg
    photo313548.jpg
    306 KB · Views: 0
  • photo313549.jpg
    photo313549.jpg
    199.8 KB · Views: 0
  • photo313550.jpg
    photo313550.jpg
    217.9 KB · Views: 0
  • photo313551.jpg
    photo313551.jpg
    172.8 KB · Views: 0
  • photo313552.jpg
    photo313552.jpg
    342.2 KB · Views: 0
  • photo313553.jpg
    photo313553.jpg
    216 KB · Views: 0
  • photo313554.jpg
    photo313554.jpg
    180.6 KB · Views: 0

Redtruck12

Petty Officer 1st Class
Joined
Jan 25, 2018
Messages
344
Are these all bottom side/outside pictures? Or are they from the inside?
Definitely need to grind out all the bad crap, beveled out probably about 4” each side of the middle of the crack building it up in gradually larger pieces of CLOTH -
not filler not thickened resin CLOTH.
preferably from inside and out but doable from outside only IF you cannot access inside.

as for the water that’s already inside and the damage it has done.... hopefully minimal 🤔
 

Eddie1920

Seaman Apprentice
Joined
Jun 21, 2007
Messages
35
all the pictures are from the outside of the hull, when you look up into the crack you can see a layer of looks like chopped matt(undamaged) and that is what you see/feel when you look down from the top, only way I could repair this from the top would be to cut that layer out, you can see in the previous picture where I have light shining up from the crack underside and it's making the inner skin of the floor from the top view down glow, I think that's just part of the top cap/floor and its undamaged in that area. just the hull/lower tub of the boat is the damaged part. if I cut that layer out id be bonding the upper cap to the hull making difficult to remove ever in the future, also looks like the previous owner had tried to repair this with Bondo body filler reinforced with fiberglass hair.
 

Woodonglass

Supreme Mariner
Joined
Dec 29, 2009
Messages
25,929
Do you have access to the damage from the inside? You REALLY need to do this on both sides.. Start with two layers of CSM and resin on the outside. 3" and 6" overlap. then Go on inside and fill the void with Peanut Butter and two layer of 1708 Then go back to the outside and use a Layer of 1708 with 8" overlap and then finish off with 2 layers of CSM. Do final sanding an feathering fill any imperfections with fairing material final sand and then primer and paint.

I think you'll find this informative
 
Top