Bayliner Capri unintentional restoration project

jmmacky

Petty Officer 2nd Class
Joined
Jun 20, 2011
Messages
177
Hello,

I am based in the UK and recently bought a "bargain" off Ebay! I thought I would do some superficial improvements/sprucing up of the boat but as I peeled back the layers found more and more problems!

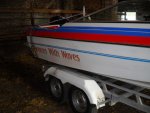
I believe the boat is a Bayliner Capri from about 1985 which has a Mercury 150 outboard which I suspect may not be original.

I have been reading some fantastic restoration threads which have really helped me so far (especially the videos provided by Friscoboater) - so thanks very much.

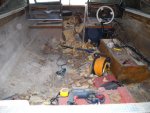
I have very little boat experience and have never done anything like this before! So far I have stripped the boat out and started grinding away the fibreglass and removing rotten plywood. I'm waiting to use my boss' JCB to remove the outboard at the moment. I am planning on replacing the stringers, transom and deck as well as give the outside a new paint job. I haven't decided what to do with seats, upholstery etc yet but think this is a long way off!

I have a lot of holiday time in my current job built up so am planning on nailing as much of the work as possible in this time as start an internship in September which will mean I have very little spare time for 12 months.

Here follows some photos so far:

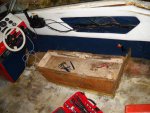
Some dodgy fibreglassing on top of the transom:
DSCN0971.jpg
 

Attachments

  • DSCN0984.jpg
    DSCN0984.jpg
    60.5 KB · Views: 0
  • DSCN0999.jpg
    DSCN0999.jpg
    57.4 KB · Views: 0
  • DSCN0973.jpg
    DSCN0973.jpg
    39.9 KB · Views: 0
  • DSCN0974.JPG
    DSCN0974.JPG
    142.5 KB · Views: 0

jmmacky

Petty Officer 2nd Class
Joined
Jun 20, 2011
Messages
177
Re: Bayliner Capri unintentional restoration project

Picking up the boat in the first place:
DSCN0969.jpg
 

jmmacky

Petty Officer 2nd Class
Joined
Jun 20, 2011
Messages
177
Re: Bayliner Capri unintentional restoration project

First signs of a rotten deck under the seat base:
DSCN1015.jpg


I have drilled out millions of rivets holding the cap on but it seems to be fibreglassed on at the transom so the plan is to remove the outboard soon and then chisel off the cap. I will completely remove everything from the hull and then start re-building.
 

proshadetree

Lieutenant Commander
Joined
Jul 19, 2008
Messages
1,887
Re: Bayliner Capri unintentional restoration project

Wow no cheap baylinner comments. Sorry about your wood problems. Mine was rotted out too. I knew it going i though. I love my old gal after the redo. Mine is an 88 1952 cuddy. Rides like no other boat I have been on. I hope you update as you go along. I still need to redo the interior on mine but it stays wet to much for that as of yet. Maybe when I get my next boat done.Welcome to I boats.
 

Woodonglass

Supreme Mariner
Joined
Dec 29, 2009
Messages
25,929
Re: Bayliner Capri unintentional restoration project

You might try a Reciprocating saw to cut that resin loose from the inside.
 

jmmacky

Petty Officer 2nd Class
Joined
Jun 20, 2011
Messages
177
Re: Bayliner Capri unintentional restoration project

So I have now removed the other main seat and all the front seats/storage spaces - this involved a lot of grinding and dust! I think a reciprocating saw would be better but would rather save the money for something else down the line for the sake of a bit more effort. I also passed my trailer test (you have to take this in the UK if you passed your driving test after 1997 before you can tow a trailer on the road) so I'll be able to tow the boat when it is eventually ready!

Myself and a couple of friends tried to disconnect the engine this evening which turned out to be much harder than expected and we had to give up in the end. We couldn't get the throttle cables off or the steering cable out. Really annoying! But after removing the engine cover and seeing all the delicate looking parts I have decided to make an engine stand rather than lay it on some straw as I had originally intended!

This photo shows how I grind off the fibreglass - rip out the old ply and then I just grind off the lip of fibreglass left until it is flush with the hull:

DSCN1026.jpg

Some of the flotation foam...
DSCN1025.JPG

Cleared to the deck:
DSCN1029.jpg

In the foreground is the new fueltank which was strapped to the back I presume in replacement for the broken original in the background of the photo under the deck:
DSCN1034.jpg
 

Navigator_Victory

Petty Officer 1st Class
Joined
Apr 3, 2011
Messages
284
Re: Bayliner Capri unintentional restoration project

Grandmother is from Yorkshire.....some fifty years ago.....good luck with your project and do not worry if it takes a couple years to complete......seems to be the average LOL
 

jmmacky

Petty Officer 2nd Class
Joined
Jun 20, 2011
Messages
177
Re: Bayliner Capri unintentional restoration project

I have made an engine stand from the plans found on iboats - i'll post a photo later.

A couple of questions:

I understand that 1708 is a good choice for glassing the transom back in but I can't find this particular product in the UK so would a simple biaxial fabric be ok? All UK GRP cloths/matts are weighted in grams rather than ounces.

Should I use biaxial for fibreglassing everything structural including deck and seat bases or would CSM be enough?
 

jmmacky

Petty Officer 2nd Class
Joined
Jun 20, 2011
Messages
177
Re: Bayliner Capri unintentional restoration project

Here is the outboard stand as per iboats plans - I'm just waiting for some coasters to arrive to put on the bottom.
DSCN1056.jpg

I made the stand this morning and spent the afternoon trying to get the deck out - it was a nightmare! There was one big sheet of ply on top which wasn't too rotten and came off fairly easily. However, underneath there is a further sheet of ply which is completely rotten and wet through. The flotation foam is like a sponge. This layer is turning out to be very awkward to remove and more annoyingly I didn't quite realise where the deck and hull joint was towards the bow and ground through the hull. Bugger! Think I'm going to take a depth adjustable circular saw to the deck tomorrow.

First glance of the bottom layer rotten ply: (Sorry about the fibreglass dust reflecting the light)!

DSCN1050.jpg

Close up of that rot:
DSCN1052.jpg

As I was grinding along the edge of the bottom ply layer a lot of sparks started flying which I thought was a screw until I looked more closely and saw it was a lot larger. I managed to lever it off:
DSCN1055.jpg

Don't know how they managed to leave them in there! They were under fibreglass and between the 2 deck layers of ply!

Brown mud/water was right up the middle between the stringers around and in front of the fuel tank:
DSCN1053.jpg

Think I will close this off with my repair so that no water can get in there. Next update tomorrow hopefully!
 

oops!

Supreme Mariner
Joined
Oct 18, 2007
Messages
12,932
Re: Bayliner Capri unintentional restoration project

I have made an engine stand from the plans found on iboats - i'll post a photo later.

A couple of questions:

I understand that 1708 is a good choice for glassing the transom back in but I can't find this particular product in the UK so would a simple biaxial fabric be ok? All UK GRP cloths/matts are weighted in grams rather than ounces.

Should I use biaxial for fibreglassing everything structural including deck and seat bases or would CSM be enough?

they must sell 1708 under a different name.....a major manufacturer is vector ply.....
a good bi axe is all you need.....
i would use the 1708 for all stringer and deck to hull joints....one or two layers of thick csm is all you need for the seat bases.

mannn....you really gutted that one....most bayliners rot stops at the walk thru.....that is going to be a major bow reconstruction for you.

being the boat a bayliner......i would seriously consider foaming the hull.

also ......with the ob.....i dont know if it has a belly tank......if it does....make sure you match the stinger height to take care of the extra 3/4 inch tank cover....
 

jmmacky

Petty Officer 2nd Class
Joined
Jun 20, 2011
Messages
177
Re: Bayliner Capri unintentional restoration project

Thanks for the pointers Oops! Read some of your hull extension thread - awesome!!

It has taken a little longer to get to this point than intended as I couldn't get the people and machinery together for a couple of days. Below is how we got the engine off - was a bit tricky due to a bolt that wouldn't come out and the steering cable that was stuck:
DSCN1068.jpgDSCN1069.jpgDSCN1072.jpg

I was now able to start trying to get the cap off - also not quite as easy as anticipated! I did this by using ratchet straps from the cap to the beams in the barn and grinded/chiseled the fibreglass off that was attaching it to the hull:
DSCN1105.jpgDSCN1092.jpg
 

jmmacky

Petty Officer 2nd Class
Joined
Jun 20, 2011
Messages
177
Re: Bayliner Capri unintentional restoration project

DSCN1088.jpg

At this point I realised how glad I am I didn't just use the boat as it was and take people out in it. The transom is completely rotten and in a few pieces. The fibreglass on each side of it was the only thing holding the outboard on:
DSCN1090.jpg

The foam towards the back was completely saturated and after removing it was a puddle running alongside the stringers. I could ring the foam out like a wet sponge.
DSCN1101.jpg

I've now finished removing all the deck and fuel tank (which I am going to get someone to look at and hopefully re-use but closed off so water hopefully can't get to it).
DSCN1102.jpgDSCN1104.jpg

Now I just need to remove the stringers and transom so I can actually start doing some building! I've found a fibreglass supply company that sell biax with matt stitched on the back (600g/300g or 800g/450g) so think I will order one of those for the structural stuff. Still not decided whether to use epoxy or poly as have read some contradicting information...!
 

jmmacky

Petty Officer 2nd Class
Joined
Jun 20, 2011
Messages
177
Re: Bayliner Capri unintentional restoration project

they must sell 1708 under a different name.....a major manufacturer is vector ply.....
a good bi axe is all you need.....
i would use the 1708 for all stringer and deck to hull joints....one or two layers of thick csm is all you need for the seat bases.

mannn....you really gutted that one....most bayliners rot stops at the walk thru.....that is going to be a major bow reconstruction for you.

being the boat a bayliner......i would seriously consider foaming the hull.

also ......with the ob.....i dont know if it has a belly tank......if it does....make sure you match the stinger height to take care of the extra 3/4 inch tank cover....

Unfortunately Vector Ply don't sell in the UK...or even Europe! I am planning on foaming the hull thanks Oops. It does have a belly tank which some previous owner stopped using for some reason, disconnected and strapped a new tank to the top of the cap at the stern. I'd like to get it working again so that it is hidden out the way. Think I'll take it to a metal engineering/machining place up the road.
DSCN1099.jpg
 

oops!

Supreme Mariner
Joined
Oct 18, 2007
Messages
12,932
Re: Bayliner Capri unintentional restoration project

ok.....the reason he stopped using it was cause it leaked. he was too lazy to pull the deck....so he strapped a jerry can on the boat.

with the belly tank, there will be a step in the stringers in the area of the tank.....i believe it is a 3/4 inch step......that means that before you re deck the boat....glass incase a 3/4 inch tank cover......then deck as usual.

in the thread in my sig....there are pics of 1708...look at them and try to find what you are looking for locally....it will be there somewhere !
 

jmmacky

Petty Officer 2nd Class
Joined
Jun 20, 2011
Messages
177
Re: Bayliner Capri unintentional restoration project

Hi


I just found this maybe it helps www.resintex.co.uk

it is also called stitch mat.

Hope it helps

Thanks for the help - couldn't find any stitch matt on this site but have ordered a similar product (combination matt) from East Coast fibreglass.
 

jmmacky

Petty Officer 2nd Class
Joined
Jun 20, 2011
Messages
177
Re: Bayliner Capri unintentional restoration project

ok.....the reason he stopped using it was cause it leaked. he was too lazy to pull the deck....so he strapped a jerry can on the boat.

with the belly tank, there will be a step in the stringers in the area of the tank.....i believe it is a 3/4 inch step......that means that before you re deck the boat....glass incase a 3/4 inch tank cover......then deck as usual.

in the thread in my sig....there are pics of 1708...look at them and try to find what you are looking for locally....it will be there somewhere !

Thanks Oops...think I have found a similar product which I have ordered.

Have put in so many hours of grinding recently which has been very tedious. I will put up some photos soon.

I was planning on starting to make the new transom tomorrow but have reached a sticking point - the stern of the boat is a funny shape and i'm not sure how to make a new transom to fit.

The original transom appears to have been in 3 pieces. The old one was very rotten which makes it difficult to know for sure. I was planning on putting one big piece of ply right the way across which would be much stronger but this won't fit flush with the outer skin of the transom. Otherwise maybe I could do double thickness in the middle, with the inner piece going right the way across and fill in the gaps with PB? What do people think?? Please help!

These photos show the top of the original transom just after I took the cap off. It was completely rotten and wet.

DSCN1089.jpgDSCN1090.jpg

These show the angle from the v back part to the sides. The piece of wood is just trying to show this a bit clearer on one side.

DSCN1121.jpgDSCN1115.jpgDSCN1119.jpg
 

jmmacky

Petty Officer 2nd Class
Joined
Jun 20, 2011
Messages
177
Re: Bayliner Capri unintentional restoration project

Sorry forgot to add the photo of what I have left of the original transom: its in the orientation it was in the boat. I was planning on making one big one with 2 bits of 3/4" ply stuck together and going all the way to the hull on the sides as well which the original didn't.

DSCN1117.jpg
 

gstrom11

Petty Officer 3rd Class
Joined
May 3, 2011
Messages
98
Re: Bayliner Capri unintentional restoration project

Wow, you really jumped into this, subscribed!
 

goboating

Petty Officer 2nd Class
Joined
Feb 7, 2011
Messages
104
Re: Bayliner Capri unintentional restoration project

One thing to consider is to make a craddle for the hull. Now that the cap is off the hull can flex as much as it wants. It would be terrible to get the repairs done and then find out the cap won't fit back on.
 
Top