Beginning of 1979 Cobia Sportster 18vbr Restoration

Get_afterit

Cadet
Joined
May 22, 2021
Messages
20
Hi Guys,

long time lurker here, have finally decided to take the plunge and restore a fibreglass boat.

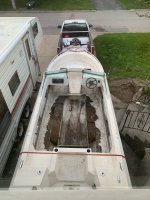
As the title states, it is a 1979 Cobia Sportster 18vbr - hull and top cap appear to be in good shape for the year, the typical wear and tear that you would expect with a 40+ year old boat but appears to be in good shape cosmetically. (this is my first fibreglass boat however so my experience is limited with them)

I plan to document the restoration and post photos and probably ask a lot of questions along the way.

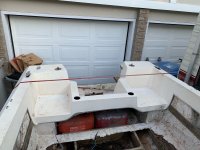
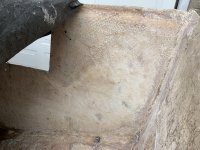
however the transom, stringers, and floor need to be replaced.

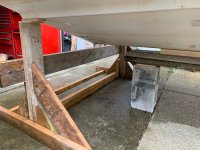
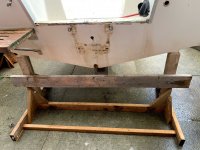
I've taken the first step and have taken the boat off the trailer, and blocked up.
I used the stringers as they are still pretty much in tact to level it from port to starboard at the rear of the boat.

question #1 -

Do I also need to have it level from bow to stern as well? if so should I use the stringers as the reference? If I do level it bow to stern do I need to be concerned with water accumulating in the bottom of the boat since I am going to pretty much gut the whole thing

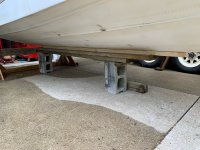
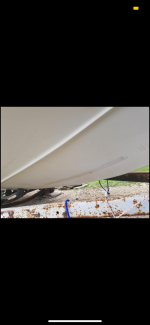
I have 2 blocks supporting the transom and an 8' length running down the keel, is this sufficient for now? I plan to run a full length support on the outer chines and use those to level the front of boat before I start cutting out the stringers.

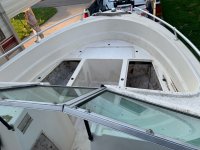
I think I have settled on removing the cap to gain access to the stringers and transom, I plan the dimension the interior beam to make sure it does not splay outwards once I remove the cap.

After I support my outer chines and write down dimensions would removing the cap be the next step?

I have attached some photos of my blocking setup - just want to make sure its strong enough and some other photos of the boat as well.

Also does anyone have any experience with these boats? how they ride in rough waters? are they considered well built? is it even worth saving?

Thanks for the replys!
 

Attachments

  • image0 (6).jpeg
    image0 (6).jpeg
    1.2 MB · Views: 9
  • image1 (5).jpeg
    image1 (5).jpeg
    1.2 MB · Views: 9
  • image2 (5).jpeg
    image2 (5).jpeg
    1.2 MB · Views: 11
  • image4 (3).jpeg
    image4 (3).jpeg
    554.9 KB · Views: 12
  • image8.png
    image8.png
    1.2 MB · Views: 11
  • image7.png
    image7.png
    1.1 MB · Views: 9
  • image6 (1).jpeg
    image6 (1).jpeg
    778.9 KB · Views: 8
  • image5 (2).jpeg
    image5 (2).jpeg
    847.9 KB · Views: 10

Get_afterit

Cadet
Joined
May 22, 2021
Messages
20
Looking over the top cap of the boat I decided it will need to be painted once I’m finished all the glass work, that being said I decided to just cut the cap 6” in front of the splash well to gain access to the transom and floor, and just glass it all back together once I am done
7339206E-65EF-42CE-93E6-B4B58BAECAAD.jpeg
Before that I finished the Hull supports, running some 2” x 4” along the outer chines and under the keel as well
6CFD71B5-AA7C-4010-AAF4-E83C8AE39CF0.jpeg
would you guys say this is adequate support or should I add more before I glass in the stringers and bulkheads?

I also had to cut out the lower part of the bow seats as well to gain access the floor as it was rotten as well
4FEEF3FF-E71E-468D-815D-E1F0FB62A38F.jpeg

with those 2 pieces of top cap removed I could really get to work.
Ripped up the floor and spent hours digging out the floatation foam. My boat looked like the foam pits at the gymnasiums once I was done8EE7399E-71C5-4125-9AB8-CB9437A10B73.jpeg
 

Get_afterit

Cadet
Joined
May 22, 2021
Messages
20
After all that, just cut out all the stringers, saved what I could to use as templates.

Before:

75A2CE03-BB21-40EA-A679-1B7AFC694295.jpeg


and then ground the whole inside of the boat

After:

21C4CA10-40C8-4A35-BE80-EFE3BF94F872.jpegNow, I am pretty much ready to cut the new stringers and transom.
I have decided on epoxy to glass in the stringers and transom... would about 6 gallons be sufficient?
I have not decided yet whether to go with epoxy or vinyl ester for the floor though, if I go epoxy what would I use for the topside of it in regards to the cloth? If not CSM would it be just a normal 6 or 10oz fibreglass cloth? How many layers?

Also, the old stringer where 3/4” solid wood, probably pine or fir - too rotten to tell.
Is it ok to just replace them with 3/4” exterior ply with 2 layers of 17 biaxial for tabbing and one layer over top to totally encapsulate them or should I use solid wood?

stay tuned, more pics to follow
 

Get_afterit

Cadet
Joined
May 22, 2021
Messages
20
Oh, also wanted to ask if someone maybe has a rough idea of how much epoxy and fibreglass cloth I’d need to do the transom, stringers, and floor?
 

todhunter

Canoeist
Joined
Sep 15, 2020
Messages
1,324
You'll be fine with 3/4" ACX plywood in place of solid wood for stringers. Your stringer glass layup of 2x 1708 tabbing layers and 1x 1708 cap is what I did - I think you'll be fine.

I'm a newbie so I wasted some materials because I was learning as I went. I've got my stringers/transom/deck done (18.5 ft boat) and I've used quite a bit more materials than I originally thought. I'm in it about 25 gallons of polyester resin, ~30 yd of 1708 and ~10 yd of CSM. PB uses a lot of resin up. Tabbing uses a lot of glass up. When you go to start tabbing in your stringers and bulkheads, you're not only tabbing them to the hull, but tabbing them to each other. Sit down with a tape measure and a calculator and work it out - you'll likely find you need a lot more glass and resin than you initially though.
 

Get_afterit

Cadet
Joined
May 22, 2021
Messages
20
That’s what I’m thinking as well, I’ve read on numerous sites that people typically use about 5 gallons of epoxy just for the transom - which seems like an awful lot.
I’m thinking since I am relaxing the transom from the inside I can cut and fit the transom pieces in perfectly so I shouldn’t be using a bunch of thickened epoxy to fill unnecessary gaps
 

GSPLures

Chief Petty Officer
Joined
Sep 3, 2019
Messages
564
That’s what I’m thinking as well, I’ve read on numerous sites that people typically use about 5 gallons of epoxy just for the transom - which seems like an awful lot.
I’m thinking since I am relaxing the transom from the inside I can cut and fit the transom pieces in perfectly so I shouldn’t be using a bunch of thickened epoxy to fill unnecessary gaps
It really all depends on the size of the transom, material used (1708 will take in more than you think for proper wet out). Even cutting a perfectly fitting transom the fillets and gluing the transom to the hull will take up a decent amount of resin, although the better fitting the less you will need for the fillets. Also depending on your skill level the amount of waste.

The boat is looking good, keep up the good work!
 

Get_afterit

Cadet
Joined
May 22, 2021
Messages
20
Quick question,
I’ve been grinding the transom preparing it for the new transom. In the following picture, should I be grinding away all of the CSM (I had to grind some of it away that had delaminated) down to the hull or can I leave it if it’s still solidly bonded to the skin, and build up the low spots with some thickened epoxy?
 

Attachments

  • 2F962BDA-A2C3-4CC8-833A-A98224CB2875.jpeg
    2F962BDA-A2C3-4CC8-833A-A98224CB2875.jpeg
    3.9 MB · Views: 7

GSPLures

Chief Petty Officer
Joined
Sep 3, 2019
Messages
564
On mine if it was solid and was fully saturated with resin (no dry spots of weave) I left it. Smooth it out the best you can and the thickened resin used to bond will fill in low spots.
 

Get_afterit

Cadet
Joined
May 22, 2021
Messages
20
Ok, Pretty good day yesterday.

Due to the cost/availabilty I have decided to go with a polyester resin for everything, other than laminating the new transom to the inside of the hull. I plan to use thickened epoxy to laminate the new transom to inside the hull, a few reasons for this is:

- Minimal fibreglassing experience, so less chance of messing it up with epoxy as opposed to poly resin
- Superior bonding with epoxy and it's waterproof as well.

I plan on using just enough epoxy to bond it to the hull. Once it cures, I will fill all the voids along the edges with a polyester resin peanut butter and fillet it.

I decided to just grind all the old CSM off the hull, to ensure I get a good bond when I epoxy the new transom in. I figured that would be the easiest way to get it nice and flat as opposed to trying to build it up with thickened epoxy.

Now, should I spend time building the skin back up with maybe a layer of 1708 or some 1.5oz CSM?

I planned to fillet the corners and reinforce them with some 1708 before installing the new transom, again, just wondering if this is necessary if it's all going to get filled with epoxy anyways?

I then made a template out of wood sticks and hot glue for the new transom.

IMG_2626.JPG

Note: The darkened resin at the top of the transom is a poly resin peanut butter thickened with some cabosil and carbon chopped strands. The fibreglass place gave me those instead of the normal chopped strands. Just wanted to try them out and I thought it would be cool to be able to say my boat is reinforced with carbon fibre.

I will use the carbon chopped strands to thicken my epoxy for bonding it to the hull as well, the only reason being that they cost me $45/quart and it will be cool to say my boat is carbon fiber reinforced.


IMG_2628.JPG

I was able to get my hands on some plywood. We are locked down here in Ontario, Canada and getting my hands on the supplies has been a challenge in it of itself.

Pretty much impossible to get my hands on marine ply, even under the best of conditions, they don't sell it at any home depot in the province, I think only a couple specialty places carry it in all of the province - same for composites - very difficult to source.
That being said, the best I could get was some 3/4" ACX Arauco plywood for $87 a sheet. I have used it before for other jobs and have always been impressed with the qualty of it compared to the other options.

IMG_2630.JPG

So, the plan today is:

- Cut out the new transom pieces and laminate them together, I plan on just using titebond 2 for this, i was unable to get any titebond 3 in my area due to the pandemic lockdown (Yay, Ontario). I will sand the wood to 80 grit, wipe it down with some acetone, then drill some ooze holes to allow air to escape.

-Would it be advisable to add some screws as a mechanical form of fastening as well? or epoxy in some dowels?

- Should I fully encapsulate the transom in resin with a layer of 1.5oz CSM or 1708 before installing into the boat? I planned on doing the edges and the side that I won't be laminating to the hull with epoxy. Way i figure it is there isn' much sense putting a layer of poly resin between the wood and epoxy on the backside.

- How many layers of 1708 and tabbing should I do? I planned on 3 layers of the 1708 with mat, with the first layer wrapping onto the hull by 6", the second layer 7" and the last layer 8". Then adding some more 12"-14" wide biaxial tape tabbing ontop of that.

There seems to be a plethora of ways to glass and tab in a transom, and everyone seems to have their own method, are there any methods or practices I should avoid?

and when tabbing in the transom and stringers should I go small widths first to larger or larger down to smaller? I have read arguments for both methods. Which one is the industry standard? It makes sense to me to go small first then successively larger, each new piece biting into more of the hull. The argument against that is that you can introduce air pockets at the edge when the larger piece overlaps the smaller piece which also makes sense as well. So which is the preferred method?

Anyways, gonna get after it, Will post some more pics up later today.
 

Attachments

  • IMG_2630.JPG
    IMG_2630.JPG
    2.7 MB · Views: 0
Last edited:

tpenfield

Moderator
Staff member
Joined
Jul 18, 2011
Messages
18,166
Looks like you are doing a good job. Subscribing in for the rest of the journey.

Poly or VE resin is the better thing to use rather than epoxy . . . unless you are going to use epoxy 100% throughout the rebuild ($$$$).
 

Get_afterit

Cadet
Joined
May 22, 2021
Messages
20
Agreed, the best price I could find on epoxy was $720 for 5.8 gallons, + 13% tax
The best price on VE was $420/5 gallons + tax
They were out of stock of iso poly, so my only choice was ortho poly @ $167 per 5 gallons

those are all CAD prices, but the way the dollar is going it looks like it will sone be on par the the USD.

and if 95% of the boats out there are made with it, and this one is as well, then it should be fine.
 

Get_afterit

Cadet
Joined
May 22, 2021
Messages
20
First transom piece is cut straight from my wood and hot glue template, had to trim a hair off the sides, put a 1/4” round over on the back.
Perfect fit
7C7856F9-2682-4830-B58D-B25C75967DBA.jpeg


So close.... story of my life.
Just 3/4” shy from getting 2 full pieces out of one sheet, I’ll glue them together then scarf in a small piece with some epoxy


42BDBD69-CC25-4DBF-A49F-27DEFD26CFF5.jpeg

Like I said in my previous post, this arauco plywood is hands down the best bang for your buck, when it comes to an ACX plywood here in Canada, no voids whatsoever.

16D95C41-CD4A-460E-8C26-7A8866405D51.jpeg
 

todhunter

Canoeist
Joined
Sep 15, 2020
Messages
1,324
I used Arauco on my rebuild too...agree that it is very nice wood.

I wouldn't worry about adding layers to the transom skin unless you got it really thin is some areas. If you make your PB with milled fibers and you use enough of it, that should make up for any low spots.

Probably nothing wrong with putting some PB and 1708 in the corners before you put the transom in, but probably not necessary either. I would just stick the transom in and fill the edges with PB, then tab.

You can add screws if you want when laminating your transom, but I felt like I got a good enough bond just by using weight. If you do use screws, you can pull them out after curing and then fill the holes with PB.

I did 2 layers of 1708 tabbing on mine. Do what you feel is good enough. I do think 4 layers as you suggested seems excessive, but hey, not my boat!

I see the arguments for which layer (small or large) of tabbing to start with and can see both sides, but I prefer small first.

I would fully encapsulate the transom before installing it. This way all you have to do is PB it in place and then add the tabbing. You'll find that it's much easier to glass something flat on your work bench than it is while vertical or in position in the boat. I would do as much as you can outside the boat. I did 1 or 2 layers of CSM on the back face, CSM around the perimeter, and 2 layers of 1708 on the front face, all outside the boat.
 

Get_afterit

Cadet
Joined
May 22, 2021
Messages
20
Decided to go with titebond 2, spread a liberal amount onto the transom, I also installed 4 dowels to line the 2 pieces up when I clamp them down to prevent them from sliding around.


08D799B1-DDB2-4A58-990C-D34F73A32828.jpeg

Transom is glued up and clamped down tight.

E6D22A59-9985-4DB1-8C36-B254881D3E4E.jpeg

29657DA5-7E4D-4F39-90A4-4564DBB6B9C8.jpeg

I opted for ooze holes, so that’s what the large puddles of glue are doing, I’ll wait until it dries then just chisel them off, no point in smearing it around.

proper squeeze out:

2A9F7ECB-39DD-4BFF-9FE1-C09F7CD1A3A3.jpeg

Once it was all clamped down I used a rotary laser level to level/shim each corner:


CAADBF83-C9AD-4F54-B775-37ABF7BED647.jpeg

It was slightly twisted, I’d say a heavy 1/16”, it was so stiff however that I had to use a 2 x 4 off the ceiling to push the corner down, in the end I got each corner within a 1/32 of each other.

jointed a piece of ash to use as a straight edge to confirm the flatness, I’d say we’re good.

F87CEADF-7925-4CFE-9998-DC6B29DC5702.jpeg

I cranked the heat in the garage to speed up the glue, should be dry in a few hours, then I’ll clean up the squeeze out, give it a quick sand and wipe down with mineral spirits, then glass it before installation into the boat.

One question though, since I am using an epoxy to glue the transom into the boat, does it make sense to glass it fully with polyester resin? The epoxy will stick better to the bare wood than the polyester resin, so no point in adding a layer that is more likely to fail. Does this make sense? I planned to just glass the edges and the front of the transom before installation.
 

Billkuma

Cadet
Joined
May 15, 2021
Messages
15
So close.... story of my life.
Just 3/4” shy from getting 2 full pieces out of one sheet, I’ll glue them together then scarf in a small piece with some epoxy
Same here...story of my life.

Impressive attention to detail and focus. I'm paying close attention since one of mine is a Four Winns Horizon 190 bowrider, except with I/O, but it needs the same treatment as your Cobia.

Admiral made the mistake, a couple weeks ago, of saying that she expects me to pick up no more than one boat a year. I plan to sell the Four Winns before I get to your point on it, but I have a good memory. :cool:

Impressive. Keep going.
 

Get_afterit

Cadet
Joined
May 22, 2021
Messages
20
Been a busy week,

Got 1 layer of 1708 biaxial glass on the transom outside the boat, I glassed only the edges and the inside face (the side not getting epoxied to the hull) and then got it clamped in.

I used thickened epoxy to bond it in place

IMG_2658.JPG

LGSX5795.JPG

Got really good squeeze out, from every old hole on the transom

IMG_2660.JPG

I let that setup overnight, then followed up with 2 more layers of 1708 and adding tabbing inbetween each layer, finished it off with some 1.5oz CSM.

I then got the keel bedded into place.

original keel was a piece of plywood sitting on a 1"x1" peice of wood, poorly glassed in place and was completely rotten.

I had a solid piece of red oak 5/4" x 5" x 96" I decided to use instead.
I know red oak is not the best wood, I would have prefered white oak, but its what I had on hand and it will be much better than the original design and completely encapsulated in resin and cloth.

bedded it in some thickened poly resin (took about 15lbs), and put 3 layers of glass over it.


IMG_2667.JPG

Starting on the bulkhead and stringers:

IMG_2669.JPGIMG_2671.JPG

IMG_2672.JPG

I plan on using 2 part foam for every space under the sole that won't be storage or have limber holes.

Anything I am forgetting about that I should add underneath now before I button it back up?
lines, electrical, etc?

More pics to come.
 
Last edited:

GSPLures

Chief Petty Officer
Joined
Sep 3, 2019
Messages
564
Been a busy week,

Got 1 layer of 1708 biaxial glass on the transom outside the boat, I glassed only the edges and the inside face (the side not getting epoxied to the hull) and then got it clamped in.

I used thickened epoxy to bond it in place

View attachment 342069

View attachment 342070

Got really good squeeze out, from every old hole on the transom

View attachment 342071

I let that setup overnight, then followed up with 2 more layers of 1708 and adding tabbing inbetween each layer, finished it off with some 1.5oz CSM.

I then got the keel bedded into place.

original keel was a piece of plywood sitting on a 1"x1" peice of wood, poorly glassed in place and was completely rotten.

I had a solid piece of red oak 5/4" x 5" x 96" I decided to use instead.
I know red oak is not the best wood, I would have prefered white oak, but its what I had on hand and it will be much better than the original design and completely encapsulated in resin and cloth.

bedded it in some thickened poly resin (took about 15lbs), and put 3 layers of glass over it.


View attachment 342072

Starting on the bulkhead and stringers:

View attachment 342073View attachment 342074

View attachment 342075

I plan on using 2 part foam for every space under the sole that won't be storage or have limber holes.

Anything I am forgetting about that I should add underneath now before I button it back up?
lines, electrical, etc?

More pics to come.
Looking good. Do a good check of the hull to make sure you do not have any cracks (I found a couple in mine so I like to give out this warning). If you find any you can do a repair inside and out for a solid repair before deck and foam go in.
 

Get_afterit

Cadet
Joined
May 22, 2021
Messages
20
havent seen any so far, other than some cracking in some spots where the polyester resin pooled up really thick when they built the boat.

Now, my wife is getting tired on it on the blocks - I have the boat perfectly lever from port to starboard and bow to stern at the moment.

Once I get all the stringers and bulkheads glassed in, do you think it would be ok to put it back on the trailer before doing the sole, and tabbing that into the side? or do I run the risk of the hull flexing and warping without the sole in there holding it all together?
 
Top