Bellows and housing install

aarons 470

Petty Officer 1st Class
Joined
Aug 29, 2012
Messages
351
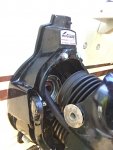
I think I got my bellows on correctly. I noticed the clip on upper bellows popped into the groove. But no verification on the bottom. Pulled on it felt ok.
Feels tight, and when I push the bellows down against housing to square it up with face of flange it’s about 3” all around from face to end of bellows. still makes me nervous as I thought I had it correctly a couple times, luckily it slid up on me each time as I tightened. so it was obvious on those first failed attempts.

I have the bellows, hose, and cable boot on the housing, Going to mount to gimble today.

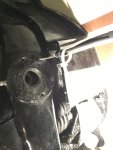
Preferred method/install order for this step?
I was going to put bellows on first because it’s the trickiest. Dry fit the other 2 and clamp on bellows first?
Any methods to verify it’s good to go other than a gentle brisk tug😳
 

Rick Stephens

Admiral
Joined
Aug 13, 2013
Messages
6,118
I would suggest you follow the Mercruiser Service Manual exactly. If you don't have it, here are the relevant pages reproduced.
Click image for larger version  Name:	Screen Shot 2018-10-09 at 4.32.11 PM.png Views:	1 Size:	129.4 KB ID:	10666205
 
Last edited:

achris

More fish than mountain goat
Joined
May 19, 2004
Messages
27,468
MR drive I think. Boat is an 82 or 83. Serial on gimbal 6078922

Nope, 1982. MC-1.... Manual #4
Check by measuring the rear engine mount spacing. Yours will be about 14". R (1983) and later are 10"

Chris.......
 

aarons 470

Petty Officer 1st Class
Joined
Aug 29, 2012
Messages
351
I Thanks Chris. I’ve been wanting to know what drive it was for sure.
Well I got this far, I’m a little weary on the next step, mounting it up. The new 5/8th water inlet hose is pretty stiff, and will cause some resistance when mounting housing. This hose is a tad kinked as it 90s over to the transom connection. I rolled it around improved some but it isn’t the best turn radius.

I won’t be able to see much as I mount the bellows. The glue gets stiff fast so there isn’t much time to work it. Going to dry fit first to see if I can tell when the groove sits in place. And hoping I can save some money and do it myself.
 

Attachments

  • photo302723.jpg
    photo302723.jpg
    602.2 KB · Views: 0

aarons 470

Petty Officer 1st Class
Joined
Aug 29, 2012
Messages
351
Not having any luck finding a video. Has to be some decent ones floating around?

Quoted $6-700 bucks shop quote includes mounting outdrive with new impeller kit

Looking like I need to Do this step myself for now and future. I can’t afford for someone else do do anything lol.
 
Last edited:

Rick Stephens

Admiral
Joined
Aug 13, 2013
Messages
6,118
Do it yourself. Absolutely. That way you can check it as often as needed without needing to pay out the big bucks and schedule a mechanic. Been a long time since I worked on an MC-1 - long enough that I don't really recall much if any differences in bellows assembly method compared to an Alpha drive. Maybe Chris or one of the others will correct me on this, but I think you can follow an Alpha assembly video.
 

achris

More fish than mountain goat
Joined
May 19, 2004
Messages
27,468
MC-1 is the same (exactly!) as Alpha One... And the only difference with the Gen II (and the Bravos) is the bell-housing end has the locking ring, not the clamp.
 

aarons 470

Petty Officer 1st Class
Joined
Aug 29, 2012
Messages
351
Only bad part is the alpha 1 video I just found has the ring to hold bellows much easier than this one. So I still haven’t seen anyone install the housing and bellows on my set up. Going to go out and see if I can dry fit it without glue and see if I can get that groove in.

the bellows go on housing first then assembly mounts to gimble correct?
 
Last edited:

Rick Stephens

Admiral
Joined
Aug 13, 2013
Messages
6,118
U-joint bellows mounted on bell housing, exhaust on gimbal housing. The trick is pushing the bellhousing in straight and having it pop onto the gimbal housing when you push..
 

achris

More fish than mountain goat
Joined
May 19, 2004
Messages
27,468
'By the book' is the uni bellows and the exhaust bellows on the gimbal housing. But I'm with Rick, uni on the bell-housing is much easier.... (for the Gen I)... You can put your fingers in and push and feel it onto the gimbal housing end much easier than trying to pull it onto the bell-housing, while trying to push the bell-housing in...

Chris......
 

aarons 470

Petty Officer 1st Class
Joined
Aug 29, 2012
Messages
351
Woo Hoo! Got it. Everything went well except I already had exhaust elbows glued onto housing so I just went for it. Im not able to cinch that clamp all the way.

I have few questions to wrap this part up so I can install outdrive.

So I have one hose clamp on the exhaust bellows, that is semi tight but needs couple cranks.

Only tool I have that I can get in there is a 5/16 smaller straight gear wrench. But the gears aren’t tight enough to get it to tighten, it is name brand though.
I’m Hardly able to move wrench And the clamp itself has play before it grabs next slot. Any ideas? Not the best pic but you can see clamp location. I don’t currently have any offset wrenches, I’m not sure if they would work either.

How much play do you want in the shift cable bellows before setting the pinch clamp?

How do you guy pinch the clamp without oblonging if to get a good seal?
 

Attachments

  • photo302766.jpg
    photo302766.jpg
    1 MB · Views: 0
Last edited:

achris

More fish than mountain goat
Joined
May 19, 2004
Messages
27,468
The clamps should be in the positions set out in the manual. Use a nut driver to tighten them up. With the shift cable bellows I turn the steering fully to port, then stretch out the bellows to the point I'm comfortable with and zip the tie at that point...
 

aarons 470

Petty Officer 1st Class
Joined
Aug 29, 2012
Messages
351
Ok, In the Manual it does show the clamp on these exhaust like it is, same orientation as the clamp on large bellows. But maybe I’m not seeing it. I have a flex but driver no way to get there. Getting some offset
wrenches, hope i can get it.
 
Top