Boat floor repair

sergiophil

Seaman
Joined
Jul 11, 2015
Messages
54
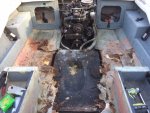
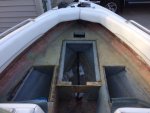
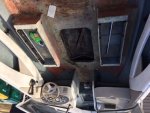
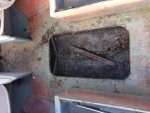
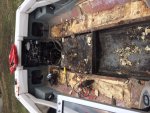
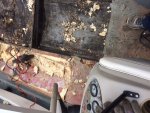
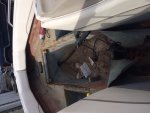
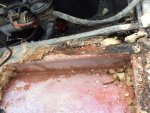
Alright folks, kinda new to the site. Going to start tearing up my soft floor. What I want to know is what type of material I need. I will be using 3/4 plywood, but I am assuming my stringers are bad and praying the transom doesn't need replacement. I've never done a floor, but from reading, ive noticed it's gonna get messy.

Questions are- what type of material cloth is needed? Certain amount of thickness or layers? Can you put multiple layers on right away? Or do you have to let one dry sand t then re apply another layer? What type of glue do you guys use to adhere the stringers together, besides fiberglassing it to the hull?

Any help would be greatly appreciated. I'm assuming doing this project myself looking around 2,000, if everything has to be replaced. That good estimate?
 

Scott Danforth

Grumpy Vintage Moderator still playing with boats
Staff member
Joined
Jul 23, 2011
Messages
50,343
Start by going thru the DIY sticky. specifically link 14, then link 2, 3, 4a, and 4b http://forums.iboats.com/forum/boat-...at-information

3/4" is too thick. your floor currently is 1/2" with fiberglass on both sides

plan on doing the transom too. that rotted long before the floor showed any signs of rot

going to assume you have an older boat, so most likely polyester resin, 1.5 oz CSM and 1708 will be the materials, however dont order a thing until you get to the part were you need to order.

first, and foremost. get a tape measure, a camera, and start documenting everything. I recommend a notebook to write things in and to put sketches with dimensions in.

the boat will need to be supported during the restoration. usually a cradle is built.

pull everything out of the boat. if this is an outboard, pull the motor and put it on a stand. if this is an I/O, pull the drive, then pull the motor (search for how-toos)

I would pull the cap. it may seam daunting, however it is the best and easiest way to get access to everything.

once you have stripped everything out of the inside of the boat and removed the cap, then document the location of all the holes, access, etc. you may be able to even see the original seam for the floor.

now, set the circular saw depth to about 5/8" and remove the floor.

now document the stringers and bulkheads. if you have an in-floor tank, document that, then remove it.

now remove all the wet and rotting foam

now remove the rotten stringers and grind down a layer into the fiberglass

move on to the transom

build new transom wood, build new stringers and bulkheads out of plywood

bed into the hull

now measure and order how much resin and cloth and mat you need.

estimate $2000-$3000 in materials and about 400+ hours of labor
 
Last edited by a moderator:

CrazyFinn

Petty Officer 1st Class
Joined
Dec 12, 2016
Messages
357
$2000 is a reasonable starting point. Don't buy/order anything until you need to, and when you do, buy it in bulk (shop around) and you will save a whole pile of money. Don't know where you are located, but chances are that somebody here will know a good place near you to buy supplies (or where to order them from).

For plywood, exterior grade is fine, you don't necessarily need to look for marine grade. For polyester resin, find a supplier for unwaxed/laminating resin. Makes putting on multiple layers much easier (you can find it in 5 gallon cans). Read through the multitude of other threads here about doing this - you will also want to get some cabosil and chopped strand fg to mix with resin to use as filler, bedding for stringers, etc.

This is all covered in great detail in other threads here, by people with far more experience than I have. Don't go buying stuff before you KNOW what you need - it's the only way you have any chance of staying within your budget.

Like Scott said, assume that your transom is rotten. It probably is - if it isn't, consider it a miracle.
 

joeltjen10

Seaman
Joined
Jul 18, 2016
Messages
54
You may want to consider using an epoxy resin instead of the Poly resin as well. Everyone has their own preference but as I've learned you don't need to glass the epoxy resin which may save some money and work.

I'm in the middle of a similar project but I don't have wood stringers to worry about and my foam is in decent condition. I did end up deciding to replace all wood in my boat including the side panels and seats. So roughly my project is going to cost me $2000 by the time I'm done.

Good Luck and if you show some pictures before and once you get it torn out, i'm sure the regulars around here will have much more to say.
 

DeepBlue2010

Lieutenant
Joined
Aug 19, 2010
Messages
1,305
You may want to consider using an epoxy resin instead of the Poly resin as well. Everyone has their own preference but as I've learned you don't need to glass the epoxy resin which may save some money and work.

I'm in the middle of a similar project but I don't have wood stringers to worry about and my foam is in decent condition. I did end up deciding to replace all wood in my boat including the side panels and seats. So roughly my project is going to cost me $2000 by the time I'm done.

Good Luck and if you show some pictures before and once you get it torn out, i'm sure the regulars around here will have much more to say.


The only situations you can skip fiberglass with epoxy is if you are using it as glue or sealer. If you are building, repairing fiberglass structure or providing mechanical bond between two structures (such as stringers with the hull for example) you can't skip the glass. Epoxy by itself will not provide nearly enough strength
 

jbcurt00

Moderator
Staff member
Joined
Oct 25, 2011
Messages
25,130
Yep ^^^

JoelJen's not working on a fiberglass boat, he's rebuilding an aluminum boat. Few (if any) of the methods he'll use are relevant, esp regarding deck and stringer reconstruction, on a fiberglass rebuild.
 

sergiophil

Seaman
Joined
Jul 11, 2015
Messages
54
I appreciate the information guys. Ya I'm gonna get the boat in my garage next few weeks and start tearing the carpet, seats out. I have a 99 bayliner Capri that I got a pretty good deal on it. I knew the floor was bad but figured I'd be able to tackle this task.

So my question, does 1708 come in different thickness, I.e. Oz, I found some that was 6 oz and 18 oz. can you just lay the 1708 down onto the stringer and then use 1708 to go over that again, or do I need fiberglass strand in between layers?

I think I'm probably gonna use polyester resins keep my budget intact in case I need to re so my whole floor.

I appreciate the help guys. Will post pictures once the build starts. Looking forward to the build.
 

Scott Danforth

Grumpy Vintage Moderator still playing with boats
Staff member
Joined
Jul 23, 2011
Messages
50,343

DeepBlue2010

Lieutenant
Joined
Aug 19, 2010
Messages
1,305
Yep ^^^

JoelJen's not working on a fiberglass boat, he's rebuilding an aluminum boat. Few (if any) of the methods he'll use are relevant, esp regarding deck and stringer reconstruction, on a fiberglass rebuild.


I understand. I just wanted to make sure the statement will not be misinterpreted by a reader who doesn't have the background.
 

JASinIL2006

Vice Admiral
Joined
Feb 10, 2012
Messages
5,724
I appreciate the information guys. Ya I'm gonna get the boat in my garage next few weeks and start tearing the carpet, seats out. I have a 99 bayliner Capri that I got a pretty good deal on it. I knew the floor was bad but figured I'd be able to tackle this task.

So my question, does 1708 come in different thickness, I.e. Oz, I found some that was 6 oz and 18 oz. can you just lay the 1708 down onto the stringer and then use 1708 to go over that again, or do I need fiberglass strand in between layers?

I think I'm probably gonna use polyester resins keep my budget intact in case I need to re so my whole floor.

I appreciate the help guys. Will post pictures once the build starts. Looking forward to the build.

Scott's right: it's probably too early to worry about ordering supplies. First order of business is getting measurements and pictures of everything that's affected, and then start taking out bad material. It's impossible to know what you'll need (or how much) until you do that. That applies to wood, resin, fiberglass, etc.

Re: your question: 1708 is a specification of the weight of the CSM and the biax fiberglass fabric. It is 17 oz. fabric stitched (diagonally) to 3/4 oz. chopped strand mat. You can buy the same fabric/CSM combinations, but with lighter fabric (e.g., 1208) or heavier fabric (e.g., 1808) stitched to the mat. The lighter stuff is easier to mold into shapes, but isn't as strong as the heavier stuff.

First order is figure out what needs to be replaced, though.
 

DeepBlue2010

Lieutenant
Joined
Aug 19, 2010
Messages
1,305
I appreciate the information guys. Ya I'm gonna get the boat in my garage next few weeks and start tearing the carpet, seats out. I have a 99 bayliner Capri that I got a pretty good deal on it. I knew the floor was bad but figured I'd be able to tackle this task.

So my question, does 1708 come in different thickness, I.e. Oz, I found some that was 6 oz and 18 oz. can you just lay the 1708 down onto the stringer and then use 1708 to go over that again, or do I need fiberglass strand in between layers?

I think I'm probably gonna use polyester resins keep my budget intact in case I need to re so my whole floor.

I appreciate the help guys. Will post pictures once the build starts. Looking forward to the build.


1708 is a composite name of the fabric weights. 1708 is 17 oz biaxial fabric and 3/4 oz CSM back. So, no, it will not come in different thicknesses or weights.

As indicated above, the 1708 is a composite fabric, it already has the CSM in its back, so you don't need to use separate layer of CSM if the only purpose of it is to promote adhesion. If the purpose is to build thickness according to a specific glassing schedule, it is a different story but you don't need to worry about that. It is not applicable to your case, I only mentioned it so the answer is not misleading to someone with different situation.
 

sergiophil

Seaman
Joined
Jul 11, 2015
Messages
54
Well started on the demolition today, and had to stop after about and hour. Floor is junk, haven't got to the stringers to fully tell if those need replacement. But I'll post a few pictures. The guy I bought it from put a nice hole in the bow for a fishing seat and drilled into the foam up front. Not to happy about that. But oh well. Let me know what you guys think, I'll be doing a lot of work tomorrow. Gotta get this done by hopefully early may!
 

sergiophil

Seaman
Joined
Jul 11, 2015
Messages
54
No Title

When I pulled floor above gas tank, someone decided to put another piece the size of fuel tank, underneath the floor, not sure if it's suppose to be that way? But tomorrow I'll post some more pictures, gonna cut the seats out then start cutting the floor.
 

Attachments

  • photo258866.jpeg
    photo258866.jpeg
    154.8 KB · Views: 2
  • photo258867.jpeg
    photo258867.jpeg
    115.9 KB · Views: 2
  • photo258868.jpeg
    photo258868.jpeg
    132.1 KB · Views: 2
  • photo258869.jpeg
    photo258869.jpeg
    142.8 KB · Views: 2
Last edited:

sergiophil

Seaman
Joined
Jul 11, 2015
Messages
54
No Title

I was able to get a lot more progress on the boat. Still have a ways to go, but I think I might pull the motor. Is there anyway to check to see if the transom is soft without pulling the motor? I was able to 90% of the foam out of the boat, and it was water logged like I imagined. I took some up close pictures, but having some input on the stringers if they need to be replaced or if they are in good condition? I appreciate any input going forward. Thanks everyone! This project is sure enjoyable and learning experience!
 

Attachments

  • photo258910.JPG
    photo258910.JPG
    156.1 KB · Views: 2
  • photo258911.JPG
    photo258911.JPG
    155.1 KB · Views: 2
  • photo258912.JPG
    photo258912.JPG
    94.8 KB · Views: 2
  • photo258913.JPG
    photo258913.JPG
    157.9 KB · Views: 2
  • photo258914.JPG
    photo258914.JPG
    186.2 KB · Views: 2
  • photo258915.JPG
    photo258915.JPG
    160.8 KB · Views: 2
  • photo258916.JPG
    photo258916.JPG
    163 KB · Views: 2
  • photo258917.JPG
    photo258917.JPG
    177.4 KB · Views: 2
Top