Lowlysubaruguy
Chief Petty Officer
- Joined
- Dec 3, 2012
- Messages
- 514
I posted late last fall looking for tips on what and how to go about this complete interior and flooring project. Thanks for all the help by the way. Id like to say I am complete, but at least I am making some progress. Lifes good I took on another project half way in its much more intense than the boat so its good practice to get my head wrapped around first LOL.
I opted for ? marine plywood cost has not become a factor there?s no holds barred im in regardless so saving a few nickels on lesser wood well its not even a thought. Im done with 23 yards of marine Nautolex Shark vinyl and have four to five more to go this is a fairly hefty project. The actual stripping process was something else, the guys who built my boat liked glue. Ive used almost five gallons of glue but I haven?t put it on as near as thick as it was anywhere. The guy who did the right side of my boat was really into the glue I worked some calories off on that side.
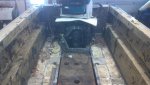
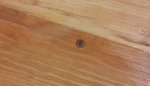
I meticulously pre drilled and countersunk ( a forsner bit leaves a clean splinter free counter sunk hole) all the holes for rivets securing the floor. Then sealed everything with numerous coats of marine epoxy resin working the resin into the holes with a .17 caliber rifle cleaning tip I had to make the holes slightly larger than the rivets and then made a special drill bit that reduced its ability to eat away the resin in the holes when I drilled into the aluminum sub framing. Out of 85 rivets I only missed one beam which was on a very narrow curved ?? bracket. I state all of this because I think this was a really good idea but took a great deal of effort to get right given that I did have to drill every hole before installation. And then when the layers above it were installed I had to put a dozen screws in that are not sealed so I wonder it was really worth all the effort. I did work silicone into half of them but many nothing could be done. I also notched out any areas in the plywood that had braces or hinges to make them sit flush . The vinyl is not as forgiving as thick plush carpet. I get why they use carpet it not only looks good but covers huge voids and uneven surfaces.
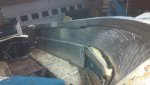
One or the biggest problem I had was curing the resin. When this is done there will have been 4 or more different sections to be sealed. December through Feb proved to be to cold to get my shop close to or above 70 degrees. Which is needed to get the resin to cure properly. So I just waited and worked on other things. Finally in the end of Feb we warmed up enough I could heat my shop. I still probably used $200 in gas to heat it for these parts. My shop is also well insulated and has a very efficient house style heater. So this is something to take into consideration. While this was a great winter project I would be done if I had started things in the spring or summer. Tips for using epoxy resin. Apply one coat let it cure and then apply multiple coats. I found this approach made for a much better and thicker seal especially on the edges over applying multiple coats one right after the other without letting one coat completely cure. I also found about 2 cups total to be about the comfortable amount to mix up at one time. I tried a larger volume to be just to much. However I had lots of edges and those holes to contend with if it was simple flat surfaces more would not have been an issue.
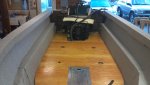
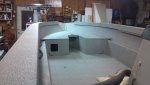
Next vinyl is roughly 1/8? or less thick carpet was probably ?? when compressed it had very thick carpet 20 or even 24 ounce I bet. As I built upwards the total dimensions of everything has changed. So none of the old pieces can be used as patterns there guides but cannot be used as an exact fit so basically everything above the floor required custom fitting. This was another pain, I expected it but expecting doesn?t change anything. One place in particular was the live well the upper decking in the bow was built around it and the subtle difference in dimensions here required some effort with my skill saw and grinder but its all good.
A heat gun is mandatory for any vinyl installation if you want my opinion. Even flat surfaces you can use it to get the glues to the perfect point before sticking it in place. A 20 foot run goes down in no time at all with a heat gun, but for corners and edges it?s a must.
I still have to make seal and install the upper halves of the consoles which will require some mental effort. I plan to pre drill everything including the holes for the windshield which will require some dead on calculations before sealing everything Im also using machine screws with these flush stainless steel anchor nuts on the back sides to help prevent stress from being a factor. This was just screwed together into the wood before. This is one of the areas that rotted out the worst. It wont be this time around, but from there its all aluminum and its already stripped so I can see the light.
I opted for ? marine plywood cost has not become a factor there?s no holds barred im in regardless so saving a few nickels on lesser wood well its not even a thought. Im done with 23 yards of marine Nautolex Shark vinyl and have four to five more to go this is a fairly hefty project. The actual stripping process was something else, the guys who built my boat liked glue. Ive used almost five gallons of glue but I haven?t put it on as near as thick as it was anywhere. The guy who did the right side of my boat was really into the glue I worked some calories off on that side.
I meticulously pre drilled and countersunk ( a forsner bit leaves a clean splinter free counter sunk hole) all the holes for rivets securing the floor. Then sealed everything with numerous coats of marine epoxy resin working the resin into the holes with a .17 caliber rifle cleaning tip I had to make the holes slightly larger than the rivets and then made a special drill bit that reduced its ability to eat away the resin in the holes when I drilled into the aluminum sub framing. Out of 85 rivets I only missed one beam which was on a very narrow curved ?? bracket. I state all of this because I think this was a really good idea but took a great deal of effort to get right given that I did have to drill every hole before installation. And then when the layers above it were installed I had to put a dozen screws in that are not sealed so I wonder it was really worth all the effort. I did work silicone into half of them but many nothing could be done. I also notched out any areas in the plywood that had braces or hinges to make them sit flush . The vinyl is not as forgiving as thick plush carpet. I get why they use carpet it not only looks good but covers huge voids and uneven surfaces.
One or the biggest problem I had was curing the resin. When this is done there will have been 4 or more different sections to be sealed. December through Feb proved to be to cold to get my shop close to or above 70 degrees. Which is needed to get the resin to cure properly. So I just waited and worked on other things. Finally in the end of Feb we warmed up enough I could heat my shop. I still probably used $200 in gas to heat it for these parts. My shop is also well insulated and has a very efficient house style heater. So this is something to take into consideration. While this was a great winter project I would be done if I had started things in the spring or summer. Tips for using epoxy resin. Apply one coat let it cure and then apply multiple coats. I found this approach made for a much better and thicker seal especially on the edges over applying multiple coats one right after the other without letting one coat completely cure. I also found about 2 cups total to be about the comfortable amount to mix up at one time. I tried a larger volume to be just to much. However I had lots of edges and those holes to contend with if it was simple flat surfaces more would not have been an issue.
Next vinyl is roughly 1/8? or less thick carpet was probably ?? when compressed it had very thick carpet 20 or even 24 ounce I bet. As I built upwards the total dimensions of everything has changed. So none of the old pieces can be used as patterns there guides but cannot be used as an exact fit so basically everything above the floor required custom fitting. This was another pain, I expected it but expecting doesn?t change anything. One place in particular was the live well the upper decking in the bow was built around it and the subtle difference in dimensions here required some effort with my skill saw and grinder but its all good.
A heat gun is mandatory for any vinyl installation if you want my opinion. Even flat surfaces you can use it to get the glues to the perfect point before sticking it in place. A 20 foot run goes down in no time at all with a heat gun, but for corners and edges it?s a must.
I still have to make seal and install the upper halves of the consoles which will require some mental effort. I plan to pre drill everything including the holes for the windshield which will require some dead on calculations before sealing everything Im also using machine screws with these flush stainless steel anchor nuts on the back sides to help prevent stress from being a factor. This was just screwed together into the wood before. This is one of the areas that rotted out the worst. It wont be this time around, but from there its all aluminum and its already stripped so I can see the light.