Bravo 3 trim cylinder leak

Status
Not open for further replies.

gapple12

Petty Officer 2nd Class
Joined
Sep 15, 2013
Messages
174
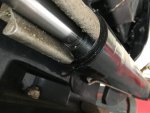
So as I’m working on my boat this past weekend, I noticed a small puddle under the outdrive. Further investigation I found it’s leaking from starboard trim cylinder where the shaft enters the cylinder (pic attached). I would say it dripped about a tablespoon all day on the ground. I’ve researched a little and everyone says it’s a easy job doing the break down and replacing the seals. True or should I just replace the whole cylinder? I’m seeing them up around $300 a side but the rebuild kit is around $20.

im not sure I’m finding the right parts, are all mercury bravo 3 drives the same?
 

Attachments

  • photo285629.jpg
    photo285629.jpg
    1.9 MB · Views: 3
Last edited:

alldodge

Moderator
Staff member
Joined
Mar 8, 2009
Messages
42,568
Yes, easy enough to just rebuild. Will need to either make or buy a pin type spanner wrench to remove end. Look for seal kit 25-87400A2
 

gapple12

Petty Officer 2nd Class
Joined
Sep 15, 2013
Messages
174
Yes, easy enough to just rebuild. Will need to either make or buy a pin type spanner wrench to remove end. Look for seal kit 25-87400A2

OK, thank you. Do I need a serial number off my out drive to verify that is the right kit or are all Bravo 3 the same rebuild kit? I just read a thread where a guy left the anode on the end and used channel locks to twist the end cap off instead of buying the special tool. Sounds like a good idea as long as i dont mess up the anode. Also, since this is a hydraulic set up, is it better to leave it in place then disconnecting all the lines during the rebuild?
 

alldodge

Moderator
Staff member
Joined
Mar 8, 2009
Messages
42,568
A Bravo is a Bravo, and the transom assemblies are all the same. The bravo upper is the same for a 1,2 or 3, the lower is only thin that changes.

Yours is new enough that we don't need to look at the first gen bravo, but even those use the same seals. You can try to use the anode and see if it will work, my only thought is if the screws snap (doubt it, but anything is possible.

If you took a piece of steel and drill a hole in it a bit larger then the shaft on the cylinder, and drill close to the end. Then take a hacksaw and make the hole a U. Now measure the holes and drill two smaller holes in the steel. Find drill dits that will fit in backwards into the screw holes. Place the steel on the cap and insert the drill bits thru the steel and into the screw holes.

I use drill bits instead of screws because they are hardened
 

gapple12

Petty Officer 2nd Class
Joined
Sep 15, 2013
Messages
174
A Bravo is a Bravo, and the transom assemblies are all the same. The bravo upper is the same for a 1,2 or 3, the lower is only thin that changes.

Yours is new enough that we don't need to look at the first gen bravo, but even those use the same seals. You can try to use the anode and see if it will work, my only thought is if the screws snap (doubt it, but anything is possible.

If you took a piece of steel and drill a hole in it a bit larger then the shaft on the cylinder, and drill close to the end. Then take a hacksaw and make the hole a U. Now measure the holes and drill two smaller holes in the steel. Find drill dits that will fit in backwards into the screw holes. Place the steel on the cap and insert the drill bits thru the steel and into the screw holes.

I use drill bits instead of screws because they are hardened

That is a great idea !!

On these trim cylinders, when you disconnect the 2 lines to it, will all the fluid drain out and do you need to bleed the lines after you reinstall the trim cylinder ?
 

alldodge

Moderator
Staff member
Joined
Mar 8, 2009
Messages
42,568
Some will come out but not all. You could get a jump when putting back together by moving the piston to the bottom of the cylinder, then fill part way with transmission fluid, and then install cap.

You could, but could also just run the cylinder up down several times and it will self bleed, just watch that the reservoir doesn't go dry. Once you no longer see bubbles in the tank after going full up then down, you should be good
 

gapple12

Petty Officer 2nd Class
Joined
Sep 15, 2013
Messages
174
Some will come out but not all. You could get a jump when putting back together by moving the piston to the bottom of the cylinder, then fill part way with transmission fluid, and then install cap.

You could, but could also just run the cylinder up down several times and it will self bleed, just watch that the reservoir doesn't go dry. Once you no longer see bubbles in the tank after going full up then down, you should be good

Great, thank you for your help
 

gapple12

Petty Officer 2nd Class
Joined
Sep 15, 2013
Messages
174
Got the rebuild kit done today, wasn’t bad at all, but I need to get some fluid to top off reservoir before I run it up and down. A lot came out and I forgot to fill the cylinder before I reassembled it. What fluid do I use ?
 

211libwtfo

Petty Officer 1st Class
Joined
Jul 29, 2016
Messages
346
Really? And I would’ve put tranny fluid in. Huh one more reason I love this place
 

gapple12

Petty Officer 2nd Class
Joined
Sep 15, 2013
Messages
174
Is that what I pour into the reservoir? Motor oil, really ?
 

gapple12

Petty Officer 2nd Class
Joined
Sep 15, 2013
Messages
174
Ok, much cheaper then buying the trim fluid. Since I didn’t fill the cylinder when I reassembled it, just running it up and down until it fills will be ok ? I guess I just don’t let the reservoir go to low ?
 

Bondo

Moderator
Staff member
Joined
Apr 17, 2002
Messages
71,088
Since I didn’t fill the cylinder when I reassembled it, just running it up and down until it fills will be ok ? I guess I just don’t let the reservoir go to low ?

Ayuh,...... Exactly,...... it's a self-purgin' system,....
 

gapple12

Petty Officer 2nd Class
Joined
Sep 15, 2013
Messages
174
Great, thanks again to everyone for your help, love these forums :)
 

gapple12

Petty Officer 2nd Class
Joined
Sep 15, 2013
Messages
174
Well, happy to report the job is done and not leaking. Easy fix and I didn't need the special tool. :joyous:
 
Status
Not open for further replies.
Top