Re: Correct way to measure a cylinder for wear.
Yes they achieve the same result but to to properly set up a dial bore tool takes to long in my opinion and you still have to use a "mike" either way. I set mine up to a base measurement and zero, then I can see if if measurement are over/under(.003) from base setting. If the taper/wear is under measurement then I measure with t-bar style guages and read the results on a micrometer. A cylinder can be worn evenly and be out of spec's. Below is how to set up a bore guage.
Determine the rough opening with a machinist's rule or micrometer and record the measurement.
2
Select and install the appropriate anvil. The anvil should be long enough to contact the side of the bore and slightly compress the stud when inserted into the hole. Do not use an oversized anvil and try to force the indicator, as this will likely destroy the accuracy of the tool.
3
Select a micrometer in the appropriate range. Most cylinder bores will be in the two-to-three-inch or three-to-four-inch range. Set the micrometer for the target measurement or for an arbitrary measurement. The arbitrary measurement should be close to the target measurement and be an even number that will be easy to do quick math on to arrive at the actual measurement. Record this number on paper with room to do simple addition problems.
4
Insert the anvil and stud between the micrometers machined surfaces. Rotate the bezel until the "zero" is in line with the needle position. The DB indicator is now ready to read a measurement relative to the setting.
Using the Dial Indicator
1
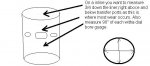
Insert the base of the indicator into the hole. Ensure that the two contact points are 180 degrees from each other and that neither the anvil nor the stud are hanging on scoring or the cross-hatch pattern of the bore wall.
2
Hold the indicator as near to vertical as possible and gently and slightly rock the DB indicator along the anvil/stud axis. The needle will swing clockwise as the tool comes to vertical and the anvil/stud come to their proper position. Read the number on the dial at the point where the needle stops rotating clockwise and attempts to start backing down in a counter-clockwise direction. This is the "relative" measurement. The number may be a positive or a negative . Record this number and remove the DB indicator from the hole.
3
Add or subtract the positive or negative number, respectively, from your target or arbitrary number. This final adjusted number is the actual measurement of the hole.
Read more: How to Use a Dial Bore Gauge | eHow.com
http://www.ehow.com/how_5531369_use-dial-bore-gauge.html#ixzz16X59sDC7