serek
Recruit
- Joined
- Jul 13, 2020
- Messages
- 4
Hello,
I am new to the forum as a member, but I have read tons of posts here. Finally, I have something small to contribute back, hopefully someone will find it useful. I am currently working on fixing few issues with my 2007 Volvo Penta 3.0GLP-J with SX-A drive. Among them is the fitting as in subject - Volvo PN 23238467, which according to Volvo official website replaced PN 3883597 for quality reasons.
My fitting snapped almost flush as it goes into the back of bell housing, so to remove the screwed in part I had to drop the sterndrive, carefully hacksaw and pray out the old fitting bit by bit. After that, I have cleared the thread truly using small pick tool and Dremel with wire brush attachment. With the thread looking perfectly clean, the new fitting goes into it, but gets stuck after about 3 full turns. More brushing, filing the thread slightly and greasing the new fitting, still not easy.
So, down to the point - Volvo Service Manual list the special tool for installation of this fitting Volvo PN 3849648. Based on that, I have decided to make my DIY version of it.
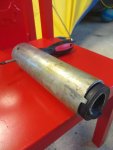
1. The base for the tool is a steel pipe/poll with OD of 2" and ID of 1 3/4". Mine is galvanised, but it makes very little difference. The pipe is little bit too wide, but narrow enough, so the fitting doesn't fall into it. The fitting has two notches that the original installation tool use, so I have grabbed my trusted friend Dremel to cut out the end of the pipe, leaving two notches. Once done, I have filed it for perfect match.
2. I used the hammer to reduce the width between two pins in the pipe (made slight oval from the round pipe at one end), so both pins catch the notches in the fitting at the same time.
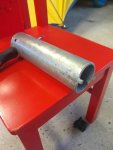
3. I measured the working space between the bell housing and gimbal ring/transom plate - you want long enough, but not too long as it will get harder to push it in place and remove - I think my tool ended up being c. 10" long.
4. Drilled few holes through the pipe on the opposite end for the screwdriver - the idea was to space them every 45 degrees, but I wasn't scientific and wasn't aiming or any award - it's not pretty, but I'll do the job.
5. Filed edges a bit, so it's safe to handle - all done in about 30 mins.
I have not provided any precise dimensions as I wasn't really measuring it. I used the broken fitting to test and adjust as I was working on it - the broken fitting shown in the pictures.
Note: I have my exhaust bellows taken out currently as I am replacing it as well. Not sure how easy it will be to push the tool in with bellows installed.
Hope this will make life easier for someone.
Regards,
Sergiusz
I am new to the forum as a member, but I have read tons of posts here. Finally, I have something small to contribute back, hopefully someone will find it useful. I am currently working on fixing few issues with my 2007 Volvo Penta 3.0GLP-J with SX-A drive. Among them is the fitting as in subject - Volvo PN 23238467, which according to Volvo official website replaced PN 3883597 for quality reasons.
My fitting snapped almost flush as it goes into the back of bell housing, so to remove the screwed in part I had to drop the sterndrive, carefully hacksaw and pray out the old fitting bit by bit. After that, I have cleared the thread truly using small pick tool and Dremel with wire brush attachment. With the thread looking perfectly clean, the new fitting goes into it, but gets stuck after about 3 full turns. More brushing, filing the thread slightly and greasing the new fitting, still not easy.
So, down to the point - Volvo Service Manual list the special tool for installation of this fitting Volvo PN 3849648. Based on that, I have decided to make my DIY version of it.
1. The base for the tool is a steel pipe/poll with OD of 2" and ID of 1 3/4". Mine is galvanised, but it makes very little difference. The pipe is little bit too wide, but narrow enough, so the fitting doesn't fall into it. The fitting has two notches that the original installation tool use, so I have grabbed my trusted friend Dremel to cut out the end of the pipe, leaving two notches. Once done, I have filed it for perfect match.
2. I used the hammer to reduce the width between two pins in the pipe (made slight oval from the round pipe at one end), so both pins catch the notches in the fitting at the same time.
3. I measured the working space between the bell housing and gimbal ring/transom plate - you want long enough, but not too long as it will get harder to push it in place and remove - I think my tool ended up being c. 10" long.
4. Drilled few holes through the pipe on the opposite end for the screwdriver - the idea was to space them every 45 degrees, but I wasn't scientific and wasn't aiming or any award - it's not pretty, but I'll do the job.
5. Filed edges a bit, so it's safe to handle - all done in about 30 mins.
I have not provided any precise dimensions as I wasn't really measuring it. I used the broken fitting to test and adjust as I was working on it - the broken fitting shown in the pictures.
Note: I have my exhaust bellows taken out currently as I am replacing it as well. Not sure how easy it will be to push the tool in with bellows installed.
Hope this will make life easier for someone.
Regards,
Sergiusz