Evinrude 40973R 40HP Selectric Shift - Forward Spring and Gear Hub - Slipped?

Joined
Jul 22, 2016
Messages
52
Hello again!
Continuing to investigate what feels like "slippage" on my Evinrude 40HP Selectric shift outboard, I've dismantled the LU and am preparing to install a long shaft conversion kit, replace a bunch of bearings and seals. To review the symptoms:

-Engine sounds great and runs great. Propulsion feels roughly proportional to engine speed until about 1/2 throttle. After that, engine will continue to spool up, but no more forward thrust is made.

Things I've verified:

-I have 12VDC back to both the F and R coils
-Both coils test within resistance specification
-Propeller is not spun about its hub
-Passed the spin test (w/ engine off, put into forward, it spins infinitely in reverse direction but, spinning in forward direction, it will go half turn or so then lock up. This checks out for both forward and reverse)

Which leaves me with thinking either:

1. I need the longshaft conversion, to get that prop further in the water and reduce slosh/cavitation? (its getting the long shaft either way)
2. And/or the forward gear spring is slipping about the forward gear hub.

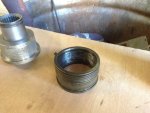
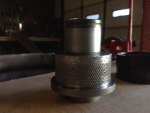
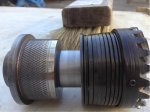
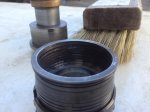
SO I wanted to get your eyes on option #2. Here are some photos of the forward spring and gear hub.

I see that the hub is mostly knurled. I do see light galling on the hub, but that's why I need a second set of eyes. Does that look like a normal, acceptable amount of wear, or is that an indicator that I'm slipping the spring? Being optimistic, I would imagine it would accumulate light wear from an instant of slippage, basically every time you engage forward. For that quick instant between neutral and forward, where the spring is still wrapping tight, you could have minor minor slip that would show wear like such? The galling doesn't look heavy enough to me to be a consequence of constant, continuous slippage.

But, i'm interested in your opinions. If that IS worn, what are your thoughts on swapping the front assembly with the rear? The manual does say they are the same... funny thing to me is the reverse assembly (not pictured) actually isn't knurled at all...

Thanks!
 

Attachments

  • photo278063.jpg
    photo278063.jpg
    119.4 KB · Views: 1
Joined
Jul 22, 2016
Messages
52
No Title

And a picture of the interior of the spring...

For what its worth, putting a set of calipers on there, the OD of the knurled section measures within 0.001" continuously, over the knurled portion toward the polished section.
 

Attachments

  • photo278064.jpg
    photo278064.jpg
    120.7 KB · Views: 0

F_R

Supreme Mariner
Joined
Jul 7, 2006
Messages
28,226
Well, if you are running a short shaft motor on a boat designed for a long shaft, there is your answer. The prop is ventilating (air around the prop).
 
Joined
Jul 22, 2016
Messages
52
Haha, ok F_R , point taken. Though I've tried to do some research to figure out, how do I determine if its a mismatched shaft length to boat situation? I haven't gotten any super concise answers. Best I've got are "prop centerline should be about level with keel when boat sits in the water, if anything a few inches under...", which just eyeballing, looks about right. Which makes me wonder if something else is wrong with the engine, or if the prop needs to be even further still into the water.

I hardly know the make/model of this boat, so it'd be hard to know what engine it would've come with. Best guess its a 1960s Starcraft Riviera. I know it came with the J/E 40HP, but I don't know leg length...

Either way, I'm putting the long shaft kit on, so we'll see if that helps!
 

jimmbo

Supreme Mariner
Joined
May 24, 2004
Messages
14,063
Just out of curiosity, what is the measurement of your boats transom?
Looking at the parts I would say it was run, at some point, with a lot of water in the oil, or just too low of an oil level. It might just be the light, but the teeth on the gear look pitted on one face and a bad contact pattern on the other.
outboard.jpg
 

F_R

Supreme Mariner
Joined
Jul 7, 2006
Messages
28,226
The above picture is good for today's motors. At least a good point to start, that is. But your old 1969 motor is old school, when a lot of wood boats with keels were still in use. The cavitation plate would be expected to be a bit lower, possibly an inch below the boat bottom. If you want to tweak it from there, you can raise the motor a bit until you get excessive ventilation, then back down as required. In actual practice, most people hang it on the boat and leave it wherever it is. Hopefully, the boat builder took all this into consideration.
 

F_R

Supreme Mariner
Joined
Jul 7, 2006
Messages
28,226
BTW, you mention prop shaft even with the keel. That's race boat stuff. Fine for all out top speed on an overpowered go-faster boat, but not worth a hoot for getting the boat moving or carrying a normal family/pleasure/fishing fishing boat load. Ever watch a race boat get going? Sometimes it is all they can do to get it up and moving.
 
Joined
Jul 22, 2016
Messages
52
the prop even w/ keel is just a comment I got from someone. Obviously pretty arbitrary. My prop's centerline is probably just 1ish inches below. It seems obvious it needs to be lower. I'll pull a measurement off my transom when I have a moment. The long shaft conversion will probably do quite a bit for me BUT....

I am still trying to figure: Does anyone, ideally someone with experience with Evinrude selectric shift gearcases specifically, see any problems with the spring and hub assembly I have shown? Does that look like that spring is slipping about the hub? If not, then it is practically certain that the long LU is the fix to my problems.

yes jimmbo i see uneven wear pattern on teeth but not so much pitting. Water in oil almost definitely, again partly the reason I'm rebuilding the LU, I have all replacement seals and gaskets and stuff to get that gearcase super watertight.
 
Joined
Jul 22, 2016
Messages
52
Mechanical forensics! Its not necessarily that "you can tell if the [spring] is going to slip by looking at the parts", its more of "can you tell if the spring was slipping based on the wear that is present on the parts". My gut tells me that the wear visible on the gear hub and spring is incidental of normal use, and not indicative of slippage b/w spring and hub, but looking for a second opinion, since I am not intimately familiar with this exact mechanism. If I worked on these gearcases day in day out, I'd be able to tell what was acceptable and normal wear, and what wasnt. I'm plenty comfortable taking apart machines of all sorts, its when you get into the "application specific" type questions that I need a second set of eyes. I work on motorcycles, mostly ;)

Also, taking it apart was really the only option... whether I needed the longer LU or to replace gearcase parts, the LU has to come off. To dismantle the gearcase proper is not that much extra work. Set of retaining ring pliers and a hammer, really. AND because as Jimmbo pointed out, I have water incursion into gearcase, I had to get in there anyway to replace o rings and seals.

So at minimum I come away from this rebuild with a long shaft LU, which likely solves my prop depth problem (potentially and hopefully my only problem), and a properly sealed watertight gearcase which is important no matter what (if not a contributor to possible gearcase malfunction). If the boat STILL acts funny, well then my gut is wrong, and the spring is slipping about the hub, and I have to get in there again :(.
 

jbuote

Lieutenant Junior Grade
Joined
Aug 17, 2016
Messages
1,001
Not an expert at all, but there was another post not too long ago about that spring slipping. Towards the end of it, there's a solution.

​Now, I don't know if doing this "Fix" now while it's opened up would help, hinder, or have no impact. Would seem shaft length is more the issue by previous suggestions here.
​Obviously, if it ain't broke, don't fix it, but maybe the true experts here could indicate if surfacing the inside of the spring now would be worse than leaving it alone since it's most likely NOT the issue..

If it's opened up now anyway???

Just simply food for thought, and I'm personally not suggesting you do this necessarily..
​Rather for your reference and for yourself or others to suggest a yes or no on if it makes any sense to do while it's open.. lol

Here's the post I'm referring to:
http://forums.iboats.com/forum/engin...0-85-90-100-hp

Of course the flip side, is doing 2 things at once won't tell you which one solved the issue really..

Oh well.. Just a thought..
​For what it may be worth...
 
Joined
Jul 22, 2016
Messages
52
very cool! Thanks for the link jbuote ! I am going to message Driftwood Jim to have him take a look at my photos. Basically he just resurfaces the frictional surfaces. A method I use frequently on old drum brakes and clutches. Looks shiney? Too slippery. Rough it up.

Looking back at my photos, only a portion of the gear hub is "glazed". The rest of the knurling is like perfect. Its easy enough, and I don't think it will hurt anything, that I will probably follow suit and rough up the surfaces as described.

Yes, I'm sorta taking the "shotgun" approach. Fix as much stuff as you can and hope it works. Honestly, I'm not particularly so concerned with knowing what the problem was in the first place, as much as I am with just fixing it! Hence the shotgun approach.
 
Joined
Jun 19, 2017
Messages
26
1- Make a continuous magic marker line on the prop from the inside to the outside on the backside as turning by hand does not provide enough force to prove it does not spin or is partially spinning. Do this so you can compare it after you go back out on the water. This will help eliminate the spun prop if you have multiple problems at the same time. I found when my LU was slipping it gave similar symptoms as you described.

2- Suggestion- How about a Jack Plate to fix the height issue. Less parts and cost.

3- Hub and the inside of the spring look to be in good condition. Yes there is certain amount of glazing here, but not abnormal for the time on these parts. From what I can see in the photo there is enough glazing to cause slipping and I strongly suggest you do the following as everything will be evened up and taken care of when you resurface these areas. This procedure is EASY to complete!!!

If you read my post listed in tashasdaddy files - Closed, Sticky:Top Secret File (UPDATED 7/13/2017)
Started by tashasdaddy

Link- http://forums.iboats.com/forum/engi...shifting-that-jumps-slips-out-of-forward-gear

it describes in detail how this unit works and how to resurface these areas. THE WHOLE HUB/SPRING INTERFACE NEEDS TO BE VERY ROUGH! Not just the knurled- cross hatched- area. Both parts hub and spring.

Since you have taken it apart already I would strongly suggest doing the resurfacing to the Front and Reverse Hub/Spring. After 50+- years there is wear and glazing in both of these areas. This will need to be done soon even if it is not now slipping. Might as well do it while everything is apart.
This procedure is EASY to complete!!!

The difference will be markedly noticed. Make sure the RPMs are down when shifting as it will engage fully and instantly.

Front and rear hubs are different and should not be swapped as the front is knurled for additional friction due to more sustained force being applied while running. The reverse hub is not knurled as it experiences less force as reverse is only used briefly and usually with less power applied.

Any questions, you can PM me again and I will gladly help for I have one and have been down this road.
 
Joined
Jul 22, 2016
Messages
52
1 - already tested for spun prop, its fine
2 - too late for jack plate, i found this long shaft kit pretty cheap on Ebay and its kinda cool anyway.
3 - ok, so you say they are in good shape yet show enough glazing to cause slipping? I guess its worth roughing them up either way before reinstall. I will coarsen as per your suggested procedure. though I may spin the hub on the lathe and sand it there.

hey, if you email me the pictures you took of your spring before/after (I dont know if you were ever able to upload any) I can resize them and post them. I will probably post photos of mine. would be interesting to compare.

i guess i have no reason to swap F/R at this point anyway - yea it is odd the manual says they are the same part but F is clearly knurled while R is not...
 
Joined
Jul 22, 2016
Messages
52
No Title

so I went to it this AM. I had trouble getting the medium emery cloth to bite into the hardened steel in any appreciable way, so I went a bit more aggressive... used a fine abrasive on a die grinder while spinning on lathe. just did a few "kiss" passes to take the polish off and put some coarseness into it. I think it should help, though I don't know how bad it was in the first place...
 

Attachments

  • photo278202.jpg
    photo278202.jpg
    57.2 KB · Views: 0

jimmbo

Supreme Mariner
Joined
May 24, 2004
Messages
14,063
The gears and spring coils are identical, their bushing/bearings are not, and neither are the Hubs.
 
Joined
Jun 19, 2017
Messages
26
The spring does not wear evenly. Mine had small diagonal strips of wear on the inside, the spring does not engage evenly on the hub therefore there are areas untouched by the hub and consequently no wear visible on the spring.

You picture is not close enough to see anything of the spring inside surface. From what I can see you did not even knock all the varnish from the 50yrs of oil off. Very dirty. My original solution post that I linked to has a close up photo of a new spring showing how the inside texture should look like. Zoom in on it.

The emory cloth cuts just fine, you could use Coarse cloth also, but you have to get in there and do the work. Not just KISSES!! Not just some coarseness the WHOLE THING needs to be done!

Use NEW Emory cloth!

The whole inside should end up clean metal. Like it was a new part. Do the job correctly and stop taking short cuts with the machining. Put a little elbow grease into it. Once you get going the cloth cuts just fine.

The hub looks great
 
Joined
Jul 22, 2016
Messages
52
the photograph is fine. you can see that there is shiney, coarse metal on the interior of the spring. it is at least the same quality of the ebay photo of the NOS coil you posted.

There is no varnish. There is no dirt. Personally I would assume that I could not make out a photograph sooner than I would suppose somebody's work is subpar.

Oh, new emery cloth? Gee great idea I've just been using the piece that was stuck to the bottom of my shoe ;).

It all looks sufficiently coarsened to me. We'll see how it goes sometime this week...
 
Top