Exploratory surgery.

crunch

Commander
Joined
Aug 1, 2006
Messages
2,844
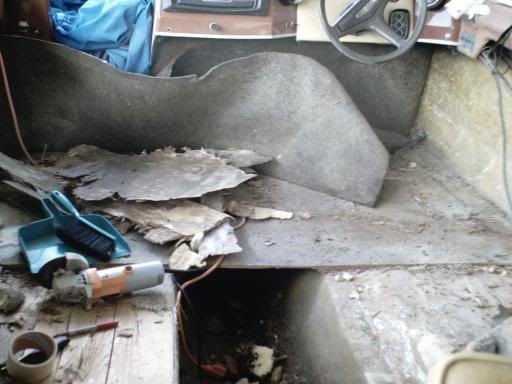
I dug into the floor today, not like anything I expected to find....

boatbeforeproject024-1.jpg


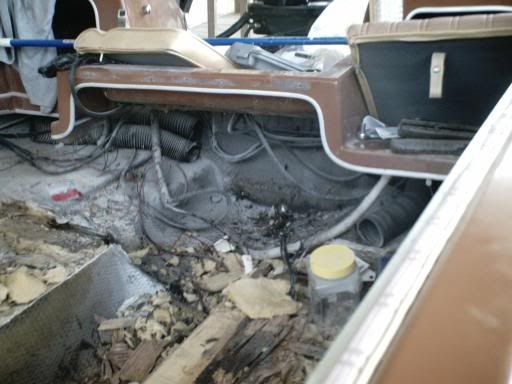
In the foreground you can see the bilge, I cut the fiberglass wrap off what I thought was a rotten stringer with a 1x10 cap.... there is no stringer!!!

boatbeforeproject025-1.jpg


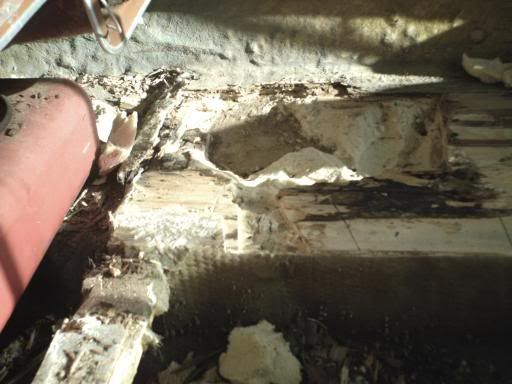
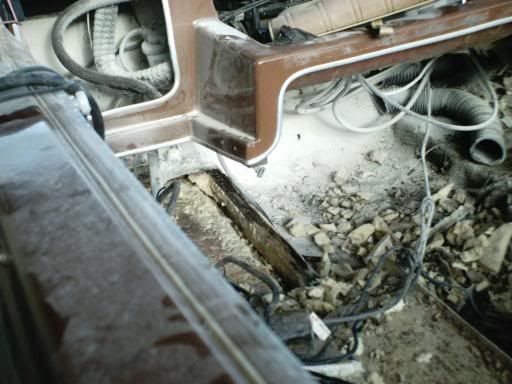
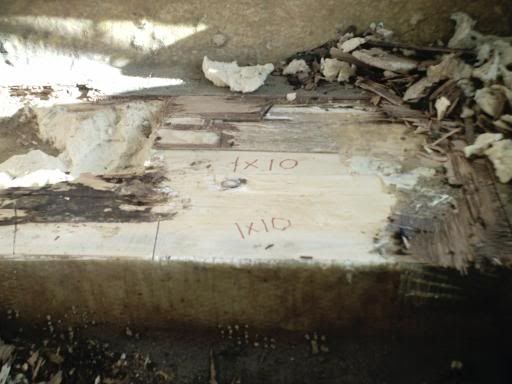
Apparently what they did was mount a 2x4 flat, just forward of the gas tank (that's as far as the floor goes)tapered on the outboard ends to fit the hull and ran it across to the other side, glassed all that in, then stapled!!! the end of a 1x10 White pine !!!! to that and ran it forward. Then stapled a 1x4 pine to the 2x4 to the hull for the back floor support.

boatbeforeproject026-1.jpg


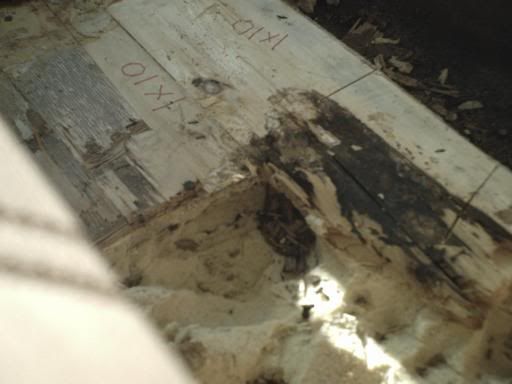
They scabbed on another 1x10 about 2' from the rear for something to bolt the seats down to, then epoxied and stapled 1/2", 4 ply BB plywood to the 1x10's and let it float on the outside.... glassed all that to the hull, drilled 2, 1" holes on each side and poured the flotation... not a flat floor.

I plan to continue to remove floor up to the dash area, but I'm 3' from the back of the start of the floor and have not seen any evidence of stringers!!! The foam is dry, the wood is only rotten 2 1/2 feet from slash well, then solid so far.

The bilge is a deep V... 12" deep, 16" wide at top, and 1/4 thick fiberglass... could this be what they use for strength? Very shallow V on this Tri-hull.... Thoughts anyone?
 

crunch

Commander
Joined
Aug 1, 2006
Messages
2,844
Re: Exploratory surgery.

Wow... Can anyone tell me how to make the pics smaller?... kinda hard to read:'(
 

crunch

Commander
Joined
Aug 1, 2006
Messages
2,844
Re: Exploratory surgery.

Opps, way to small... I'll finger it out... 8)
 

Bob_VT

Moderator & Unofficial iBoats Historian
Staff member
Joined
May 19, 2001
Messages
26,065
Re: Exploratory surgery.

Out of sight - out of mind! 90+% (probably closer to 99%) of the end users never see under the deck and we never see the construction at the factory in progress. I am not surprised.

The true question is what is a better way to rebuild it?

If you are this far in I would do the entire bottom.
 

crunch

Commander
Joined
Aug 1, 2006
Messages
2,844
Re: Exploratory surgery.

Thanx Bob, But when I got this boat I didn't get it because I needed a big project to tide me over the next 2 years. (I get plenty of big projects to keep life interesting)

After sleeping on it over night I think I'll stop at 4' with the floor, 3' with the 1x10's...fill voids in foam with spray expanding foam, scab fresh 1x10's where the rotten ones were, 1/4" glass wrap just like it was on side of bilge, new 5 ply AB in cutout section, Glass the whole floor (old floor was not glassed over bilge), and enjoy the boat in about 2 weeks 8)


No sense fixin it if it ain’t broke....
 

crunch

Commander
Joined
Aug 1, 2006
Messages
2,844
Re: Exploratory surgery.

UPDATE:

Plan was good until I pulled fuel tank and explored a bit aft, no major problems, but my fertile mind came up with an idea.

Why not move the fuel tank forward? This boat has to be ass heavy, it has a 251 lb. engine on the back, a fuel tank that holds 18 gal. ( 115 lbs.?) a battery that has to weigh 30 lbs. and a trolling motor I'd guess at 40 lbs. (it's a wonder that it doesn't go under at the stern as soon as it's put in the water :$

It must have been a problem before... it has a Whale-tail on it.

I have all the original hardware and it looks to be in good shape. I'm thinking:

Change the old, square, flat metal fuel tank to a long, narrow, flat, long poly tank and stuff it up under the BOWRIDER? deck.(can't stuff it that far, but what I have in mind would put the fuel about at the center of gravity)... I have an open Chanel about 1 ft wide by 6 inches deep, and about 4 ft. long amidship.

So here is the big Q. SPACE VENTING. Old tank has vents both sides that run to old tank space (one facing forward, one back) can I just extend those vent hoses through the bilge area (lotsa room) and vent through existing external vents?

New tank will be totally enclosed (hatch for wires, tank vent, fill pipe, sender, but tank will be built in.

I know I’m making a built in bomb, I’d just like to disarm it.
 

ziggy

Admiral
Joined
Jun 30, 2004
Messages
7,473
Re: Exploratory surgery.

cbyc, ya might try the uscg web site. they have boat building specs there. that may shed some light on what ya want to do with yer fuel tank. i'm guessin there are things ya can do and can't do. sorry i'd leave a link for ya but i just got a new puter and have lost the link for now........looks like were in the same boat for now. floor tore up. though i don't think i'll be back on the water in 2 weeks. your pretty ambishes. go get'em man.
i'm havein trouble figureing out where (what part of) yer workin on yer boat. perhaps a pic a little further away so we can see the big sceem of things.....if ya want of corse....:)
 

tmcalavy

Rear Admiral
Joined
Aug 29, 2001
Messages
4,005
Re: Exploratory surgery.

Another option I didn't mention in you original thread is trading up. If total reconstruction doesn't appeal to you, there is a good thread that shows what you can do with a little horse trading, common sense and good luck...whether you refit and keep the boat or decide to move on to something else.
Here's the link:
http://forums.iboats.com/bbBoard.cgi?a=viewthread;fid=1;gtid=1155149
If the link doesn't work, go to the Boats Topics and Questions forums and look for Thanks to Iboats w/pics thread.

TWM
 

crunch

Commander
Joined
Aug 1, 2006
Messages
2,844
Re: Exploratory surgery.

Home of old fuel tank, future home of battery, battery was on starboard side rear.

boatbeforeproject030.jpg


Where I'm thinking of relocating tank... I can cut out center floor as far forward as I want as I'm going to overlay the whole floor with 1/2" 5 ply.

boatbeforeproject032.jpg


I'm thinking run one vent hose forward of, and under new tank and other hose just to the rear of new tank. Remove fuel fill and vent hardware and relocate that to side of boat at front kick board, or leave vent where it is and run a long hose.
 

crunch

Commander
Joined
Aug 1, 2006
Messages
2,844
Re: Exploratory surgery.

TWM,

This boat doesn't need a total reconstruction, just a bit of judicious TLC.

Thru the good advice and knowledge base I've gotten from Iboat's forums, I have:

Woken up an old outboard and it idles fine now (smoke test will be when it's finally on the water) and did all of the maintenance chores for a sleeping outboard.

Yarded out the rotten floor, determined that the flotation isn't wet, cut out all rotten wood (still going back, but the transom is solid, just have to get the last 6" where fuel tank and battery were mounted... patch the back floor that I took out, then overlay that with epoxied 5 ply.( Yup, gonna add 50 lbs)

Someday I might trade-up, but for now this is all the boat I need (once-upon-a-time I had an 18' glass over plywood cabin... must have weighed 2500 + lbs, had an 80 hp ‘rude on it, pull 2 skiers at 35 mph... this boat is 950 lbs, 80 hp merc... should fly :)

Of course the question is...the pesky fuel tank.
 

crunch

Commander
Joined
Aug 1, 2006
Messages
2,844
Re: Exploratory surgery.

Answer to pesky fuel tank is.................. gunna keep the old one, I'd have to go down to 12 gal tank to go mid ship :'(

Did find the first stringer today.

boatbeforeproject033.jpg


The thing is 1 1/4" wide. 2 1/4" high, and all of 23" long... fuel tank support.

I started following rotten decking under the slash well and got back to the transom, rot stopped 6" from transom so I'm good to go... other side is sound under slash well. ( thank God I don't have to crawl under there and grind right in my face again o:)

Transom on the inside is glassed only at the edges, not even coated. I can’t believe these boat manufacturers.

I’m going to use 17 oz. Dbl. Bi-axial tape 6 inches wide on both sides of the bilge after replacing the 1x10's to give the strength needed for the keel. Put the floor down on a bed of foam trimmed to height (bet I do a better job than they did 8) then bond the deck to the 1x10's using Thixotropic powder and resin, fillet the edges with wood flour and resin, 2 layers of the 6" bi-axial tape, then o layer of 12 oz. Bi axial cloth over floor and up the sides 12"... sound like a plan????... any ideas????
 
Top