Fiberglass layup part project***March 29-Doghouse primered!****

Boomyal

Supreme Mariner
Joined
Aug 16, 2003
Messages
12,072
Re: Fiberglass layup part project***UNQUALIFIED SUCCESS!! NEW PICTURES***

Re: Fiberglass layup part project***UNQUALIFIED SUCCESS!! NEW PICTURES***

sport15 said:
Instead of ten layers of glass, why not core with thin multiply or luan?

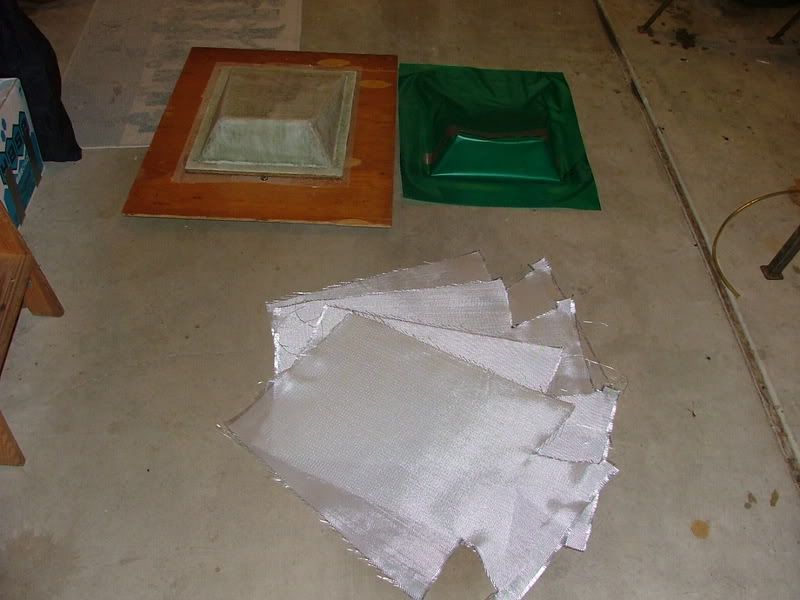
Good idea sport, but for now, I have 10 oz glass cloth coming out of my ears. (see higher up in post)

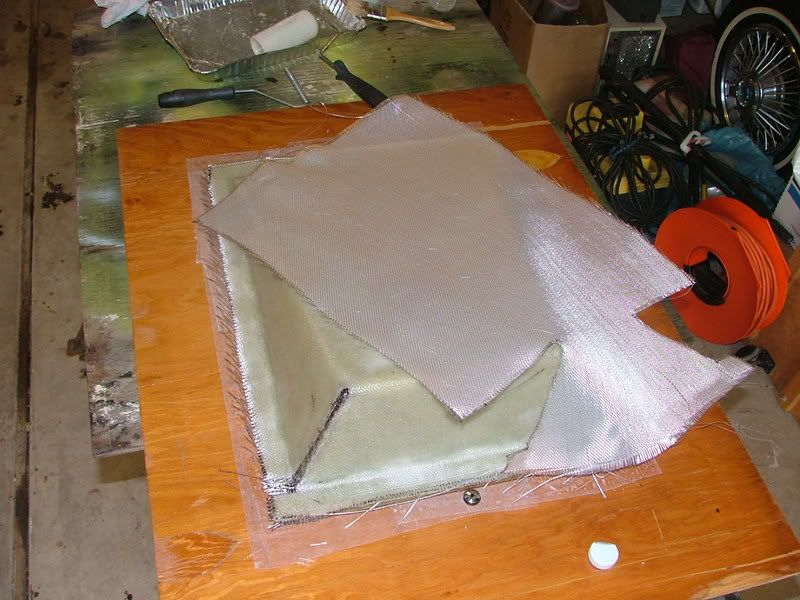
As for lauding the posting of this project, it is a two way street. I have also learned ideas from the inputs and comments left on this thread. In particular was the bagging of multiple layers at one time. It would have been very tedious if I had done it the way I initially conceived.

Now I can add your suggestion to the mix even if I do not employ it this time.
 

Boomyal

Supreme Mariner
Joined
Aug 16, 2003
Messages
12,072
Re: Fiberglass layup part project***HERE IS THE DOGHOUSE***

Re: Fiberglass layup part project***HERE IS THE DOGHOUSE***

Here are a couple of pictures of my Doghouse boo boo.

I had made a template to make sure that the amount I cut off the back of the doghouse would allow sufficient clearance of the front of the engine. I guess I only measured once. The net result was the rectangular hole (lower hole was for a floor light) had to be cut to allow clearance for the water pump pulley. My part will be glued on to the front of the DH.

The net result is that I still was able to gain the extra floor space that I'd hoped to achieve.(due to the rear slanting face of the DH) I still have to make a floor extention to cover the exposed forward end of the bilge, now that the cover has been moved back 5 inches.

Was the extra space gained worth it? Well if I combine the extra space with the experience and satisfaction in making fiberglass parts, I'd say I have come out ahead.

DSCF0505.jpg


DSCF0507.jpg
 

Dunaruna

Admiral
Joined
May 2, 2003
Messages
6,027
Re: Fiberglass layup part project***HERE IS THE DOGHOUSE***

Re: Fiberglass layup part project***HERE IS THE DOGHOUSE***

[colour=blue]Nice job, Boom!!

Now, on to more serious matters. I can't help but notice that you are showing very little respect for that classic parked in your garage. Stuff draped over the fenders, fibreglass dust everywhere. You are not a fit person to own such a beast.

Send it to me immediately!!!! 8).

Just jokin'.

But seriously, #3 Statesman Drive, Croydon, Victoria, Australia 3136.
 

wire knot

Petty Officer 2nd Class
Joined
Aug 24, 2006
Messages
137
Re: Fiberglass layup part project***HERE IS THE DOGHOUSE***

Re: Fiberglass layup part project***HERE IS THE DOGHOUSE***

Great project.
Thanks for sharing.

I gotta ask a dumb question. (thats where you say.....
.."nobody more qualified, go ahead.").

The vaccum sucks through the tire valve,
Doesn't it suck resin too?
I've wondered what keeps the resin out of
the pump?

Pardon my ignorance.

WK
 

Boomyal

Supreme Mariner
Joined
Aug 16, 2003
Messages
12,072
Re: Fiberglass layup part project***HERE IS THE DOGHOUSE***

Re: Fiberglass layup part project***HERE IS THE DOGHOUSE***

wire said:
Great project.
Thanks for sharing.

I gotta ask a dumb question. (thats where you say.....
.."nobody more qualified, go ahead.").

The vaccum sucks through the tire valve,
Doesn't it suck resin too?
I've wondered what keeps the resin out of
the pump?

Pardon my ignorance.

WK

Actually wk, a good question. In some applications they actually make a resin trap for this reason. It is simply a jar or can where the line from the part dumps in the top, and the line from the pump does the same thing. Any resin that would be sucked into the line just drops into the container.

In my case, I didn't feel that I was using enough resin to get sucked into the line. I place the tire valve under the leading lip of the previous hand laid layers. This also kept the plastic hood from being sucked down on top of the fitting. My vacuum line also formed a trap. Considering all, I figured I did not need any additional protection and I was right.

In some applications they actually use the vacuum to draw resin thru the cloth lay ups. I rolled mine on over each successive layer so there was hardly enough surplus to worry about.

Dunaruna said:
[colour=blue]Now, on to more serious matters. I can't help but notice that you are showing very little respect for that classic parked in your garage. Stuff draped over the fenders, fibreglass dust everywhere. You are not a fit person to own such a beast.

Send it to me immediately!!!! 8).

[colour=red]Mrs Boomyal said, why don't you just send it over to Aldo, it'll free up a good garage bay. But i figured it would bankrupt you in import duties so I told her we'd best keep it a while longer[/colour].;)
 

Dunaruna

Admiral
Joined
May 2, 2003
Messages
6,027
Re: Fiberglass layup part project***HERE IS THE DOGHOUSE***

Re: Fiberglass layup part project***HERE IS THE DOGHOUSE***

[colour=blue]Mrs. Boomyal sounds like a very intelligent woman, you should listen to her.

Duties be damned, I need a mid-life crisis mustang!!!!
 

Boomyal

Supreme Mariner
Joined
Aug 16, 2003
Messages
12,072
Re: Fiberglass layup part project***THE FINAL SUCK, ONE PART OFF***

Re: Fiberglass layup part project***THE FINAL SUCK, ONE PART OFF***

Here are the pictures for the final layup of THE part. The part that remains is to lay up some 3.5" tubes to make the actual drink holders with. I will then cut holes in the top of the part and glass the tubes to the part. The only hold up is that I have been having trouble finding 3.5" diameter form material. It needs to be made of some material that I can break away from the inside once the glass is laid up around it. I thought of cardboard tubes but it seems that they go from 3" to 4" and nothing in between.

Here I have cut the final four pieces and remade the plastic hood so that it was smoother than the first one.

DSCF0527.jpg


In this picture I will be wetting out the fourth and final piece of cloth.

DSCF0529.jpg


All set up for the final suck.

DSCF0531.jpg


Here is the final part. It is 10 layers of 10 oz cloth thick. The part popped right off the plug as advertized. Before I removed it, I rolled on a couple of coats of epoxy mixed with glass bubbles and some white pigment. This made it a little easier to sand.

DSCF0534.jpg


Here is a closeup of the cross section of the glass. You can see how tight it is thanks to the vacuum bagging.

DSCF0536.jpg


Although the part came out extremely well, the next time I would figure out how to make a female mold. This took a lot of time and required a lot of sanding between coats. All that would be eliminated with a female mold plus I could lay in heavier glass and do it all at once.

Here is the part clamped to the front of the doghouse, just for affect.

DSCF0539.jpg
 

CalicoKid

Lieutenant Commander
Joined
May 27, 2002
Messages
1,599
Re: Fiberglass layup part project***THE FINAL SUCK, ONE PART OFF***

Re: Fiberglass layup part project***THE FINAL SUCK, ONE PART OFF***

That's what I was thinking...

Your results look great. I like your fill coat with pigment.
 

Boomyal

Supreme Mariner
Joined
Aug 16, 2003
Messages
12,072
Re: Fiberglass layup part project***THE FINAL SUCK, ONE PART OFF***

Re: Fiberglass layup part project***THE FINAL SUCK, ONE PART OFF***

tashasdaddy said:
why not just buy some cup holder inserts,?

Remember, this excercise was to cover up a mess up that I had done with the doghouse. It was to cover the hole that I had to cut in the front, to clear the water pump pulley after I cut a strip off the back of the doghouse.

I had done this to gain more floor space from what I considered to be an excessively long doghouse.

DSCF0505.jpg
 

CalicoKid

Lieutenant Commander
Joined
May 27, 2002
Messages
1,599
Re: Fiberglass layup part project***THE FINAL SUCK, ONE PART OFF***

Re: Fiberglass layup part project***THE FINAL SUCK, ONE PART OFF***

Of course but wouldn't a couple drop in cupholders work rather than molding your own? Would be easy to pull out for cleaning too. They even have stainless, mmmm SHINEY :D

3420509c_2.gif
 

Boomyal

Supreme Mariner
Joined
Aug 16, 2003
Messages
12,072
Re: Fiberglass layup part project***THE FINAL SUCK, ONE PART OFF***

Re: Fiberglass layup part project***THE FINAL SUCK, ONE PART OFF***

CalicoKid said:
Of course but wouldn't a couple drop in cupholders work rather than molding your own? Would be easy to pull out for cleaning too. They even have stainless, mmmm SHINEY :D

3420509c_2.gif

Not a bad idea CK, you got a link for those? Sure save a lot of time and work.
 

Boomyal

Supreme Mariner
Joined
Aug 16, 2003
Messages
12,072
Re: Fiberglass layup part project***THE FINAL SUCK, ONE PART OFF***

Re: Fiberglass layup part project***THE FINAL SUCK, ONE PART OFF***

Thanks, never did look at that link. I misunderstood tashadaddy. I thought he was referring to my whole project when he suggested to buy a 'cup holder'.
 

Nova II 260

Senior Chief Petty Officer
Joined
Jul 27, 2006
Messages
681
Re: Fiberglass layup part project***THE FINAL SUCK, ONE PART OFF***

Re: Fiberglass layup part project***THE FINAL SUCK, ONE PART OFF***

Great thread !! Thanks.
 

lorax

Petty Officer 2nd Class
Joined
Nov 3, 2002
Messages
134
Re: Fiberglass layup part project***THE FINAL SUCK, ONE PART OFF***

Re: Fiberglass layup part project***THE FINAL SUCK, ONE PART OFF***

Could have made yourself a nice negative mold by applying molding making material over your very nice positive mold. Could have then put gel coat as your first layer and then laid up the cloth. Would not have needed any sanding in the end either. Just a thought.

How does this work? What's mold making material?
 

Boomyal

Supreme Mariner
Joined
Aug 16, 2003
Messages
12,072
Re: Fiberglass layup part project***THE FINAL SUCK, ONE PART OFF***

Re: Fiberglass layup part project***THE FINAL SUCK, ONE PART OFF***

lorax said:
Could have made yourself a nice negative mold by applying molding making material over your very nice positive mold. Could have then put gel coat as your first layer and then laid up the cloth. Would not have needed any sanding in the end either. Just a thought.

How does this work? What's mold making material?

That's what I'd like to know lorax. I have not yet launched off to find out. But I would like to make another piece for a friend of mine. I just won't do it the same way due to the amount of time and effort.

In principal, you use some kind of compound to make a female mold, using my male plug. Once done, you can lay up as many coats of various glasses inside the mold. You could even start out with a gel coat to virtually make a surfaced finished part, all in one step.

There would be no real need to use the vacuum because you would have gravity on your side.
 

willamettejeff

Chief Petty Officer
Joined
Nov 15, 2004
Messages
550
Re: Fiberglass layup part project***THE FINAL SUCK, ONE PART OFF***

Re: Fiberglass layup part project***THE FINAL SUCK, ONE PART OFF***

Tap Plastics has mold making materials. Also, saw something called urethane clay the other day that was supposed to be used for making molds, but don't remember where I saw it. Seems like Mark42 was also doing some molding a while back and he might have some suggestions. Hope this helps. - Jeff -
 

drewpster

Commander
Joined
Oct 17, 2006
Messages
2,059
Re: Fiberglass layup part project***THE FINAL SUCK, ONE PART OFF***

Re: Fiberglass layup part project***THE FINAL SUCK, ONE PART OFF***

What did you use, and how did you make the plastic hood, or bag. Looks like green rubber?
 

Boomyal

Supreme Mariner
Joined
Aug 16, 2003
Messages
12,072
Re: Fiberglass layup part project***THE FINAL SUCK, ONE PART OFF***

Re: Fiberglass layup part project***THE FINAL SUCK, ONE PART OFF***

drewpster said:
What did you use, and how did you make the plastic hood, or bag. Looks like green rubber?

drewpster, the material was just something that I had a roll of. It was a fairly heavy guage plastic sheet. I had a roll of similar material in translucent clear but the green roll was out in front of the stack of stuff. It was nothing high tech.

I drapped the material over the lower portion of the mold and cut it. Then I drapped another piece over the top of it, scribed it and made cuts so it laid flat over the lower part. I then used rubber cement to join the two halves together. I then applied some strips of duct tape in the corners where I had no overlapping material. Kinda like a contoured blouse for the well endowed lady.8)

BTW, this weekend I hope to cut in and mount the stainless steel cup holders. I will post pics.
 
Top