Finally got mine!

Sunsetrider

Petty Officer 1st Class
Joined
Jun 12, 2011
Messages
299
Re: Finally got mine!

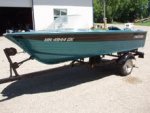
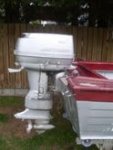
Looks like it is a Crestliner Sea Scout from the late 60s or early 70s (*sigh*). Oh well.

SeaScoutBlue.jpgSeascoutStern.jpg

Notice the cap joining the transom to the side on the red one. I think that pretty much seals the deal!

edit - I'll post the larger pics later on. Too nice out to stay inside any longer.
 

Captmills

Petty Officer 1st Class
Joined
Aug 22, 2009
Messages
374
Re: Finally got mine!

still cool to have a tinny, most of what goes on here will work to some degree on yours. besides these guy's are the best and we have all learned from each other.
 

Sunsetrider

Petty Officer 1st Class
Joined
Jun 12, 2011
Messages
299
Re: Finally got mine!

I must say that I appreciate the encouragement to hang around with my lowly Crestliner. I don't get the sense that the participation level over at the Crestliner site is the same as here. But let's keep that to ourselves!

Turns out I do have some hull rivets, and an interesting weld issue. I'm at the point where I will need a little advice. The hull has a formed centre keel as well as two riveted "keels" (? is there a term for these?) along both bottom outside edges. See first pic, where you can also see the rivets. The second pic shows (if you can discern them) these rivets from the interior. You can also possibly see that there is a spot weld every 18 inches or so along the stringer that lies just beyond the "keel" rivet line. For some reason these welds appear as 4-inch long weld blisters in a line on both sides at the bottom outside of the hull. The pic failed to make it through.

I am told (and will water-test later on) that the hill is free of leaks. What is the accepted practice here as far as treating the hull interior, whether at the welds or at the rivets? My guess is that I ought to pressure wash in there, water test for leaks, then put Gluvit around where there are rivets. Am I on the right track. While awaiting comment I will be reading my new book: "The 12-Volt Bible for Boats." :D
 

Attachments

  • Keelrivets.jpg
    Keelrivets.jpg
    27.8 KB · Views: 2
  • rivetweld.jpg
    rivetweld.jpg
    63.4 KB · Views: 2

GA_Boater

Honorary Moderator Emeritus
Joined
May 24, 2011
Messages
49,038
Re: Finally got mine!

Sunset - No shame having a Crestliner. Good boats from what I've heard. Those are probably strakes than help keep the hull tracking during a higher speed turn. Are the welds on the stringers? Maybe someone spot welded those in the past or that's how it was made. You're on the right track with the Gluvit. Clean out the hull, including limber holes if you have them, leak test and if no leaks to fix (fingers crossed) Gluvit the rivets and seams.
 

barato2

Commander
Joined
Dec 7, 2010
Messages
2,956
Re: Finally got mine!

what he said, plus maybe tape off the limber holes before slingin the gluvit. i'll do that on my next tinne resto.

nuttin wrong with Crustliners, another proud old tinnie make. Americana at its best.
 

Sunsetrider

Petty Officer 1st Class
Joined
Jun 12, 2011
Messages
299
Re: Finally got mine!

Good tip on the limber holes! Right now I'm basically alternating between sanding, sanding, sanding and thinking about how to best remove some of the more recent hardware that was bolted on with 2-inch now-rusted bolts and nuts. The self-tappers were easy peasy of course. Why would anyone use a 2-inch bolt through an aluminum skin? That was rhetorical by the way . . . :)

Funny thing, this boat is definitely 15 feet, and I believe the Sea Scout only came in a 14.
 

barato2

Commander
Joined
Dec 7, 2010
Messages
2,956
Re: Finally got mine!

cutting wheel on an air die grinder......you can get cheepie for 25 or so. angle grinder won't give you enough control and you'll gouge your alum skin. guess how i learned this.:redface:
 

Sunsetrider

Petty Officer 1st Class
Joined
Jun 12, 2011
Messages
299
Re: Finally got mine!

Huh. I didn't know about those . . . I can get one at Canadian Tire for $31 - Campbell Hausfield - and I coincidentally have a CH compressor etc. behind the DR350 in my garage. I'm guessing here that such a thing will be more effective than a Dremel with a wheel? Which so far in my experience are basically useless? Can't hurt to have one more air tool in my unused collection! Thanks for the tip.

Don't know if I'll need it all but I picked up JB Weld, 5200 tube and a quart of Gluvit today. :)
 

barato2

Commander
Joined
Dec 7, 2010
Messages
2,956
Re: Finally got mine!

i think the original idea for the Dremel was just to make a tiny version of a die grinder. but yeah, it cuts a lot faster than the tiny cutting wheels you can get for the Dremel. only advantage of the latter AFAIK is that the tiny wheels leave a very narrow kerf. i consider a die grinder to be one of my "must-have" tools
 

Sunsetrider

Petty Officer 1st Class
Joined
Jun 12, 2011
Messages
299
Re: Finally got mine!

I suspect it is best if I post my aluminum-related issues here in my own thread. Correct me if I'm wrong. So: I am working on my wiring plan, want to get it finished before doing the decking. I have downloaded some good-looking diagrams, and asked questions in the Electrical section. I've read - and continue to study - the Starcraft resto threads here and over in the Resto section. But I've yet to see much discussion about the nutz and bolts of the wiring process. Any input whatsoever on this topic would be very much appreciated - but my immediate question is: how do folks secure the wiring harness running from the battery to the dashboard along the aluminum sides under the gunwale. There is that 6-inch aluminum drop-down part that looks to be the right place to channel the wires, but with no wood to screw into, how do we support the wire bundle?
 

barato2

Commander
Joined
Dec 7, 2010
Messages
2,956
Re: Finally got mine!

you can get zip ties that have a hole for a mounting screw/rivet. i personally like short pieces of nylon webbing, cut with hot knife and holes for rivets with hot nail....very strong. it will be easier if you get your wires bundled and into some of the corrugated split wire loom first, or some people mount a section of NM conduit up under the gunwale.....good idea to get it slightly bigger than you need so you can add wires in the future if desired.
 

HarryO60

Cadet
Joined
May 23, 2012
Messages
17
Re: Finally got mine!

Nice boat....seems built like a tank with 4 stringers on a 15' boat. My guess is Crestliner of early vintage. As far as wiring and controls, steering cable and outboard shift and throttle cables PVC pipe mounted with rivets under the gunnels works really well. Your approach on wiring is very good. Making a wiring diagram will be a huge help. Go to The Hull Truth forums and look at some of the rewire work done there. That will give you an idea of what your trying to acheive
 

Sunsetrider

Petty Officer 1st Class
Joined
Jun 12, 2011
Messages
299
Re: Finally got mine!

Tanks for the replies guys. I am definitely going to incorporate some type of conduit to contain the bundle but I'll take a peek at that Hull Truth site to get a better picture of the attachment concept. As for the "tank", it does seem to me that the welded hull and deep, multiple stringers are substantially more substantial (? :eek:) than the other 15-16 footers I have seen in these resto threads. Plenty of room for flotation . . .
 

GA_Boater

Honorary Moderator Emeritus
Joined
May 24, 2011
Messages
49,038
Re: Finally got mine!

Sunset - I think you've been adopted or is that adapted by the Mob. Stick around.

As for the "tank", it does seem to me that the welded hull and deep, multiple stringers are substantially more substantial (? ) than the other 15-16 footers I have seen in these resto threads.

Now careful - We're a fickle bunch. LOL To put your mind at ease the later SC models like the Fish Master and Super Fisherman are using the same type of stringer/rib construction.
 

STARCRAFT16SS

Petty Officer 1st Class
Joined
Mar 25, 2008
Messages
344
Re: Finally got mine!

Welcome...stay here...keep the pics coming...love to see how you do..how the boat turns out...:D:D:D:)
 

Sunsetrider

Petty Officer 1st Class
Joined
Jun 12, 2011
Messages
299
Re: Finally got mine!

Thanks guys! The boat has been at my buddy the boat mechanic's for a while. I have it back now and plan to spend time this weekend on the interior: light sanding the inside sidewalls, Gluvit the welds and rivets, remove the rest of the deck hardware (dremel first, then if that doesn't work, look into getting a die cutter), and measure the lengths needed for the wires. Also refining the wiring plan.

I have a carpenter buddy coming Monday to start on our bedroom (cedar ceiling to replace the freaking mush-tiles) and flooring. I'll have him advise me on cutting the floor ply (not sure how to cut that slight arc) and what he thinks of putting in 1/4 inch ply sideboards (or just forget it). See, the thing is, I can see how it would be not too difficult to install sideboards but the channel that the bottom of the board would slip into sits lower than the floor level. So the decision of whether or not to put in sideboards dictates the width of the deck ply.

I am finding myself drawn to Dek Master nylon for the decking, and I believe the stock roll width would give me 6 inches up each sidewall.

There are so many aspects to this "simple" resto that my head is spinning . . . in a good way, of course!
 

GA_Boater

Honorary Moderator Emeritus
Joined
May 24, 2011
Messages
49,038
Re: Finally got mine!

what he thinks of putting in 1/4 inch ply sideboards (or just forget it). See, the thing is, I can see how it would be not too difficult to install sideboards but the channel that the bottom of the board would slip into sits lower than the floor level. So the decision of whether or not to put in sideboards dictates the width of the deck ply.

There are so many aspects to this "simple" resto that my head is spinning . . . in a good way, of course!

Sunset - The side panels are connected to the floor with an AL angle. Like this


Unless you find angle like that some where, you could do something like this


Just showing ideas.

this gives me the heebiee jeebies

Kev - It's a glasser. It's indestructible. :eek:
 
Top