Finally got mine!

Sunsetrider

Petty Officer 1st Class
Joined
Jun 12, 2011
Messages
299
Re: Finally got mine!

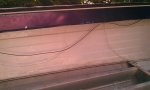
GA - perhaps I have misinterpreted the purpose of the configuration of the sides of this boat. Looking at the pic below you can see the indented lip along the bottom of the inside vertical surface of the gunwale. You can also see a darkish line running along the length of the boat near the junction with the deck surface. That line is in fact a channel about 1/4 inch wide and about the same depth, and is located directly below the aforementioned "lip." I was thinking that a length of 1/4 inch ply would screw into the lip up top and snuggle into the channel below. I would further secure the bottom edge with a triangular "baseboard" trim along the deck against the sidewall which serves to provide an angled transition for the vinyl deck covering. It is this alignment of lip and channel that is tempting me to consider sideboards. Otherwise I likely wouldn't bother. But it seems as if it was meant to be . . . .
 

Attachments

  • Sidewall1.jpg
    Sidewall1.jpg
    39.1 KB · Views: 3

Sunsetrider

Petty Officer 1st Class
Joined
Jun 12, 2011
Messages
299
Re: Finally got mine!

I haven't had any luck removing the bolted-on hardware with the dremel, so I guess I'll have to get a die cutter. Not sure of the correct way to cut these off since it seems I have to go up into the narrow channel under the gunwale and cut right through the nut itself. Is there a smarter way?

So I'm spending some time removing the paint from the aluminum bow tripe (see pic 1 below) with stripper, scraper, screwdriver (for the narrow channels) and scotch-brite pad. Looks much better that way I think. You can see the funky horn I am also trying to remove, so far without success. Pic 2 shows the nav light I found to hide the mess of screws at the bow. I hope I can clean it up because I think it is outrageously cool!

I spotted clear flexible hosing at our general store which will be perfect as a conduit once I determine the size I need. The throttle-steering cables are surprisingly thick all together.

Tomorrow at work I`ll scan in my preliminary seating plan for slings and arrows.
 

Attachments

  • Bow_horn.jpg
    Bow_horn.jpg
    152.9 KB · Views: 4
  • NavLight.jpg
    NavLight.jpg
    152 KB · Views: 4

GA_Boater

Honorary Moderator Emeritus
Joined
May 24, 2011
Messages
49,038
Re: Finally got mine!

Sorry, Sunset. I misinterpreted your Q. I saw side board and figured you were planning on installing hockey stick side panels. But you are talking about a "fillet" between the floor and hull. Right?

EDIT - That bow light is serious cool.
 

Sunsetrider

Petty Officer 1st Class
Joined
Jun 12, 2011
Messages
299
Re: Finally got mine!

Sorry, Sunset. I misinterpreted your Q. I saw side board and figured you were planning on installing hockey stick side panels. But you are talking about a "fillet" between the floor and hull. Right?

I think you got me right the first time . . . I mean a wood panel (preferably foam-backed-vinyl-covered like you see on current boats) that often have a cut-out with a shelf for various items. I wouldn't have a cut-out because it would be too difficult to put in a shelf. They form the interior sidewalls of the boat. It would be about 6 feet long, 18 inches high, and drop from the bottom of the gunwale panel to the junction of the floor with the sides. But now I am thinking that might be overkill, and as well, that channel might not be for that purpose after all. Hard to tell when I can't even identify the model of the boat!

Still thinking out loud: but without that panel, not so easy to get a solid transition from floor to wall . . . what to do, what to do . . .

Still cannot remove the hardware. Tried HSS drill bits, no luck. Tried a screw-removing bit, no luck. Next up: TNT.
 

rheagler

Senior Chief Petty Officer
Joined
Jul 14, 2007
Messages
662
Re: Finally got mine!

I'm almost afraid to suggest it but I have removed many fasteners with a 4-1/2 angle grinder. You have to be extremely careful, they can ruin your day in a fraction of a second, but with gloves, long sleeves, good eye protection and steady hands (use both of them on the machine with the side handle and guard) you can slowly grind away the head of the offensive fastener and poke it on through from the top. Like B2 said though, you can gouge the boat up just as easy as gouging your skin up. The tool can do amazing things but must be respected.
 

jasoutside

Supreme Mariner
Joined
Dec 20, 2009
Messages
13,269
Re: Finally got mine!

If you cut into the alum, or your hand, it's kinda problematic:rolleyes:

Go for it:cool:
 

GA_Boater

Honorary Moderator Emeritus
Joined
May 24, 2011
Messages
49,038
Re: Finally got mine!

Sunset - That channel is just the rivet joint between the bottom and sides of the hull. You could add the side panels. Using the angle like I mentioned above ties it to the floor. And some more angle under the gunnel to secure the top. One of the guys was thinking about using rain gutter to make a tray behind the side panel. Just something to think about when you can't sleep at night.
 

Sunsetrider

Petty Officer 1st Class
Joined
Jun 12, 2011
Messages
299
Re: Finally got mine!

Sunset - That channel is just the rivet joint between the bottom and sides of the hull. . . . One of the guys was thinking about using rain gutter to make a tray behind the side panel. Just something to think about when you can't sleep at night.

Hmmmm . . . change of direction here . . . . good info!
 

Sunsetrider

Petty Officer 1st Class
Joined
Jun 12, 2011
Messages
299
Re: Finally got mine!

If you cut into the alum, or your hand, it's kinda problematic:rolleyes:

Go for it:cool:

More concerned about the boat than the hand. So not quite ready to go for it just yet! :p (Mind you, were talking about the top of the gunwale here, not the hull itself . . . )

Will spend some more time on them after work today.
 

barato2

Commander
Joined
Dec 7, 2010
Messages
2,956
Re: Finally got mine!

i may be missing or forgetting something, but why is it being this tough? i thought most of that gunwale hardware was just screwed on with sheet metal screws from factory? remember that hardware can be found reasonably cheaply from a glasser someone is parting, so if you need to just cut the hardware itself apart, not the end of the world.

worry about the hand too. you could buy several old tin boats with your co-pay at the hand surgeon.....and the arthritis will be a drag down the road.
 

Sunsetrider

Petty Officer 1st Class
Joined
Jun 12, 2011
Messages
299
Re: Finally got mine!

i may be missing or forgetting something, but why is it being this tough? i thought most of that gunwale hardware was just screwed on with sheet metal screws from factory?
hese
The self-tapping screws from the factory were easy-peasy. These ones are rusty-bolted on and painted silver by a PO. Yech.

worry about the hand too. you could buy several old tin boats with your co-pay at the hand surgeon.....and the arthritis will be a drag down the road.

First, I'm in Canada so no co-pay - or any other cost other than pain killers. Second, I already have arthritis! Ain't nuthin' going to stop it coming on . . .
But my carpenter guy came down to the boat at his lunch and just drilled those suckers out with a 1/4 inch bit from the top. Bing bing they dropped! So the two I have left I now realize I just need a helper to squeeze under the bow and hold the nut with a wrench while I start with a screwdriver and move on up to a HSS bit. I am confident that I can clean off the deck ware and move on to sanding and gluvit.

Still thinking about those sideboards, and the Eavestrough Solution.

Anyone else notice that thanks to the Limpics, "medal" and "podium" are now verbs??? Cool. Like "screw."
 

barato2

Commander
Joined
Dec 7, 2010
Messages
2,956
Re: Finally got mine!

but maybe not as much fun....?

i find HSS bits to have a half life of about 5 min the way i use em....i buy cobalt-steel bits, they last much longer and stay sharp longer

glad you seem to be getting there. for me, the transom bolts were the major gumption trap.

you are a true tinhead with that degree of cavalier atitude toward wounds........bleeding on your starcraft is how you show her you love her
 

Captmills

Petty Officer 1st Class
Joined
Aug 22, 2009
Messages
374
Re: Finally got mine!

I was going to suggest drilling from the top but sounds like you got it. All my hardware was toasted by saltwater and every piece of it had to be drilled out. the fun part was finding hardware the would go back in the same holes but I managed to use about 90% of the same ones, even the handles on the transom!!! that was sweet, jb weld for the rest
 

Sunsetrider

Petty Officer 1st Class
Joined
Jun 12, 2011
Messages
299
Re: Finally got mine!

Yes, I got them all out, everything worked better with a helper below. I won't be installing as many pieces as were on before and even if I find matching mounts there will be an excess of holes. I am trying to figure out how to fill them. One suggestion was a round-headed bolt (forget what they are called and wonder how they get screwed in?) but just how exactly do you use JB Weld to fix the holes?
 

barato2

Commander
Joined
Dec 7, 2010
Messages
2,956
Re: Finally got mine!

cut a patch from some scrap aluminum and stick it on from below. don't forget to clean surface first or sand to metal. if you use just the right amount of JB, it will more or less fill the hole and you can sand flush. don't use excess as the stuff is a bear to sand. i use a "roloc" sanding disc (about 2" diameter) on a die grinder to get enough precision.

smaller patches over screw holes and the like will stick on their own just with the JB, but if you're patching bigger holes (antenna, rod holders, etc), be sure to wedge something in place to hold the patch tight, or clamp it.....i had sevl sag or fall off.
 

Sunsetrider

Petty Officer 1st Class
Joined
Jun 12, 2011
Messages
299
Re: Finally got mine!

Can the JB Weld be smoushed (c) smooth before it hardens?
 

Captmills

Petty Officer 1st Class
Joined
Aug 22, 2009
Messages
374
Re: Finally got mine!

on a few holes that were larger I took a piece of flashing (small square) with some jb on it and stick it on from the bottom/underside then spead jb on top/hole and smooth out as if you were putting on body putty, just dont put on alot because it is hard to sand out. (don't use more than you want to sand off) wait till fully dry to sand.
 
Top