Floor and stringer repair and replacement

Joined
Nov 8, 2017
Messages
57
A lot of your terms I don't understand but I get what you are saying. Also the thickness of the ummm hole for the outdrive needs to be the same right? I am hoping to start removing the motor and stuff this weekend hoping my dad will trust me and not think its to much and wanna scrap the boat in that case maybe I will just tell him to give it to me and I will fix it and give it back all done. What do you make a cradle out of just wood and how do you attach it. Does it help that its on the trailer as far as supporting it?
 

kcon

Petty Officer 1st Class
Joined
Dec 10, 2016
Messages
303
Hole for the outdrive in the transom absolutely needs to exactly match the current hole, as does the thickness of the transom. I'm an idiot and made my transom an entire inch thicker, so I had to cut my splash well to have the top cap git back on the hull, it's admissible in my scenario though cause I'm using an outboard motor, I just need longer bolts.

You're going to want everything to match up to the way it is now, absolutely take measurements, sketches, and pictures of EVERYTHING. Something I neglected to do but I got lucky. I propped my hull up on several 4x6's cut evenly and positioned to get the hull completely level, you want level and you probably won't get that by keeping it on the trailer, but I'm sure someone else will have better insight into that.
 
Joined
Nov 8, 2017
Messages
57
OK. Little update I have been slacking but I do have 3 small kids so time is hard. Finally figured out how to get the motor out using a large forklift. So waiting to do that I ripped up the floor on one side and you guys were not joking that foam is a bit***. So the stinger on the outside looks to be a 2x12 is that normal? I thought they were all plywood. I take it they need to be replaced like for like? Good news is that I can get all the supplies I need through my brother for 10% above cost so that's about the only good news I think I'm gonna get out of this project. As of now I'm still on board to see it through bit this is no easy work I give mad props to the guys that have tackled this big project
 
Joined
Nov 8, 2017
Messages
57
This might be a stupid question but my brother brought up using composite decking can this be done? Use it for the deck stringers transom is any of this possible? Then there would be no more rot issues correct?
 

Scott Danforth

Grumpy Vintage Moderator still playing with boats
Staff member
Joined
Jul 23, 2011
Messages
50,269
This might be a stupid question but my brother brought up using composite decking can this be done? Use it for the deck stringers transom is any of this possible? Then there would be no more rot issues correct?

NO, it cant be done

MDPE used in composite decking has zero strength and resin does not stick to it.

quit trying to re-invent the wheel...... use exterior grade plywood, cut to shape, tab it it, foam it, finish it, go boating
 
Joined
Nov 8, 2017
Messages
57
Ok thank you. I have never heard of it and for that thought it might be wrong cause otherwise everyone would do it to prevent rot
 

oldrem

Commander
Joined
Nov 7, 2013
Messages
2,002
There is always Coosa Board for transoms that will never rot, but it is about double the cost of marine plywood
 

Roady68

Seaman Apprentice
Joined
Sep 17, 2016
Messages
38
There is always Coosa Board for transoms that will never rot, but it is about double the cost of marine plywood

I went with the Coosa Board for stringers. In the big scheme of work I did, it was a small incremental costs. Since there is limitations on size that can be economically shipped, I ended up scarfing with blocks. I used epoxy and stainless bolts to get the 8 feet or so I needed. The one stringer was double plywood anyway, so it fit well. I did use marine plywood for the decking pieces. I epoxied coated both sides and edges after it was cut.
 
Joined
Nov 8, 2017
Messages
57
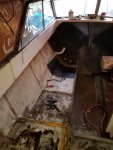
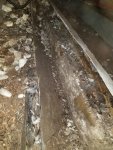
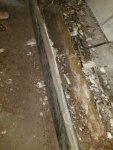
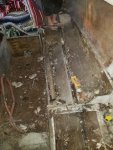
Ok I know I have been absent forever. Decided to rip everything out redoing all of it. New wiring new fuel tank transom stringers ect..... I have some pictures of where I'm at with it and what the stringers look like to get an idea of how I'm gonna replace them but the pictures are to big and I'm trying to resize them
 
Joined
Nov 8, 2017
Messages
57
[No message]
 

Attachments

  • photo314623.jpg
    photo314623.jpg
    193 KB · Views: 1
  • photo314624.jpg
    photo314624.jpg
    265.7 KB · Views: 1
  • photo314625.jpg
    photo314625.jpg
    269.8 KB · Views: 1
  • photo314626.jpg
    photo314626.jpg
    255.1 KB · Views: 1
  • photo314627.jpg
    photo314627.jpg
    180.4 KB · Views: 1
Joined
Nov 8, 2017
Messages
57
Not sure how the stringers are done. Seems to be plywood but there is a wider shorter piece next to the plywood. Seems they built a floor few inches up for the fuel tank to sit on should I do that also ? Seems tanks now are curved on the bottom to fit the hull. Any insight on what to use as the stringers like the size.
 

steve_h7

Chief Petty Officer
Joined
Sep 16, 2018
Messages
401
I don't want to rip anymore out till I know exactly what I'm using and get some measurements

Agree... measure everything and take lots and lots of pictures. You'll look at them constantly when you get to the point of putting it back together.
My floor and stringers were a jumble of pressure treated lumber and miscellaneous pieces trying to keep it together. Sometimes it can be a challenge figuring out how exactly the original factory design was meant to be... but it's usually based on two or more stringers running the length of the hull with bulkhead pieces running perpendicular to the stringers.

My factory fuel tank rested on the floor too but I was told that new designs now suspend them so there's air space all around the tank. I used 1/2" plywood strips on each end to lift the tank off the tank support board attached to the hull and used neoprene strips around the tank to prevent damage to it in the event the supports fail.

Are you going to remove the cap? You'll need to build a support for the hull to retain it's shape.
 
Joined
Nov 8, 2017
Messages
57
Ok that's what I thought. No I will not be removing the cap. Also Im thinking that the fuel tank was put 4 or so inches off the hull is the coolant hoses ran under it for the heater in the galley
 

steve_h7

Chief Petty Officer
Joined
Sep 16, 2018
Messages
401
Are you going to be able to access the whole rear portion of the boat to replace the transom without removing the cap? I know I was able to just cut the splash well portion of my smaller boat off without removing the whole cap but you need to plan how you'll access it if you plan on not removing the entire cap.
 
Joined
Nov 8, 2017
Messages
57
I will have access to it now as far as clamping it not sure. My next step is to remove the engine and outdrive. So I will get a better idea on what I'm gonna do. If I have to remove the cap that my be the end point for me. I could remove it but prob have a professional reinstall it. I don't feel comfortable even doing the through hulls
 
Top