Floor, Stringer & Transom Replacement - 85 Doral TRX

Matrex

Seaman
Joined
Aug 2, 2008
Messages
54
Re: Floor, Stringer & Transom Replacement - 85 Doral TRX

Thanks racinrc14,

BTW, I took your advice on fixing the cracks - they are very narrow so I widened them a bit, then drilled the ends to stop further spreading, then filled them in, sanded them etc. Should be better than new.

I am starting to think the other problem I called delamination is not such a big deal. I am thinking it is more a body filler-type application. It looks like dried putty, and you are correct, the problem is only below the motor mount. I knocked off all the loose stuff.

IMG_0149.jpg


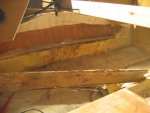
The rear of the boat is not straight across - it sweeps forward slightly (i.e. back corner angles back to splash well - straight across transom to other side splash well - angle up to rear corner) and has similar bottom to top angles. It looks to me like some sort of putty or filler they slathered across the back of the hull to hold the shape of the hull and fill voids when they pressed the transom into place. Does this make sense? You can see what I mean about the shape of the rear wall of the boat by looking aft of the seats/splashwell in this photo:
Boat2.jpg


Thanks for the input - I am a first timer at all of this... guidance/advice appreciated.
 

erikgreen

Captain
Joined
Jan 8, 2007
Messages
3,105
Re: Floor, Stringer & Transom Replacement - 85 Doral TRX

From the look of that putty (could be epoxy putty, more likely something like poly with a filler) someone tried to fix a leaky or soft spot with a patch. It's possible the transom or part of it has been replaced before, too.

Get all that out from the inside until you have just the outer glass and gelcoat, then cut your new transom to fit.

You need to be able to clamp the new transom tightly to the outer skin, so you'll need to make sure you fit whatever curve it has, either by pre-bending the wood or another method. It may be a multiple piece transom, with three pieces forming the shape, in which case you can replace it with three.

To attach the transom, as seen in many other threads here, you use putty, preferably epoxy with a structural filler like wood flour or chopped glass with cabosil, and coat the inside of the new transom wood with it, using a tile trowel, the kind with the notches.

Then when it's wet,you clamp it... most people use the bolt holes around the motor opening plus drill a few more (small holes are easy to fill) and clamp with allthread rod or long bolts, using scraps of plywood or dimension lumber to spread the clamping pressure. It's important to get a good bond with the outer skin with no bubbles if possible. Once the epoxy hardens you can remove the clamps, and you should then putty around the edges to attach the transom to the sides of the hull, followed by application of tabs around the edges and an overall layer of glass.

Don't forget to seal the inside edges of the motor hole with a layer of epoxy and glass.

Then you put it all back together, better than new.

Erik
 

racinrc14

Petty Officer 2nd Class
Joined
Oct 29, 2008
Messages
162
Re: Floor, Stringer & Transom Replacement - 85 Doral TRX

Looks like you're well on your way! So many people (myself included) shy away from such repairs when the reality of it is that it's merely time consuming, that's all. Anyone can do these repairs, it just takes time and patience. And with the great advice on this forum and others like it, no boater should have to give up on their pride and joy just because it looks difficult. Man, I've seen some of the places that lay up these fiberglass creations, and from what I've seen, rocket scientists they ain't! Seeing the progress you're making gets me motivated to work on mine.

As for the wood, looks like you could do it in three pieces as Erik suggested. I would only add a beveled edge where either end piece fits against the center, to get a good wood-to-wood joint. Do you have room to assemble the pieces, and then fit them to the transom, or will you have to assemble them in the transom? If you could assemble them first, it would be a nice touch to fiberglass the two joints with a couple layers of glass, just for strength, then slide the assembly in and install as Erik suggested. I also like the idea of drilling holes for clamping purposes, but I would drill the holes when I'm satisfied with the trial fit, but before actually spreading any compound, as it will be a mess do drill these holes with resin all over. I've seen some very large clamps that look like they might fit over the top of the transom to clamp it all in place, but either way, clamping is a must to get a good bond.
 

Matrex

Seaman
Joined
Aug 2, 2008
Messages
54
Re: Floor, Stringer & Transom Replacement - 85 Doral TRX

Thanks for the advice and words of encouragement guys!

I ground out the old filler today as Erik suggested. The hull shell looks nice and clean with that crud gone. Came off very easy with the grinder and sandpaper. I dry fitted my new transom pieces and they slid right in. I bonded the two layers middle together, clamped and screwed and will leave them over night. If the warm weather holds, hopefully tomorrow I'll get the pieces into the boat.

IMG_0151.jpg


I have to say I feel much better about this whole project after today. Once that old filler was removed, I got more confident in how it all would come together. Without Eriks advice I was hesitant to make that first move forward since I wasn't 100% sure what the step should be.

racinrc14 you are absolutely correct when you say it isn't rocket science. The hardest part is taking the first step...
 

jcsercsa

Captain
Joined
May 21, 2007
Messages
3,401
Re: Floor, Stringer & Transom Replacement - 85 Doral TRX

Hay Matrex, she is looking good keep up the good work , It really isnt that hard , its just getting in there and doing it !! you said you used west system , wish i would have seen this earlyer , could have save you some money , Us Composities has some great prices !!

Ok keep up the good work !! john
 

Matrex

Seaman
Joined
Aug 2, 2008
Messages
54
Re: Floor, Stringer & Transom Replacement - 85 Doral TRX

Transom pieces are all in, seem to have bonded to the shell properly. I am about to start the process of tabbing & glassing the transom in. I see lots of discussion on the proper way to do this. Using EPOXY....

I have been given a bunch of 10 oz cloth. Is a couple of layers of this sufficient for tabbing?

Another thing I am thinking about for a bit later but thought I'd throw it out there...

My neighbor is a roofer. He was over yesterday and mentioned that the membrane material they use on flat roofs would probably work over plywood for the floor of a boat. Obviously waterproof, it is also tough. I was thinking I could epoxy the bottom, then seal up the top of the floor with this, then cover with whatever. Not sure about the weight. The nice part.... it would be free. Free is good! :D
 

Matrex

Seaman
Joined
Aug 2, 2008
Messages
54
Re: Floor, Stringer & Transom Replacement - 85 Doral TRX

Found a GREAT little book called "Understanding Epoxy" - freebie from Industrial Formuators. Everything you need to know about when or why to use epoxy, how to use it, and what works with epoxy. Also tips and tricks

Download it at http://www.indform.com/
 

Matrex

Seaman
Joined
Aug 2, 2008
Messages
54
Re: Floor, Stringer & Transom Replacement - 85 Doral TRX

Finally feel like I am making progress. I got the transom tabbed in today using the materials I had at hand. It is getting very cold so I want to get it done before the snow flies again.

Tonight I ripped out the stringer along one side of the hull and found it was full of wet foam. Pulling a grinder through it made short work of that - and a big sloppy mess. I can't see how it would have made much difference for flotation though - the space was only about 3"x5" by maybe 4 feet. Not sure if I will put it back in. Photo attached below.

My question of the day: Admiring my new transom today it suddenly hit me there is one more piece of wood in this boat that I had not considered replacing... right in front of the transom, embedded in the hull it looks like a piece of wood about 24 inches long. Should I be grinding the glass off the top of this and laying in a new piece? It does not look like it was open anywhere - but every other piece of wood was rotten. I guess I answered my own question...

replace.jpg
 

Attachments

  • foam.jpg
    foam.jpg
    65.2 KB · Views: 0

legoman67

Chief Petty Officer
Joined
Oct 16, 2008
Messages
636
Re: Floor, Stringer & Transom Replacement - 85 Doral TRX

i would drill into it and do a core sample, odds are it is fine because all the fibreglass looks good and its buried in the hull.

just drill like half an inch into it and have a look. if its bad then continue and you are no further behind, if its good throw some sealer in there and your ahead.
 

racinrc14

Petty Officer 2nd Class
Joined
Oct 29, 2008
Messages
162
Re: Floor, Stringer & Transom Replacement - 85 Doral TRX

Looking good Matrex!

As for the stringer, I would definitely 'glass it back in (minus the foam), as it looks like it adds stiffness to the hull bottom, and I think the floor screws down to it also. Better check the other side as well, since you're already there.
 

Matrex

Seaman
Joined
Aug 2, 2008
Messages
54
Re: Floor, Stringer & Transom Replacement - 85 Doral TRX

well, I have finished my transom replacement, tabbed it in and layered it with two coats of glass. The transom cap area I coated with about 1/4 inch of epoxy resin. That should never get wet again.

I am about to drop the cap back down. Before I do, I seem to recall reading that the new fiberglass should be painted to protect from UV. Is that correct? Mine is completely hidden behind seats etc. so I wasn't going to bother. Is there a compelling reason to slap some pain on there?
 

fuzzeywiggler

Petty Officer 1st Class
Joined
Feb 17, 2008
Messages
357
Re: Floor, Stringer & Transom Replacement - 85 Doral TRX

I am about to drop the cap back down. Before I do, I seem to recall reading that the new fiberglass should be painted to protect from UV. Is that correct? Mine is completely hidden behind seats etc. so I wasn't going to bother. Is there a compelling reason to slap some paint on there?

I believe that epoxy is not UV resistant so it would be good to protect it.

I would say if this area will remain covered untell it needs to be restored again don't bother, but if it will get occasional sun give it a coat.

Fuzzy
 

oops!

Supreme Mariner
Joined
Oct 18, 2007
Messages
12,932
Re: Floor, Stringer & Transom Replacement - 85 Doral TRX

when you put the cap back on.........go to the local home depot type store and grab a bazillion paint stir sticks......

start with the bow....and use the stir sticks to shim and wedge the cap onto the boat....it will save you a few sailors words ;)
 
Top