From broken to beautiful in 180 days...

Cap’n Ray

Petty Officer 2nd Class
Joined
Jul 1, 2011
Messages
103
The boat is a 1977 Carver Mariner 3396 33' Cabin Cruiser "Gemini II" (for now- name change at first launch). Here's the quick 'back story': Non-mechanically inclined boat owner purchased in April of 2010, used boat for the balance of the '10 season (upper mid west) and filed a marina "pull and store" form to winterized the boat. Being slightly inexperienced, the check box for "remove hull plug" was NOT marked (I can actually feel the cringes already). The boat received all typical winterization (head, fresh water, engines, oil change, oil and fuel filter change, battery disconnect, etc) but nobody said anything about the hull plug (a little liability seems to fall on the tech here I think) the boat WAS covered for most of the winter, but still saw several spring rains uncovered.

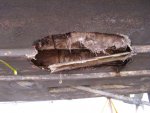
At the end of the storage season, the owner put in a request to un-winterize the boat, and marina personnel attempted to pick-up a now VERY HEAVY 33' boat with a 4 pad 'hydraulic' yard trailer- FAIL!! The port side stern pad (about 8-10" square at most) popped thru the hull even with the port engine and between the two outter stringers, much water exited the boat at this time!! There is a crack pattern onthe starboard side nearly identical to the hole in the port side, as well as some cracks and scuffs near the bow (where the front pads rested). Needless to say, the boat was sling lifted to a location near the shop and cautiously blocked to await her fate. New boat owner was devastated, filed an insurance claim and shortly later posted the boat for sale.

The then owner was made a couple of pitifully low offers by people wanting to scrap the boat, I offered him a trade equal to his asking price and told him I wanted to restore her. Done deal! PO paid for delivery (500 miles by commercial carrier) and is happily enjoying his new to him 27' Bayliner. I now have a holey boat (pray for me). The core is NOT rotted, but simply separated at the edges of the hole. There was a repair previously made to the area with ext. Grade ply, and decent FG work which was partially broken with the hull damage- testament to the quality of the repairas it broke too, didn't just rip out- good bonds I'd say. The water did NOT go above the waterline inside the boat- engines, drives and interior were spared- no evidence of any water damage so far.

It is my intention to repair the damage (in my mind there are two holes and two "impact areas" to be dealt with), and get her back to seaworthy condition. I have a reasonable amount of FG experience (one boat restore and a few amateur built airplanes), but will still be seeking advice. I've also followed OOPS!!s hull extension thread and am amazed and encouraged!!
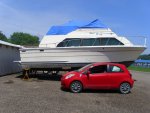
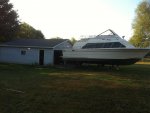
DSCI3092.jpg This picture was taken the day we first saw her.
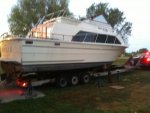
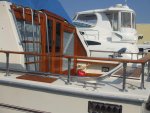
077.jpg This picture was when she was loaded on the delivery truck, ready to come home.
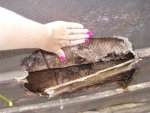
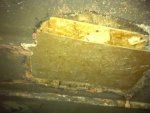
DSCI3080.jpg Here is a photo of the hole, Admiral took it and used her hand to provide scale! The cracks and scuffs don't show well, I will try for better photos later.

Here's hoping for typical iBoats participation, and a successful repair in 180 days or so- want to participate in next boating season!! Thanks for reading, and stay tuned!
 
Last edited:

ezmobee

Supreme Mariner
Joined
Mar 26, 2007
Messages
23,767
Re: From broken to beautiful in 180 days...

Here's hoping for typical iBoats participation, and a successful repair!! Thanks for reading, and stay tuned!

Pictures and paragraphs will help facilitate this.

(I mean this in the nicest possible way) :)
 

Cap’n Ray

Petty Officer 2nd Class
Joined
Jul 1, 2011
Messages
103
Re: From broken to beautiful in 180 days...

ezmobee...
Thank you for the 'brain jumpstart'... I tend to get excited and type the same way I talk!!

Photos have been attached to the first post, more to come now that she's home and where I can go out and take them!!

084.jpg Here is where she's sitting now, Hope this is an adequate working location!

And now the first question:
I intend to replace lost core with similar end-grain balsa soaked in thinned epoxy resin to remain true to original construction. My question though, what type of 'cloth' should I use to build up the glass on both sides- I've seen arguments for several types (woven roving, mat (csm?), etc). I would like the bilge side to look as much the same as possible (woven roving) and plan that for the final layer, but not sure what to use under that (from the core 'up'), and from the core down to the gelcoat on the outside bottom.

I have a few other projects to work on while I gather information to put together an order for my FG, core, finish and bottom coat products. I need to (among other things) clean the bilge... WELL, deodorize the cabin, replace the batteries, repair some wiring (Previous previous owner used romex to add some outlets- gotta go!!) and a few other minor odds and ends. The hope is to have everything done when the glass work is finished so we can just go enjoy. Gonna hook up the plunger this weekend and run both of the engines for a while too.

Thanks in advance, and stay tuned!
 

Cap’n Ray

Petty Officer 2nd Class
Joined
Jul 1, 2011
Messages
103
Re: From broken to beautiful in 180 days...

OH... forgot to mention, as I said before- the water did NOT reach the motors, drives and interior, and the insurance survey indicated NO 'structural' damage (stringers and transom ok), I also checked closely, and drilled a couple holes at the bottom of the transom and found nothing but dry wood. I know someone would have suggested checking, wanted to save someone a little bit of typing.
 

Cadwelder

Lieutenant Commander
Joined
Aug 30, 2010
Messages
1,780
Re: From broken to beautiful in 180 days...

Sounds like you've done some homework...good luck with her. She's way out of my league, but there are guys here that deal with that size all the time, Yacht Dr., Ondarvr and Oops come to mind.

Safe boating
CW
 

Cap’n Ray

Petty Officer 2nd Class
Joined
Jul 1, 2011
Messages
103
Re: From broken to beautiful in 180 days...

Thanks for the well-wishes CW, and the guys you listed are all 'hero material'!! I hope Oops chimes in, that would certainly boost my ego! As far as being out of your league, I doubt that for a number of reasons- first; it doesn't matter the size of the boat- it has a moderate size hole and the repair is going to be the same principal I believe... maybe just a few more layers of glass than on a smaller boat. Second; I got this boat for trade equivalent of $5k (sellers asking price) my trade was an 82 Bayliner Victoria sunbridge 27' cabin cruiser that I only paid 4k for and did a VERY little work on so my investment is marginal (BTW, PO purchased this boat for 17k last April!)... the Carver is a bit of a dream boat, lots of room for family and friends, and in GORGEOUS condition overall- right place, right time, right boat, right seller etc... I respect your advise and welcome it here too... you have made many excellent suggestions to others and likely have useful input for this project as well!

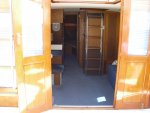
Couple more pix...
DSCF2325.jpgDSCI3076.jpg


Thanks for reading! Stay Tuned...
 

Luhrs28

Chief Petty Officer
Joined
Jul 14, 2010
Messages
423
Re: From broken to beautiful in 180 days...

That's a really nice looking boat. I patched a bunch of old thru-hulls on mine but they were only 1.5" dia. holes. My only advice is to grind way past (like 10") the edges of each hole and layer up the epoxy/mat until it's at least the same thickness as the original hull. (I used 1708 biax) Have your final outer layers extend the 10" extra around the outside edge of the hole. You want to give the epoxy as much area as possible to grab onto.

On the outside of my patches I skipped the gelcoat and just painted on bottom paint right over the epoxy/mat (after a little sanding). I don't know if that's correct or not but that's what I did.

Good luck with her!
 

Cap’n Ray

Petty Officer 2nd Class
Joined
Jul 1, 2011
Messages
103
Re: From broken to beautiful in 180 days...

Thanks Luhrs, I appreciate the info, suggestions and good wishes!

I pulled the batteries last night and put em on a charger out of the boat- easier to clean, service and monitor. Going to put em back in this evening or first thing tomorrow and fire her up... Gotta hear those engines run!! Doing some light cleaning and heavy planning. I'll post some better pix of the hole tomorrow.

Thanks for reading and stay tuned!
 

Cap’n Ray

Petty Officer 2nd Class
Joined
Jul 1, 2011
Messages
103
Re: From broken to beautiful in 180 days...

Just a quick update;

Fired up both engines this morning, they sounded great and ran PERFECT!!! The ONLY issue was no water flow on the port engine after running for about 30seconds. I shut it down, double checked everything (sea-**** open, flush adapter positioned and flowing etc) and tried again- no joy. I think I may have a bad raw water pump. Going to have to do a little bit of research for repair on this one, but it's a minor issue in the grand scheme of things. Pictures of the hole coming this evening (got too hot too fast). As always, suggestions hints and tips are greatly appreciated!!

Thanks for reading, and stay tuned!
 

Luhrs28

Chief Petty Officer
Joined
Jul 14, 2010
Messages
423
Re: From broken to beautiful in 180 days...

Right, most likely a shredded rubber impeller. If so that's no big deal.
 

Cap’n Ray

Petty Officer 2nd Class
Joined
Jul 1, 2011
Messages
103
Re: From broken to beautiful in 180 days...

Ok, so the good camera is MIA, so by the time I finally gave up finding it, it was getting pretty dark, took a couple pix with the iPhone, but they're not the greatest...

image.jpg
Here's a crappy 'overview' of the hole (and the fiberglass/ OSB I put in to cover it during shipping.

DSCI3078.jpg
and this one shows the whole thing again... this was taken within a couple days of the damage.
 

Cap’n Ray

Petty Officer 2nd Class
Joined
Jul 1, 2011
Messages
103
Re: From broken to beautiful in 180 days...

Luhrs- any idea how long it usually takes a completely drained system to begin to pump water out the exhaust (inboards on the 'plunger')? And if I'm not mistaken, it is NOT affected by the thermostat correct?
 

Luhrs28

Chief Petty Officer
Joined
Jul 14, 2010
Messages
423
Re: From broken to beautiful in 180 days...

Mariner: I'm not sure if you said the engines are freshwater cooled with heat exchangers, or raw water cooled. If freshwater cooled I would say within no more than 8-seconds after starting the engine you should have water exiting the exhaust, and that's with everything dry when starting. And you're correct even with the T-stat closed you will have full water flow through the heat exchanger and out the exhaust.

On my boat when testing on land just the pressure from the garden hose will push enough water through the raw water pump to completely fill the system and have a dribble out the exhaust.

I would say your next step should be to disassemble the raw water pump and while you're at it check for any blockage in the system. Try to squirt the garden hose in the raw water pump discharge (to mimic the pump) and see if you get flow all the way through to the exhaust.

If it's not freshwater cooled I'm not 100% sure but I still think you should have flow out the exhaust even with the T-stat closed.
 

Cap’n Ray

Petty Officer 2nd Class
Joined
Jul 1, 2011
Messages
103
Re: From broken to beautiful in 180 days...

It is raw water cooled. 8 seconds or so was kinda what I thought. The starb. Engine began flowing water in about that time- I had to climb down from the bridge, over the transom and down the ladder- so I'll pull the raw water pump and see what I find. It's an 'accessory' driven by a belt on the 'front' of the engine... Port engine and pump is on the port side so it's probably the toughest one to get to, but shouldn't be horrible. Thanks for the input, I'll keep you posted.

Thanks for reading and stay tuned!
 

Cap’n Ray

Petty Officer 2nd Class
Joined
Jul 1, 2011
Messages
103
Re: From broken to beautiful in 180 days...

Ok, so to knock out a couple projects while i wait for my major project funding, I need some suggestions:

First, there are small 'rails' on either side of the hull just above the waterline and about the last third of the hulls length, they are teak and VERY weathered. What would be the best treatment for these as they surely get soaked often and are not in a very convenient location for regular maintenance?

Second, it is my intention to build a 'shelf' that will also help strengthen the repair (between the stringers) and I'm considering using the space to relocate the batteries- they are currently as far under the deck to the starb. side of the engine compartment as possible and TERRIBLY difficult to service, I'm thinking of putting them on the port side 'shelf' I build for two reasons- easier to service, and the boat currently has 450lbs of 'tube sand' on the port side to correct a starboard list. Moving 2 deep cycle and 1 start battery may offset the need for the 'ballast'- suggestions?
 

rickster

Cadet
Joined
May 5, 2003
Messages
20
Re: From broken to beautiful in 180 days...

Howdy neighbor. I'm right down the road. Keep my boat and camper at Melvern Lake, But visit Pomona frequently. Looks like quite a project,but you seem to have a handle on what you need to do. Good luck with it. It looks like a very nice boat.
 

Luhrs28

Chief Petty Officer
Joined
Jul 14, 2010
Messages
423
Re: From broken to beautiful in 180 days...

Yes I would definitely remove the ballast. Why push more water out of the way than necessary? My boat lists to starboard also if I have my 2 fuel saddle tanks filled equally. So I just keep a little more fuel in the port tank than starboard and everything is fine.
 

Bob_VT

Moderator & Unofficial iBoats Historian
Staff member
Joined
May 19, 2001
Messages
26,064
Re: From broken to beautiful in 180 days...

I doubt that Yaris will tow that ;) You have a PM
 

Cap’n Ray

Petty Officer 2nd Class
Joined
Jul 1, 2011
Messages
103
Re: From broken to beautiful in 180 days...

Rickster: howdy neighbor!! Pm when your gonna be near Pomona, you can come by and see her in person- usually a cold beverage around here too!!

Luhrs: yep, pretty much what I thought too- I'll level her out by moving the batteries tho, and make life simpler at the same time.

Bob: awwww man! I figgered I had a nice economical tow vehicle too!! :) pm replied.
 

25thmustang

Lieutenant Commander
Joined
Mar 20, 2008
Messages
1,849
Re: From broken to beautiful in 180 days...

Watching this thread now. That boat looked to be in really good shape prior to the accident.

As for the teak, my suggestion is look into the Cetol. I used it on wood that I wanted to not have to touch for a long time. Although not being able to get to the back side of it (assuming here) it might not be the best product.
 
Top