Got spark and good compression but lower cylinder not working

jbuote

Lieutenant Junior Grade
Joined
Aug 17, 2016
Messages
1,001
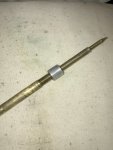
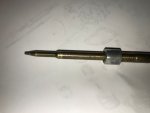
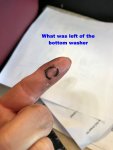
He tinkered with the carb throttle lever and made it rev manually. Good lord it smoked and stunk so bad...running way too rich (on a plus side, all mosquitoes died). He began looking for a fuel adjustment screw like you'd find with a lawn mower and such but I didn't know what he was hunting for. I asked and he finally told me, so I pointed out the needle valves on the plate. He said they were out a turn to a turn and a half, then brought the bottom one way back down to set and then out only about 1/4.

First check crankcase compression however advised to do that, but just to put this out there, I don't know what exactly he "Tinkered" with, did or did not disconnect/connect/adjust..
Did he make any other adjustments?
Could the link & sync be off now? Could the full advance timing be off now? :noidea:

Figured I'd mention the thought and maybe the guru's could say if what you're experiencing could be from that or not.
I think it could, but I'm not so confident in that statement on an older engine like yours...
 

oldboat1

Fleet Admiral
Joined
Apr 3, 2002
Messages
9,612
He's opening the throttle without advancing the timing plate. That's why it smokes.

Not a good idea, and invites some nasty outcomes.
 

KathyD19

Petty Officer 1st Class
Joined
Jul 17, 2012
Messages
352
:eek:
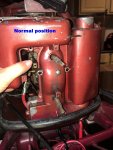
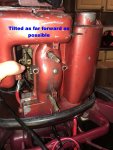
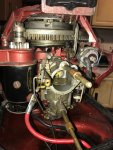
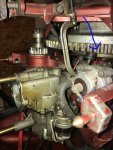
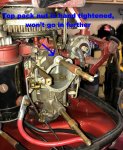
:faint2: I think all he did was opened the throttle, like oldboat1 said. Don't like the idea of inviting nasty outcomes. He didn't adjust anything else that I'm aware of, he didn't have any tools or time to do anything else. He did unhook both spark cables and rehook them up to the other cylinder to be sure they were both firing which he said they were (and it did sound like they were today). He put them back to their correct spark cable-> cylinder after checking. Regarding the link and sync....yes that is definitely something I need to address. I am good friends with another poster on here, WillyClay, and we email back and forth. He's provided me with the proper method of doing that process and I need to take care of that next. The pictures are hard to see in the old photocopied diagram and I've been having a hard time locating the cam that's attached to the magneto armature plate that has a scribe line and pointer, etc. Nothing on my motor looks like that picture. I'll take a better look at it tomorrow and try to figure this out. It's such a good old motor, I would hate to be the one to cause it's premature death by my ignorance. Thank you for sticking with me on this.
 

KathyD19

Petty Officer 1st Class
Joined
Jul 17, 2012
Messages
352
Two questions: how do I remove the #*_*#&@ air silencer so I can get to the carb to do the link and sync and also is it ok to leave the air silencer off for ease of access in the future? (I've removed all necessary screws and it is free but I can't get enough clearance over the high and low speed needles to slide it forward and off)
 

KathyD19

Petty Officer 1st Class
Joined
Jul 17, 2012
Messages
352
First picture is how the air silencer is in the normal upright position. The second pictures shows it tilted as far forward as I can but it can't pass over the rim of the motor case or the needles. Do the needles need removed?
 

Attachments

  • photo293318.jpg
    photo293318.jpg
    542.8 KB · Views: 0
  • photo293319.jpg
    photo293319.jpg
    615.5 KB · Views: 0

lindy46

Captain
Joined
Nov 27, 2008
Messages
3,886
From what I remember you have to remove the needles and packing nuts to get the silencer off. Just record where they were set before removing so you can get them back to where they were.
 

Willyclay

Captain
Joined
Sep 8, 2006
Messages
3,263
Thanks lindy46 for that direction. My RDSL-21 did not have an air silencer so I have no experience with this hurdle. I did find an online Johnson factory service manual with the link&sync procedures plus much better pictures that I sent Kathy via email.
 

KathyD19

Petty Officer 1st Class
Joined
Jul 17, 2012
Messages
352
Thank you! I understand they are brass so I will be gentle. They just unscrew, correct? I have already fiddled with the top one to see if it would unscrew so unfortunately I didn't record where it was set before doing that. I hope I didn't mess it up and that I'll be able to reset them properly. I will "bag and tag" them as WillyClay had suggested to me to be sure I put them back correctly. He's given me all the info on doing the link and sync, I just needed to get past the air silencer so I can access where I need to work.
Can I leave the air silencer off from now on? Will that affect the motor in any negative way?
 

racerone

Supreme Mariner
Joined
Dec 28, 2013
Messages
38,411
We used to take them off at the dealer 45 years ago or more.----Put the screen from a 33 or 40 HP model in front of the carburetor intake.
 

Willyclay

Captain
Joined
Sep 8, 2006
Messages
3,263
A quick check of the part number for those screens and also with later model 33&40's finds that the screens are NLA. I will check my parts bin and see what I can find but I don't see a problem of running without a screen. My 1985 Johnson 25hp does not have a screen.
 

KathyD19

Petty Officer 1st Class
Joined
Jul 17, 2012
Messages
352
[No message]
 

Attachments

  • photo293419.jpg
    photo293419.jpg
    598.6 KB · Views: 0
  • photo293420.jpg
    photo293420.jpg
    571.5 KB · Views: 0
Last edited:

KathyD19

Petty Officer 1st Class
Joined
Jul 17, 2012
Messages
352
I was able to remove the air silencer by removing the needles and packing nuts (then replacing them, hand-tightened ,although I'm not sure they are in the accurate position at this point). My question now is how to access the cam plate and cam roller to do the link and sync procedure? The pictures that I have from the Service manual seem to be from above so I'm wondering if I have to remove the flywheel to access this area (hoping I don't have to). Also, when I removed the bottom needle, a fair amount of fuel came out that hole..is that normal? Thanks in advance.
 

Attachments

  • photo293422.jpg
    photo293422.jpg
    688.2 KB · Views: 0
  • photo293423.jpg
    photo293423.jpg
    656.6 KB · Views: 0

Willyclay

Captain
Joined
Sep 8, 2006
Messages
3,263
The main focus of the Link&Sync procedure is inspection and verification of this function! The cam, roller and reference marks are visible in your picture, so you should be able to tell whether or not it is all correct or not. Try to perform this phase without loosening any fasteners or removing any more parts. The remote control throttle cable connector must be removed to do this procedure. Good luck!
 

lindy46

Captain
Joined
Nov 27, 2008
Messages
3,886
Fuel coming out when you removed the lower needle is normal - that is fuel that was in the float bowl. You shouldn't have to remove the flywheel to do a link and synch. Look on the rod that connects the cam roller to the carb. I believe there is an eccentric adjustment bolt where it connects to the carb. Loosen the lock bolt so you can turn the eccentric bolt. Now advance the throttle until the triangular-shaped pointer just to the left of the cam roller aligns with the cam mark(s). At this point, the cam roller should just begin to move and open the carb butterfly. Adjust the eccentric to make it happen. You may have to remove the cut-out switch to get to the eccentric bolt. The other way to adjust, is to loosen the two bolts on the cam (underneath) and adjust the cam in or out to make the cam roller open as described above.
 

KathyD19

Petty Officer 1st Class
Joined
Jul 17, 2012
Messages
352
Thanks Lindy46. I had to google what an "eccentric bolt" was so that's good that I'm still learning things. (I have an eccentric uncle, but he's more of a nut than a bolt :lol:)
 

KathyD19

Petty Officer 1st Class
Joined
Jul 17, 2012
Messages
352
Gentlemen I have an update, bear with me. I removed the air silencer and had to remove the high and low speed needles to do so. I think I may have figured out what the issue with not attaining full throttle speed is (the collar and set screw on the fuel saver linkage rod need to be adjusted). I wanted to barrel test to see if my adjustment made a difference but wandered into a new issue. (and I haven't even had the chance to link and sync). When replacing the carb high and low speed needles I noticed that on the top one, the pack nut wouldn't screw in flush to the motor. I didn't force it because I know how soft brass is and I realized something wasn't right. I also noticed that the top needle is different than the bottom one in the regard that there is a silver threaded collar on it that when looking at the service manual I see is called the floating valve seat. Looking further at the manual I notice there is supposed to be pack washers for the top needle/pack nut (and assuming for the lower as well although it's not listed in the manual). I am attaching several pictures here. The top needle/pack nut assembly has no washers present. The bottom one had a degraded one that fell apart on my finger as I gently wiped after spraying carb cleaner. My friend WIllyClay and I email back and forth and he thinks he's found the part number for those washers
About Sierra Marine


OEM Match
18-7106-9 - Needle Packing 10 Pack 307583
Is the missing washer a reason the pack nut doesn't screw in fully on the top needle? There is a fair amount of shiny brass showing on it's threads so I believe it had to have been screwed in all that way before so it wouldn't have been exposed to get greasy and tarnished. I also have made and uploaded some youtube videos to show WillyClay (Bill) what I was doing when removing the top needle and observing the floating valve seat function. I'll see if I can attach the link to that on here. I realize I still need to do the link and sync and I can fill you all in further on what I did with the adjustment screw on the fuel saver linkage (I have another short video of that) but right now I need to know how to put these needles back and what's wrong that the pack nut won't screw in completely. Thank you!
 

Attachments

  • photo293883.jpg
    photo293883.jpg
    664 KB · Views: 1
  • photo293884.jpg
    photo293884.jpg
    213.9 KB · Views: 0
  • photo293885.jpg
    photo293885.jpg
    429.4 KB · Views: 0
  • photo293886.jpg
    photo293886.jpg
    486.7 KB · Views: 1
  • photo293887.jpg
    photo293887.jpg
    278.9 KB · Views: 1

racerone

Supreme Mariner
Joined
Dec 28, 2013
Messages
38,411
They are NOT supposed to screw in flush to the motor.----If they do then there is not enuff packing in there.
 

KathyD19

Petty Officer 1st Class
Joined
Jul 17, 2012
Messages
352
Racerone...thanks! Good to know. The bottom one does seem to screw in all the way. The reason I questioned the top one is because of so much shiny brass showing on the threads, it would seem that it had been covered up to that point before. Do I still need to replace the washers? If so, both top and bottom ? How many per?
 
Top